Mapping
Overview of mapping in Data Hub.
About Model-to-Model Mapping
A data model defines how data is structured. Each field in a dataset corresponds to a property in the data model, even if the data model is not explicitly defined.
Your source datasets might have data models that are different from each other. For example, one dataset might have a field called family-name and another might call the same field surname.
Model-to-model mapping is the process of associating the fields (properties) in your source dataset (data model) with properties in a standardized data model to make it easier to access the data regardless of its source.
For example, you can create the property lastname in your standardized data model. Any request for the value of lastname would return the correct value whether the source field is called family-name or surname.
Mapping in MarkLogic Data Hub
In Data Hub, the standardized model is an entity model, which is a canonical representation of your entity or business object.
To define a mapping, you need:
- An entity model which you create.
- One or more source datasets.
You can define a mapping manually by creating a mapping definition file for each source dataset.
Mapping Functions
A basic mapping simply associates one entity property with one field in the source record. However, you can also calculate values to assign to the entity property by specifying a mapping expression.
A mapping expression is a valid XPath expression that can include functions and can use values from one or more source fields. For example, you can add the values of two source fields and save the sum in a single entity property.
You can also create your own custom functions.
$URI in your mapping expression to refer to the URI of the document being processed.Mapping to multiple entities from a single mapping step
Map multiple entities from a single source document.
Data Hub supports mapping one source document to multiple entity types. When source files contain information about multiple entities, Data Hub enables you to use one mapping step that creates multiple entities from a source document and creates foreign key relationships between them that can be queried later.
Overview of steps
1 Load source data
2 Model related entities
3 Map the source data to these entities
4 Run the mapping to generate the entity instances
5 Query the entity instances using Optic or SQL APIs
- In mapping settings, use the Attach Source Document field to specify if the source document is to be copied into the mapped entity instance.
- For every mapped entity, the hubURI mapping function can facilitate using the URI field to define a URI template as a mapping expression. The hubURI function generates a UUID and prefixes the name of the specified entity type to it. The function signature is hubURI(entityType).
- You can define custom parameters that can be referenced from mapping expressions.
Map Multiple Entities from a Single Source Document
Once you load your source documents, you can map multiple entity instances from one source document within a single transaction.
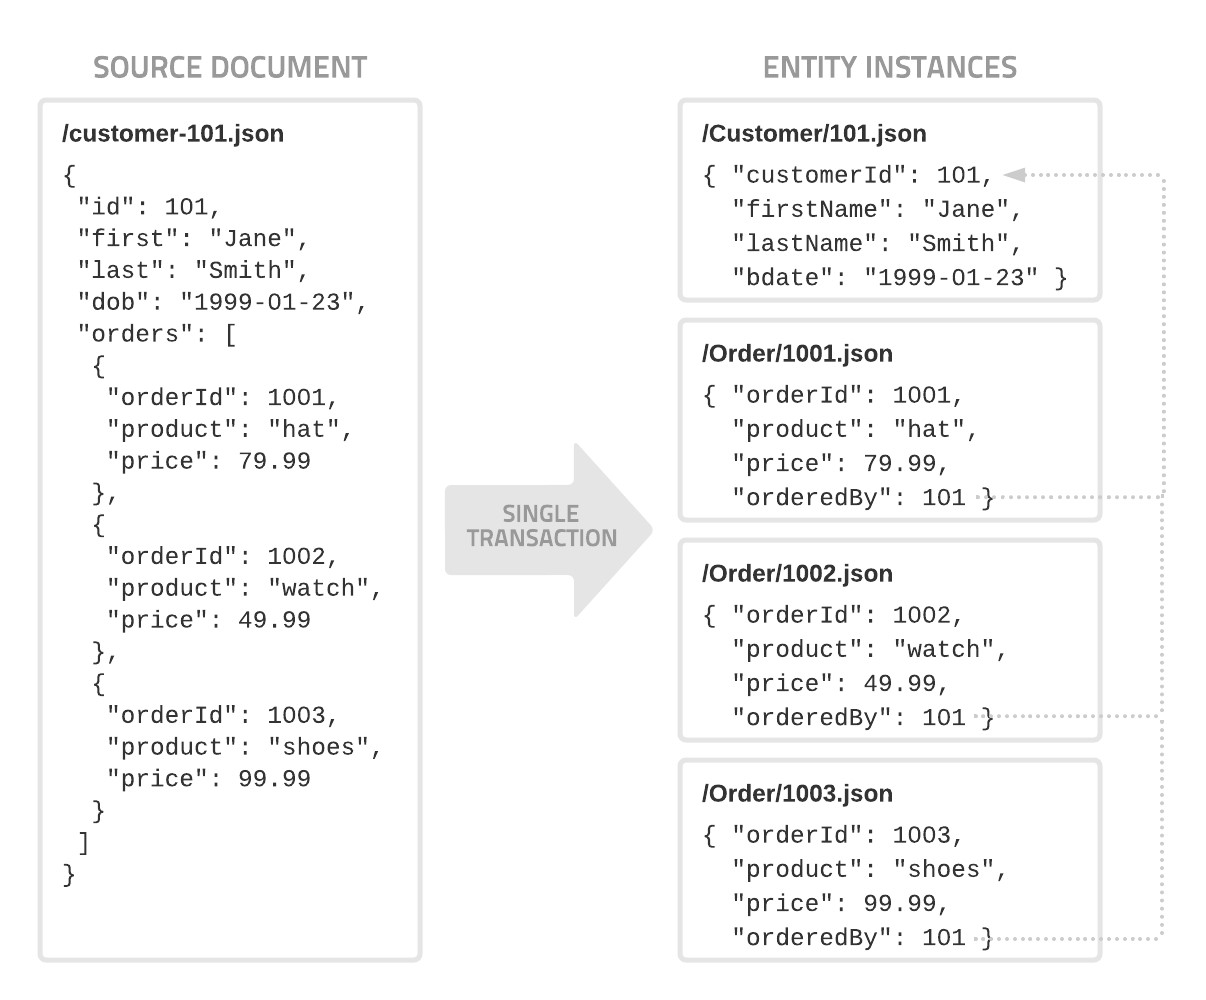
As a prerequisite for mapping, a data architect must model the related entity types. Before you can map to multiple entity types within the same mapping step, you must create foreign key relationships between those entity types. For example, the source document contains information that can map to a top-level customer entity along with multiple order entities for that customer. The data architect chooses the top-level entity, which is most often what the source document is about. For example, the source document is about a customer with multiple details, so customeris a good choice as the top-level entity. In this example, the basic customer information would populate the top-level entity instance. The customer is also related to other entities, such as one or more orders. The mapping step reads the source document and populates an entity instance for the customer details (the top-level entity) and related entity instances that contain the details for each of the customer orders. The customer and order entity instances are associated with a foreign key relationship (enabled by the orderedByproperty).
Specifying foreign key relationships between entity types enables query results.
A foreign key relationship creates a relationship between two records based on a common value. Create foreign key relationships between two entity types that allow you to: 1) map to multiple entities from a single mapping step and then 2) query to find related mapped entity instances.
To create a foreign key relationship, you must create a property in an entity type and relate it to another property in another entity type.
The foreign key relationship property is added to related entities. To decide which entity the property should go in, see Mapping Explanations for mapping multiple entities from a single source.
From the MarkLogic Data Hub Central welcome screen, select Model to open the Model screen.
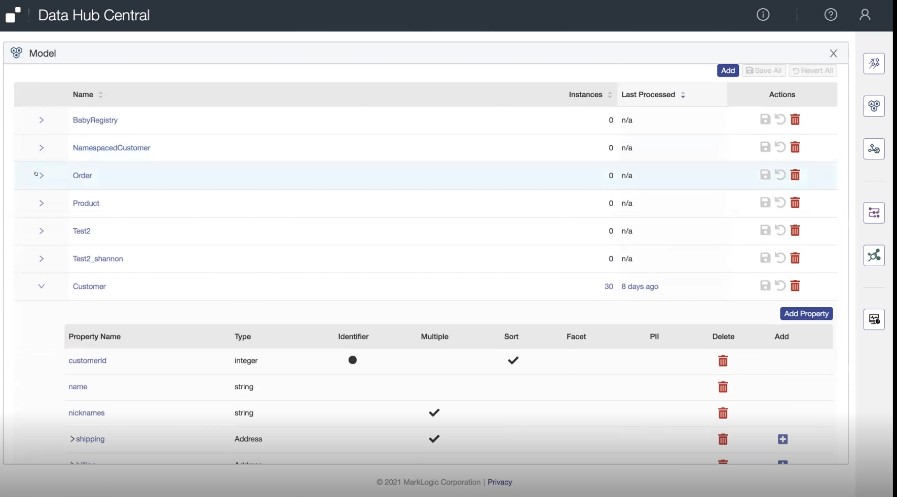
In this example, the data architect chose Customer as the high-level entity.
The Customer entity has multiple properties.
The property orderedBy establishes a foreign key relationship with the Customer entity.
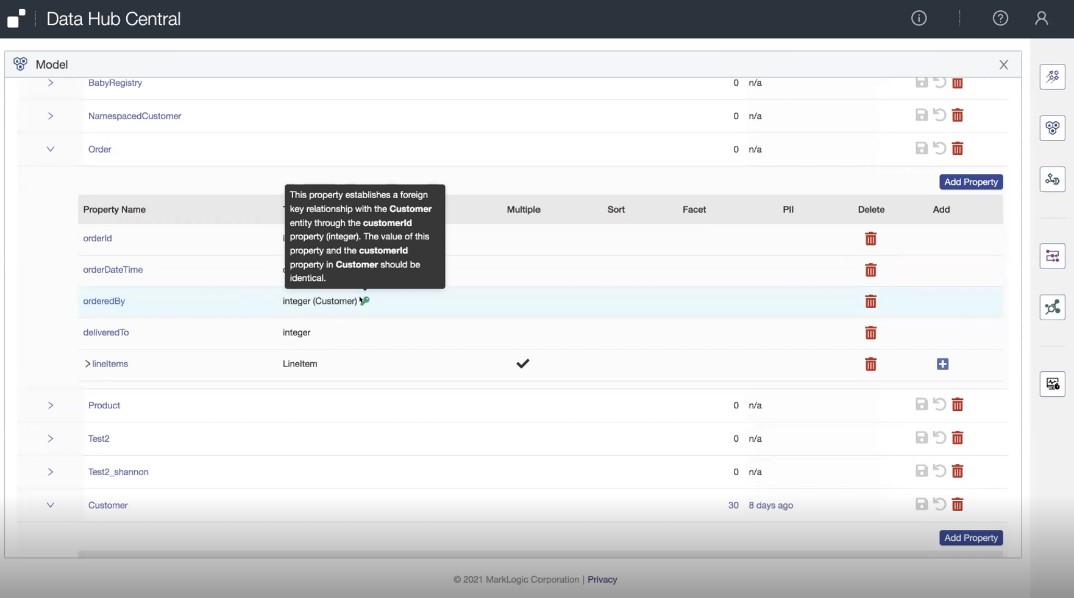
To create a foreign key relationship between two entity types, click orderedBy to open the Edit Property dialog box.
Specify the Type, which in this case is Customer in the Related Entity category.
Specify suitable Join Properties
For the Join Property, use a property in a related entity that matches a property in the other entity type, which in this example is the foreign key specified as customerId. Doing so enables returning a query result that lists orders a customer has made because the order contains the orderID, which is linked to the customerId. In this example, an order instance has the customerId. The customer instance also has the customerId.Because the customerId is in both the customer instance and order instances, choosing customerId as the Join Property establishes the necessary relationship for returning useful query results.

Specify the Join Property, which is customerId in this example.
Note: When a property exists within a structured type (e.g., street address), it cannot be added as the Join Property for another entity.
Mapping to multiple related entities
The source file must have a high-level entity instance from which multiple other entities are related. For example, if the source file includes information about a customer, all of the orders the customer has created, and any wedding or baby registries the customer created, you would create a mapping step with Customer as the high-level entity, and Orders, BabyRegistry, and WeddingRegistry as related entities. Create a foreign relationship between two entity types
- Create the mapping step. When selecting the target entity, consider the content of your source file, and choose the entity type that represents the core concept the source file is about. For example, if the source file contains all the information about a customer.
- Select the related entities you'd like to map to from the "Map to related entities" field. Note: Only entities with foreign key relationships to each entity will be available in the "Map to related entities" fields.
- Map the source data to the related entities.
From the Model screen, click the curate icon on the right to open create and configure steps that curate and refine the data.
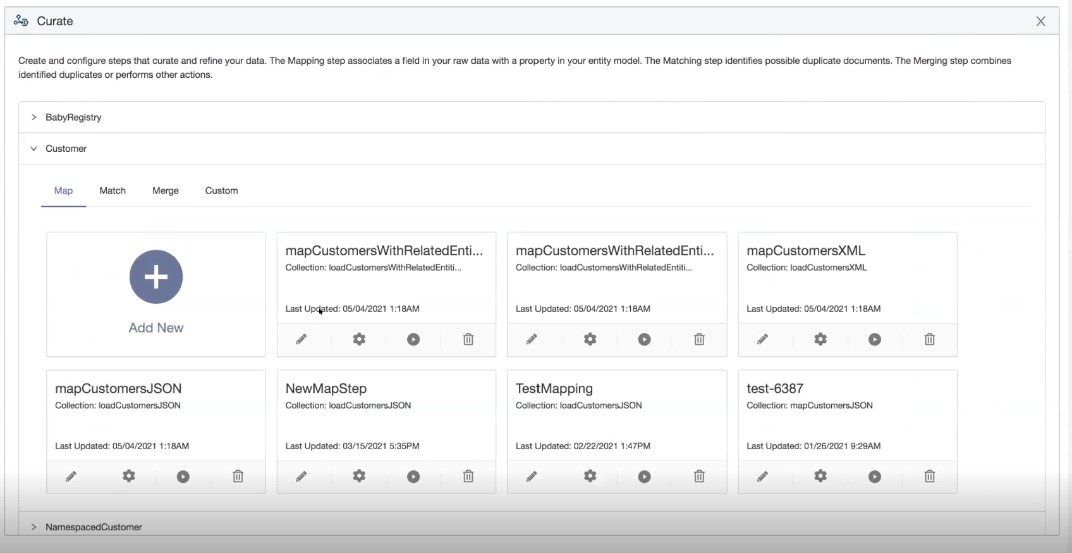
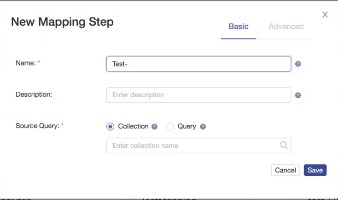
Select Add New to create a new step, and specify the Source Query, which in this example is loadCustomersWithRelatedEntitiesXML.

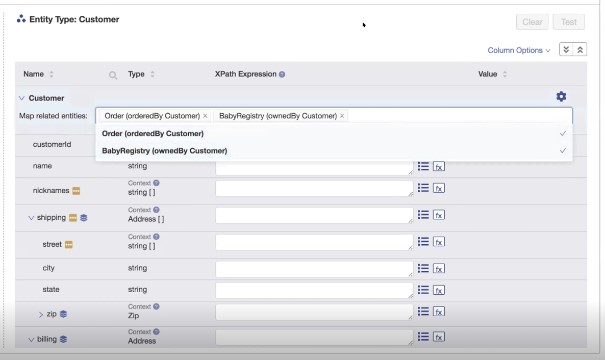
Because Orderis modeled as a foreign key related to Customer, the result is that a filter is available.
In this example, filtering on Order (orderedBy Customer) and BabyRegistry (ownedBy Customer) presents the options for mapping the content for each of those entities.
Running the one mapping step creates separate entity instances for each entity mapped.
Note: Every related entity mapping can generate more than one entity instance. This can be done by setting the 'Context' appropriately for each of the related entity mapping. It is set to "/" by default. If the "Context" is set to a source element of type array, the mapping when run will generate multiple entity instances.
Querying Related Entities
Once you have run your mapping to generate the entity instances from your source data, you can query the entity instances with SQL or the Optic API. (As you save your entity model, Hub Central automatically saves Template Driven Extraction (TDE) documents in the SCHEMAS database to support these queries.)
Consider the following entity model with a simple Customer/Order entity relationship:
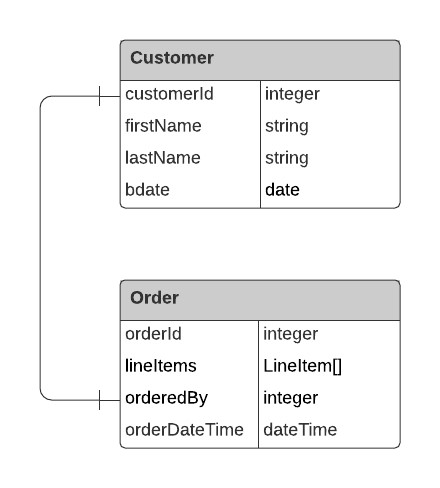
The following are SQL and Optic API queries that will return entity instance information for that model. You can run the queries against the FINAL database using the Query Console application. Note that the MarkLogic user executing the queries in Query Console will need to have the "data-hub-operator" role to see the query results.
SQL Queries
List all Customer instances:
SELECT * FROM Customer
List a specific Customer instance:
SELECT * FROM Customer
WHERE Customer.customerId = 301
List the Order instances for a specific customer:
SELECT * FROM Customer, "Order"
WHERE Customer.customerId = 301
AND Customer.customerId = "Order".orderedBy
Optic API Queries
List all Customer instances:
const op = require('/MarkLogic/optic');
op.fromView('Customer', 'Customer').result();
List a specific Customer instance:
const op = require('/MarkLogic/optic');
op.fromView('Customer', 'Customer')
.where(op.eq(op.col('customerId'), 301)).result();
List the Order instances for a specific customer:
const op = require('/MarkLogic/optic');
const customers = op.fromView('Customer', 'Customer');
const orders = op.fromView('Order', 'Order');
const Plan = orders.joinInner(customers, op.on(orders.col('orderedBy'), customers.col('customerId')))
.where(op.eq(op.col('customerId'), 301))
Plan.result();
Mapping Parameters
You can define custom parameters that can be referenced from mapping expressions. One way you can use custom parameters is to associate source data values with other types of reference data (for example, zip codes with geospatial coordinates). Then you can use the lookup function in your mapping expressions to enrich entity instances with data defined in the parameter. During mapping execution, parameter lookups are called once for each batch of documents (in contrast to mapping functions, which are called once for each document), so storing reference data in parameters can be more efficient.
For more information, see Mapping Parameters. For an example of defining a parameter to store reference data, see this example parameter definition for the $ZIP_POINTS parameter, and this example step configuration showing the $ZIP_POINTS parameter being referenced by a lookup function in a mapping expression.
Validation of Mapped Entity Instance
To specify whether to validate the mapped entity instance against the schema document based on the entity model and how to handle the discrepancy, you can set the validateEntity option in the mapping step.
		"2" : {
				"name" : "MyMappingStep",
				...,
				"options" : {
					...,
					"validateEntity" : "false",
					...
				}
				},
| Field | Description |
|---|---|
"validateEntity" : "false" |
The data types are not compared. |
"validateEntity" : "accept" |
Compares the data types. If the comparison fails, the resulting mapped record is created anyway.
If the comparison fails, validation errors are logged in the header section of the envelope ( |
"validateEntity" : "reject" |
Compares the data types. If the comparison fails, the resulting mapped record is not created.
If the comparison fails, validation errors are logged in the batch document in the JOBS database. |
This setting is included in a mapping step generated by the Gradle tasks hubCreateFlow and hubCreateStepDefinition.