Overview
Set up tunneling if you prefer to work directly from your local environment using your own browsers to access the Data Hub Service endpoints.
Before you begin
You need:
Peered Track
About this task
Set up secure shell (SSH) tunneling to access the Data Hub Service (DHS) endpoints from your local environment. In this task, you will use PuTTY with Windows to set up SSH tunneling between your browsers and Data Hub Service.
Procedure
- Locate your public-private key pair for your client-side bastion host.
- To set up SSH tunneling, download and launch PuTTY.exe.
Note: Use the left pane, titled Category, to show configuration options for each selected category.
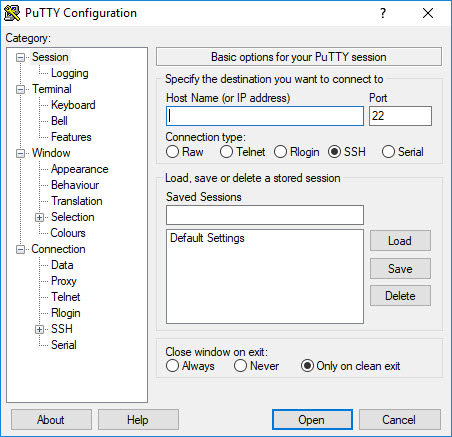
- Select Session from the left pane.
- In the Basic options for your PuTTY session page, supply one of the following bastion host labels for Host Name:
- IP address
- Host name/Fully Qualified Domain Name (FQDN)
Click the following link to view a full list of configure SSH tunneling resources.
- Select from the left pane.
- Select from the left pane.
- In the Options controlling SSH authentication page, click Browse to open your private key.
- Select from the left pane.
- In the Options controlling SSH port forwarding page, enter the following source port/destination pairs:
| Source Port |
Destination |
| 8000 |
<ICAlb>:8000 |
| 8003 |
<ICAlb>:8003 |
| 8010 |
<ICAlb>:8010 |
| 8011 |
<ICAlb>:8011 |
| 8013 |
<ICAlb>:8013 |
- Select Session from the left pane.
- In the Basic options for your PuTTY session page, supply a NAME for Saved Sessions and click Save.
Note: Saving the session enables future use.