
MarkLogic Server 11.0 Product DocumentationSearch Developer's Guide — Chapter 29
Custom Tokenization
The process of tokenization splits text in document content and query text into parts, classified as word, whitespace, and punctuation tokens. You can customize tokenization in two ways:
- Custom Tokenizer Overrides: Customize how the tokenizer classifies tokens.
- User-Defined Lexer Plugins: Customize how the tokenizer divides text into tokens.
You can use these customizations individually or together.
Custom Tokenizer Overrides
Use custom tokenizer overrides on fields to change the classification of characters in content and query text. Character re-classification affects searches because it changes the tokenization of text blocks. The following topics are covered:
- Introduction to Custom Tokenizer Overrides
- How Character Classification Affects Tokenization
- Using xdmp:describe to Explore Tokenization
- Performance Impact of Using Tokenizer Overrides
- Defining a Custom Tokenizer Override
- Examples of Custom Tokenizer Overrides
Introduction to Custom Tokenizer Overrides
A custom tokenizer override enables you to change the tokenizer classification of a character when it occurs within a field. You can use this flexibility to improve search efficiency, enable searches for special character patterns, and normalize data.
You can only define a custom tokenizer override on a field. For details, see Overview of Fields in the Administrator's Guide.
As discussed in Tokenization and Stemming, tokenization breaks text content and query text into word, punctuation, and whitespace tokens. Built-in language specific rules define how to break text into tokens. During tokenization, each character is classified as a word, symbol, punctuation, or space character. Each symbol, punctuation, or space character is one token. Adjacent word characters are grouped together into a single word token. Word and symbol tokens are indexed; space and punctuation tokens are not.
For example, with default tokenization, a text run of the form 456-1111 breaks down into 2 word tokens and 1 punctuation token. You can use a query similar to the following one to examine the break down:
xquery version "1.0-ml";
xdmp:describe(cts:tokenize("456-1111"));
==> ( cts:word("456"), cts:punctuation("-"), cts:word("1111") )
If you define a custom tokenizer override that classifies hyphen as a character to remove, the tokenizer produces the single word token "4561111". In combination with other database configuration changes, this can enable more accurate wildcard searches or allow searches to match against variable input such as 456-1111 and 4561111. For a full example, see Example: Improving Accuracy of Wildcard-Enabled Searches.
Tokenization rules apply to both content and query text. Since tokenizer overrides can only be applied to fields, you must use field queries such as cts:field-word-query or cts:field-value-query to take advantage of your overrides.
You cannot override a character to its default class. For example, the space character ( ) has class space by default, so you cannot define an override that classifies it as space.
You cannot override a composite character that decomposes into multiple characters when NFD Unicode normalization is applied.
How Character Classification Affects Tokenization
You can define a custom tokenizer override to classify a character as one of the following categories:
space: Treat as whitespace. Whitespace is not indexed.word: Adjacent word characters are grouped into a single token that is indexed.symbol: Each symbol character forms a single token that is indexed.remove: Eliminate the character from consideration when creating tokens.
Note that re-classifying a character such that it is treated as punctuation in query text can trigger punctuation-sensitive field word and field value queries. For details, see Wildcarding and Punctuation Sensitivity.
The table below illustrates how each kind of override impacts tokenization:
| Char Class | Example Input | Default Tokenization | Override | Result |
|---|---|---|---|---|
| space | 10x40 |
10x40 (word) |
admin:database-tokenizer-override("x","space") | 10 (word)
x (space)
40 (word) |
| word | 456-1111 |
456 (word)
- (punc.)
1111 (word) |
admin:database-tokenizer-override("-","word") | 456-1111 (word) |
| symbol | @1.2 |
@ (punc.)
1.2 (word) |
admin:database-tokenizer-override("@","symbol") | @ (symbol)
1.2 (word) |
| remove | 456-1111 |
456 (word)
- (punc.)
1111 (word) |
admin:database-tokenizer-override("-","remove") | 4561111 (word) |
Using xdmp:describe to Explore Tokenization
You can use xdmp:describe with cts:tokenize to explore how the use of fields and tokenizer overrides affects tokenization. Passing the name of a field to cts:tokenize applies the overrides defined on the field to tokenization.
The following example shows the difference between the default tokenization rules (no field), and tokenization using a field named dim that defines tokenizer overrides. For configuration details on the field used in this example, see Example: Searching Within a Word.
xquery version "1.0-ml";
xdmp:describe(cts:tokenize("20x40"));
xdmp:describe(cts:tokenize("20x40",(),"dim"))
==>
cts:word("20x40")
(cts:word("20"), cts:space("x"), cts:word("40"))
You can use this method to test the effect of new overrides.
You can also include a language as the second argument to cts:tokenize, to explore language specific effects on tokenization. For example:
xdmp:describe(cts:tokenize("20x40","en","dim"))
For more details on the interaction between language and tokenization, see Language Support in MarkLogic Server.
Performance Impact of Using Tokenizer Overrides
Using tokenizer overrides can make indexing and searching take longer, so you should only use overrides when truly necessary. For example, if a custom override is in scope for a search, then filtered field queries require retokenization of every text node checked during filtering.
If you have a small number of tokenizer overrides, the impact should be modest.
If you define a custom tokenizer on a field with a very broad scope, expect a larger performance hit. Choosing to re-classify commonly occurring characters like (space) as a symbol or word character can cause index space requirements to greatly increase.
Defining a Custom Tokenizer Override
You can only define a custom tokenizer override on a field. You can configure a custom tokenizer override in the following ways:
- Programmatically, using the function admin:database-add-field-tokenizer-override in the Admin API.
- Interactively, using the Admin Interface. For details, see Configuring Fields in the Administrator's Guide.
Even if reindexing is disabled, when you add tokenizer overrides to a field, those tokenization changes take effect immediately, so all new queries against the field will use the new tokenization (even if it is indexed with the previous tokenization).
For example, assuming the database configuration already includes a field named phone, the following XQuery adds a custom tokenizer override to the field that classifies "-" as a remove character and "@" as a symbol:
xquery version "1.0-ml";
import module namespace admin = "http://marklogic.com/xdmp/admin"
  at "/MarkLogic/admin.xqy";

let $dbid := xdmp:database("myDatabase")
let $config :=
  admin:database-add-field-tokenizer-override(
    admin:get-configuration(), $dbid, "phone",
    (admin:database-tokenizer-override("-","remove"),
     admin:database-tokenizer-override("@", "symbol"))
  )
return admin:save-configuration($config)
Examples of Custom Tokenizer Overrides
This section contains the following examples related to using custom tokenizer overrides:
- Example: Configuring a Field with Tokenizer Overrides
- Example: Improving Accuracy of Wildcard-Enabled Searches
- Example: Data Normalization
- Example: Searching Within a Word
- Example: Using the Symbol Classification
Example: Configuring a Field with Tokenizer Overrides
The following query demonstrates creating a field, field range index, and custom tokenizer overrides using the Admin API. You can also perform these operations using the Admin Interface.
Use this example as a template if you prefer to use XQuery to configure the fields used in the remaining examples in this section. Replace the database name, field name, included element name, and tokenizer overrides with settings appropriate for your use case.
(: Create the field :)
xquery version "1.0-ml";
import module namespace admin = "http://marklogic.com/xdmp/admin"
    at "/MarkLogic/admin.xqy";

let $config := admin:get-configuration()
let $dbid := xdmp:database("YourDatabase")
return admin:save-configuration(
  admin:database-add-field(
    $config, $dbid,
    admin:database-field("example", fn:false())
  )
);

(: Configure the included elements and field range index :)
xquery version "1.0-ml";
import module namespace admin = "http://marklogic.com/xdmp/admin"
    at "/MarkLogic/admin.xqy";

let $dbid := xdmp:database("YourDatabase")
let $config := admin:get-configuration()
let $config :=
  admin:database-add-field-included-element(
    $config, $dbid, "example",
    admin:database-included-element(
      "", "your-element", 1.0, "", "", "")
  )
let $config :=
  admin:database-add-range-field-index(
    $config, $dbid,
    admin:database-range-field-index(
      "string", "example",
      "http://marklogic.com/collation/", fn:false())
  )
return admin:save-configuration($config);

(: Define custom tokenizer overrides :)
xquery version "1.0-ml";
import module namespace admin = "http://marklogic.com/xdmp/admin"
    at "/MarkLogic/admin.xqy";

let $config := admin:get-configuration()
let $dbid := xdmp:database("YourDatabase")
return admin:save-configuration(
  admin:database-add-field-tokenizer-override(
    $config, $dbid, "example",
    (admin:database-tokenizer-override("(", "remove"),
     admin:database-tokenizer-override(")", "remove"),
     admin:database-tokenizer-override("-", "remove"))
  )
);
Example: Improving Accuracy of Wildcard-Enabled Searches
This example demonstrates using custom tokenizers to improve the accuracy and efficiency of unfiltered search on phone numbers when three character searches are enabled on the database to support wildcard searches.
Run the following query in Query Console to load the sample data into the database.
xdmp:document-insert("/contacts/Abe.xml",
  <person>
    <phone>(202)456-1111</phone>
  </person>);
xdmp:document-insert("/contacts/Mary.xml",
  <person>
    <phone>(202)456-1112</phone>
  </person>);
xdmp:document-insert("/contacts/Bob.xml",
  <person>
    <phone>(202)111-4560</phone>
  </person>);
xdmp:document-insert("/contacts/Bubba.xml",
  <person>
    <phone>(456)202-1111</phone>
  </person>)
Use the Admin Interface or a query similar to the following to enable three character searches on the database to support wildcard searches.
xquery version "1.0-ml";
import module namespace admin = "http://marklogic.com/xdmp/admin"
    at "/MarkLogic/admin.xqy";

let $config := admin:get-configuration()
return admin:save-configuration(
  admin:database-set-three-character-searches($config,
    xdmp:database("YourDatabase"), fn:true())
)
With three character searches enabled, the following unfiltered search returns false positives because the query text tokenizes into two word tokens, 202 and 456, with the wildcard applying only to the 456 token.
xquery version "1.0-ml";
cts:search(
  fn:doc(),
  cts:word-query("(202)456*"),
  "unfiltered")//phone/text()
==>
(456)202-1111
(202)456-1111
(202)111-4560
(202)456-1112
To improve the accuracy of the search, define a field on the phone element and define tokenizer overrides to eliminate all the punctuation characters from the field values. Use the Admin Interface to define a field with the following characteristics, or modify the query in Example: Configuring a Field with Tokenizer Overrides and run it in Query Console.
| Field Property | Setting |
|---|---|
| Name | phone |
| Field type | root |
| Include root | false |
| Included elements | phone (no namespace) |
| Range field index | collation: |
| Tokenizer overrides |
This field definition causes the phone numbers to be indexed as single word tokens such as 4562021111 and 2021114560. If you perform the following search, the false positives are eliminated:
xquery version "1.0-ml";
cts:search(fn:doc(),
  cts:field-word-query("phone", "(202)456*"),
  "unfiltered")//phone/text()
==>
(202)456-1111
(202)456-1112
If the field definition did not include the tokenizer overrides, the field word query would include the same false positives as the initial word query.
Example: Data Normalization
In Example: Improving Accuracy of Wildcard-Enabled Searches, custom tokenizer overrides are used to remove punctuation from phone numbers of the form (202)456-1111. The overrides provide the additional benefit of normalizing query text because the tokenizer overrides apply to query text as well as content.
If you define (, ), -, and (space) as remove characters, then a phone number such as (202)456-1111 is indexed as the single word 2024561111, and all the following query text examples will match exactly in an unfiltered search:
The same overrides also normalize indexing during ingestion: If the input data contains all of the above patterns in the phone element, the data is normalized to a single word token for indexing in all cases.
For sample input and details on configuring an applicable field, see Example: Improving Accuracy of Wildcard-Enabled Searches.
Example: Searching Within a Word
This example demonstrates using custom tokenizer overrides to create multiple tokens out of what would otherwise be considered a single word. This makes it possible to search successfully for a portion of the word.
Suppose you have input documents that include a dimensions element of the form MxN, where M and N are the number of feet. For example, 10x4 is the measurement of an area that is 10 feet by 4 feet. You cannot search for all documents which includes at least one dimension of 10 feet because 10x4 tokenizes as a single word.
To demonstrate, run the following query in Query Console to load the sample documents:
xquery version "1.0-ml";
xdmp:document-insert("/plots/plot1.xml",
  <plot>
    <dimensions>10x4</dimensions>
  </plot>);
xdmp:document-insert("/plots/plot2.xml",
  <plot>
    <dimensions>25x10</dimensions>
  </plot>);
xdmp:document-insert("/plots/plot3.xml",
  <plot>
     <dimensions>5x4</dimensions>
  </plot>)
Next, run the following word query against the database and observe that there are no matches:
xquery version "1.0-ml";
cts:search(fn:doc(), cts:word-query("10"),"unfiltered")
Use the Admin Interface to define a field with the following characteristics, or modify the query in Example: Configuring a Field with Tokenizer Overrides and run it in Query Console.
The field divides each dimension text node into two tokens, split at x. Therefore, the following field word query now finds matches in the example documents:
xquery version "1.0-ml";
cts:search(fn:doc(), cts:field-word-query("dim", "10"),"unfiltered")

==>
<plot>
  <dimensions>25x10</dimensions>
</plot>
<plot>
  <dimensions>10x4</dimensions>
</plot>
Example: Using the Symbol Classification
This example demonstrates the value of classifying some characters as symbol. Suppose you are working with Twitter data, where the appearance of @word in Tweet text represents a user and #word represents a topic identifier (hash tag). For this example, we want the following search semantics to apply:
- If you search for a naked term, such as
NASA, the search should match occurrences of the naked term (NASA) or topics (#NASA), but not users (@NASA). - If you search for a user (
@NASA), the search should only match users, not naked terms or topics. - If you search for a topic (
#NASA), the search should only match topics, not naked terms or users.
The following table summarizes the desired search results:
| Query Text | Should Match | Should Not Match |
|---|---|---|
NASA |
@NASA |
|
@NASA |
@NASA |
|
#NASA |
#NASA |
If you do not define any token overrides, then the terms NASA, @NASA, and #NASA tokenize as follows:
NASA:cts:word("NASA")@NASA:cts:punctuation("@"), cts:word("NASA")#NASA:cts:punctuation("#"), cts:word("NASA")
Assuming a punctuation-insensitive search, this means all three query strings devolve to searching for just NASA.
If you define a tokenizer override for @ that classifies it as a word character, then @NASA tokenizes as a single word and will not match naked terms or topics. That is, @NASA tokenizes as:
cts:word("@NASA")
However, classifying # as a word character does not have the desired effect. It causes the query text #NASA to match topics, as intended, but it also excludes matches for naked terms. The solution is to classify # as a symbol. Doing so causes the following tokenization to occur:
cts:word("#"),cts:word("NASA")
Now, searching for #NASA matches adjacent occurrences of # and NASA, as in a topic, and searching for just NASA matches both topics and naked terms. Users (@NASA) continue to be excluded because of the tokenizer override for @.
User-Defined Lexer Plugins
You can use a user-defined lexer plug-in to affect how MarkLogic splits the text in document content and queries into parts. Create a user-defined lexer plugin in C++ by implementing a subclass of the marklogic::LexerUDF class and deploying it to MarkLogic as a native plugin. The LexerUDF class is a UDF (User Defined Function) interface.
MarkLogic also provides several built-in lexer plug-ins you can use to customize tokenization. For details, see Customization Using a Built-In Lexer or Stemmer.
This section covers the following topics:
- When to Consider a User-Defined Lexer
- LexerUDF Interface Summary
- Understanding User-Defined Lexer Control Flow
- Implementation Guidelines for User-Defined Lexers
- Creating and Deploying a User-Defined Lexer Plugin
- Registering a Custom Tokenizer with MarkLogic
- Testing a User-Defined Lexer
- Error Handling and Logging
When to Consider a User-Defined Lexer
MarkLogic provides several built-in lexers that you can configure for a language if you are not satisfied with the default lexer. The following are some use cases in which you might consider implementing a your own lexer:
- You need to tokenize a language that is not directly supported by MarkLogic.
- You want to use a specific 3rd party library for tokenization for a given language.
- Your data requires universal reassignment of certain characters to different tokenization classes. Tokenizer overrides, which fulfill a similar need, only apply within specific fields and come at the cost of retokenization.
- You require special format tokenization in the context of specific data fields where the requirements are more complicated than the simple reclassification provided by tokenizer overrides.
In some cases, you might also need a user-defined stemmer or custom dictionary. For example, if you're tokenizing a language not supported by MarkLogic and you wish to use stemmed searches on that language, then you would also deploy a custom stemmer. For details, see Using a User-Defined Stemmer Plugin and Custom Dictionaries for Tokenizing and Stemming.
LexerUDF Interface Summary
You implement a user-defined lexer as a subclass of the MarkLogic::LexerUDF base C++ class. This class is defined in MARKLOGIC_INSTALL_DIR/include/MarkLogic.h. You can find detailed documentation about the class in the User-Defined Function API reference and in MarkLogic.h. You can find an example implementation in MARKLOGIC_INSTALL_DIR/Samples/NativePlugins.
The following table contains a brief summary of the key methods of LexerUDF. For a discussions of how MarkLogic uses these methods, see Understanding User-Defined Lexer Control Flow.
Understanding User-Defined Lexer Control Flow
A user-defined lexer is implemented as a subclass of marklogic::LexerUDF. Once your lexer is installed as a native plugin and associated with a language, it will be applied automatically when loading content or processing query text in the context of the configured language.
MarkLogic maintains a per-language pool of lexer objects. When MarkLogic needs one of your LexerUDF objects, it first checks to see if one is available from the pool. If not, MarkLogic creates one using the object factor created during plugin registration. MarkLogic then calls the initialize method of the object.
The following diagram illustrates how MarkLogic interacts with a LexerUDF object during tokenization:
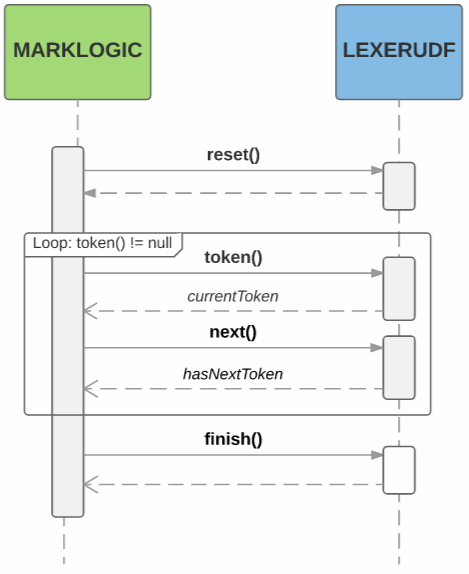
The lexer owns the memory allocated for the Token returned by the token method, and is responsible for releasing it when appropriate, such as when the finish method is called.
If it is necessary to re-tokenize a text run, MarkLogic invokes the lexer's reset method again.
When a tokenization run finishes, MarkLogic returns the lexer object to the pool. A lexer stays in the pool until it becomes stale. MarkLogic can choose to mark a lexer stale, or a lexer can flag itself as stale by returning true from its isStale method.
When a lexer is no longer needed, MarkLogic calls its close method. This enables the lexer to deallocate memory and release other resources, as needed.
Implementation Guidelines for User-Defined Lexers
When implementing a LexerUDF subclass, keep the following guidelines in mind.
Your UDF implementation runs in the same memory and process space as MarkLogic Server, so errors in your implementation can crash MarkLogic Server. Before deploying a user-defined lexer, you should read and understand Using Native Plugins in the Application Developer's Guide. See also Testing a User-Defined Lexer.
- You must implement a subclass of
LexerUDFfor each tokenization algorithm you want to use. - Your lexer should partition its input into words, punctuation, and whitespace tokens with no gaps, overlaps, or reordering because MarkLogic stores the sequence of tokens, not the original input string.
- Tokenization is a low-level, inner-loop operation that MarkLogic performs during indexing (including document ingestion) and query evaluation. Your stemmer should introduce as little overhead as possible.
- Your lexer is not responsible for applying tokenizer overrides. If tokenizer overrides are configured, MarkLogic will apply them to the tokens returned by the lexer.
- Your implementation does not have to be thread safe. MarkLogic will instantiate a new lexer in each thread in which it wants to perform tokenization.
- You can include a Part of Speech indicator as part of
Tokenobject returned byLexerUDF::token. This indicator can sometimes improve the precision of the stemmer. The default stemmers only use this information for Japanese. When deciding whether and which part of speech to use, keep the following mind:- Including a Part of Speech is only useful when you use both a custom lexer and a custom stemmer that acts on the PoS. The default stemmer only uses PoS for Japanese.
- You should usually return
UNSPECIFIED_POSfor tokens in short strings such as query text because there is not enough context to make a reliable classification. If you use a custom stemmer, MarkLogic recommends your stemmer return all possible stems forUNSPECIFIED_POS. - If you are sure of the POS classification, tagging a token with a specific part of speech can improve the precision of the stemmer or serve as a signal for stem ordering.
UNSPECIFIED_POSis more efficient in time and space for the stemmer. If you don't really need the extra precision or your stemmer plugin does not use POS, you should not use specific parts of speech. Using specific parts of speech makes the stemmed searches indexes bigger and adds to processing time.
- A single text run might need to be tokenized more than once. Your lexer should be idempotent across calls to its
restartmethod. - Report errors using the
Reporterobject that is passed to mostLexerUDFmethods, rather than by throwing exceptions. For details, see Error Handling and Logging. - You might also want to support your language with a custom stemmer and/or a custom dictionary. To learn more about customization options, see Stemming and Tokenization Customization.
Creating and Deploying a User-Defined Lexer Plugin
Follow the steps below to create and deploy a lexer UDF in MarkLogic as a native plugin. A complete example is available in MARKLOGIC_DIR/Samples/NativePlugins.
- Implement a subclass of the C++ class
marklogic::LexerUDF. See MARKLOGIC_DIR/include/MarkLogic.hfor interface details. - Implement an extern "C" function called
marklogicPluginto perform plugin registration. For details, see Registering a Native Plugin at Runtime in the Application Developer's Guide. - Build a dynamically linked library containing your UDF and registrationf unction. You should use the Makefile in MARKLOGIC_DIR
/Samples/NativePluginsas the basis for building your plugin. For more details, see Building a Native Plugin Library in the Application Developer's Guide. - Following the directions in Using Native Plugins to package and install your plugin. See the note below about dependent libraries.
- Configure your lexer as the lexer plugin for at least one language. For details, see Configuring Tokenization and Stemming Plugins.
The native plugin interface includes support for bundling dependent libraries in the native plugin zip file. However, many 3rd party natural language processing tools are large, complex, and have strict installation directory requirements. If you are using such a packge, you should install the 3rd party package package independently on each host in the cluster, rather than trying to include it inside your native plugin package.
Registering a Custom Tokenizer with MarkLogic
A native plugin becomes available for use once you install it, but it will not be loaded until there is a reason to use it. A plugin containing only a lexer UDF is only loaded if it is associated with at least one language, and the need to tokenize text in that language arises.
When MarkLogic loads a native plugin, it performs a registration handshake to obtain details about the plugin such as what UDFs the plugin provides. This handshake is performed through an extern "C" function named marklogicPlugin that must be part of every native plugin.
The following code is an example of a registration function for a plugin that registers only a single lexer capability. Assume the plugin implements a LexerUDF subclass named MyLexerUDF. The code registers the lexer with the plugin id sample_lexer.
extern "C" PLUGIN_DLL void
marklogicPlugin(Registry& r)
{
  r.version();
  r.registerLexer<MyLexerUDF>("sample_lexer");
}
For details, see Registering a Native Plugin at Runtime in the Application Developer's Guide. For a complete example, see the code in MARLOGIC_DIR/Samples/NativePlugins.
Testing a User-Defined Lexer
You can test your LexerUDF implementation in the following ways:
- Create standalone test scaffolding.
- Use the cts:tokenize XQuery function or the cts.tokenize Server-Side JavaScript function to exercise your plugin after it is installed and configured for at least one language.
Testing your lexer standalone during development is highly recommended. It is much easier to debug your code in this setup. Also, since it is possible for native plugin code to crash MarkLogic, it is best to test and stabilize your code outside the server environment.
You can find example test scaffolding in MARKLOGIC_DIR/Samples/NativePlugins/TestStemTok.cpp. See the main() function for a starting point.
Error Handling and Logging
Use marklogic::Reporter to log messages and notify MarkLogic Server of fatal errors. Your code should not report errors to MarkLogic Server by throwing exceptions.
Report non-fatal errors and other messages using marklogic::Reporter::log. This method logs a message to the MarkLogic Server error log and returns control to your code. Most methods of LexerUDF accept a marklogic::Reporter input parameter.
Report fatal errors using marklogic::Reporter::error. You should reserve calls to Reporter::error for serious errors from which no recovery is possible. Reporting an error via Reporter::error has the following effects:
- If you report a fatal tokenization error during document insertion, the insertion transaction aborts.
- If you report a fatal tokenization error during reindexing, reindexing of the document fails.
- Control does not return to your code. Tokenization stops.
- MarkLogic Server returns
XDMP-UDFERRto the application. Your error message is included in theXDMP-UDFERRerror.
The following snippet reports an error and aborts tokenization:
#include "MarkLogic.h"
using namespace marklogic;
...
void ExampleUDF::next(Reporter& r)
{
  ...
  r.log(Reporter::Error, "Bad codepoint.");
}
For more details, see the marklogic::Reporter class in MARKLOGIC_DIR/include/MarkLogic.h.