MarkLogic 9 Product DocumentationAdministrator's Guide — Chapter 13
Databases
This section introduces basic database management procedures. Later sections in this guide introduce some concepts for tuning the performance of your databases. For information on database backup and restore operations, see Backing Up and Restoring a Database. The following topics are included:
- Understanding Databases
- Creating a New Database
- Attaching and/or Detaching Forests to/from a Database
- Viewing Database Settings
- Loading Documents into a Database
- Merging a Database
- Reindexing a Database
- Clearing a Database
- Disabling a Database
- Deleting a Database
- Checking and Setting Permissions for a Document in a Database
This chapter describes how to use the Admin Interface to create and configure databases. For details on how to create and configure databases programmatically, see Creating and Configuring Forests and Databases in the Scripting Administrative Tasks Guide.
Understanding Databases
A database in MarkLogic Server serves as a layer of abstraction between forests and HTTP, WebDAV, or XDBC servers. A database is made up of data forests that are configured on hosts within the same cluster but not necessarily in the same group. It enables a set of one or more forests to appear as a single contiguous set of content for query purposes. See Understanding Forests for more detail on forests.
Multiple HTTP, XDBC, and WebDAV servers can be connected to the same database, allowing different applications to be deployed over a common content base. A database can also span forests that are configured on multiple hosts enabling data scalability through hardware expansion. To ensure database consistency, all forests that are attached to a database must be available in order for the database to be available.
The system databases -- Security, Schemas, Triggers, Modules, Extensions, Last-Login and App-Services -- should all be single forest databases. For high availability, one or two replica forests can and should be configured. But there is no benefit to having multiple master forests in the database.
Schemas and Security Databases
The installation process creates the following auxiliary databases by default - Documents, Last-Login, Schemas, Security, Modules, and Triggers. Every database points to a security database and a schema database. Security configuration information is stored in the security database and schemas are stored in the schemas database. A database can point back to itself for the security and schemas databases, storing the security information and schemas in the same repository as the documents. However, security objects created through the Admin Interface are stored in the Security database by default. MarkLogic recommends leaving databases connected to Security as their security database.
Modules Database
The modules database is an auxiliary database that is used to store executable XQuery, JavaScript, and REST code. During installation, a database named Modules is created, but any database can be used as a modules database, as long as the HTTP or XDBC server is configured to use it as a modules database. Also, it is possible to use the same database to store executable modules, to store queryable documents, and/or to store triggers.
If you use a modules database, each executable document in the database must have the root (specified in the HTTP or XDBC server) as a prefix to its URI. Also, if you want to access the documents in the database via WebDAV, then it should have automatic directory creation enabled, because automatic directory creation is required for WebDAV. For information about directories and roots, see Directories and Server Root Directory.
For example, if you are using a modules database and specify a root in an HTTP or XDBC server of http://marklogic.com/, the following documents are executable from that server:
http://marklogic.com/default.xqy
http://marklogic.com/myXQueryFiles/search_db.xqy
but the following files are not executable (because they do not have URIs that start with the root):
http://mycompany.com/default.xqy
/myXQueryFiles/search_db.xqy
In order to execute any documents in a modules database, the documents must be loaded with execute permissions. You can do this either by loading the documents as a user with default privileges that include execute permissions, or by setting those permissions on the document after it loads. For information on using permissions, privileges, and other security features in MarkLogic Server, see Security Administration and the chapters related to security in the Application Developer's Guide.
Triggers Database
The triggers database is an auxiliary database that is used to store triggers. During installation, a database named Triggers is created, but any database can be used as a triggers database. Also, it is possible to use the same database to store executable modules, to store queryable documents, and/or to store triggers. A triggers database is required if you are using the Content Processing Framework. For details on the Content Processing Framework, see Content Processing Framework Guide.
Database Settings
Each database has settings that control various aspects of a database such as memory allocation, indexing options, and so on. You configure these settings in the Admin Interface. You can configure the following basic types of settings for each database:
- Basic Administrative Settings
- Index Settings that Affect Documents
- Rebalancer Settings
- Reindexing Settings
- Document and Directory Settings
- Memory and Journal Settings
- Other Settings
- Merge Control Settings
Basic Administrative Settings
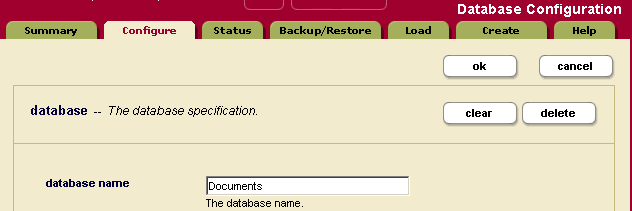
The administrative settings configure properties such as the database name and which security and schema databases a database uses. These settings take effect immediately after any changes are made in the Admin Interface.
| Database Setting | Description |
|---|---|
database name |
The name of the database. |
security database |
The name of the security database which this database accesses. |
schema database |
The name of the schemas database which this database accesses. |
triggers database |
The name of the triggers database which this database accesses. |
| data encryption | Enable or disable encryption at rest for this database. For details, see Encryption at Rest in the Security Guide. |
| encryption key id | Data encryption key ID. For details, see Encryption at Rest in the Security Guide. |
Index Settings that Affect Documents
When you change any index settings for a database, the new settings take effect based on whether reindexing is enabled (reindexer enable set to true). For more details on text indexes, see Text Indexing.
In general, adding index options will have the effect of slowing document loading and increasing the size of database files.
| Database Setting | Description |
|---|---|
language |
Specifies the default language for content in this database. Any content without an xml:lang attribute will be indexed in the language specified here. You should have a license key if you specify a non-English language; if you specify a non-english language and do not have a license for that language, the stemming and tokenization will be generic. |
stemmed searches |
Controls the level of stemming applied to word searches. Stemmed searches match not only the exact word in the search, but also words that come from the same stem and mean the same thing (for example, a search for be will also match the term is). For more details on stemmed searches, see Understanding and Using Stemmed Searches in the Search Developer's Guide. |
word searches |
Whether or not to enable unstemmed word searches. Enables searches for exact matches of words. |
word positions |
Index word positions for faster phrase and cts:near-query searches. |
fast phrase searches |
Speeds up phrase searches by eliminating some false positive results. |
fast reverse searches |
Speeds up reverse query searches by indexing saved queries. |
triple index |
Enables the RDF triple index to support SPARQL execution over RDF triples. When this parameter is true, sem:sparql can be used, but document loading is slower and the database files are larger. |
triple positions |
Specifies whether to index positional data to speed up the performance of proximity queries that use the cts:triple-range-query function. |
fast case sensitive searches |
Speeds up case sensitive searches by eliminating some false positive results. |
fast diacritic sensitive searches |
Speeds up diacritic-sensitive searches by eliminating some false positive results. |
fast element word searches |
Speeds up element-word searches by eliminating some false positive results. |
element word positions |
Index element word positions for faster element-based phrase and cts:near-query searches. |
fast element phrase searches |
Speeds up element phrase searches by eliminating some false positive results. |
element value positions |
Index element word positions for faster element-based phrase and cts:near-query searches that use cts:element-value-query. |
attribute value positions |
Index attribute word positions for faster attribute-based phrase and cts:near-query searches that use cts:element-value-query and faster cts:element-query searches that use a cts:element-attribute-*-query. |
field value searches |
Enables searches that use cts:field-value-query. |
field value positions |
Enables positions for searches that use cts:field-value-query. |
three character searches |
Enables wildcard searches where the search pattern contains three or more consecutive non-wildcard characters (for example, abc*x, *abc, a?bcd). When combined with a codepoint word lexicon, speeds the performance of any wildcard search (including searches with fewer than three consecutive non-wildcard characters). MarkLogic recommends combining the three character search index with a codepoint collation word lexicon. For more details about wildcard searches, see Understanding and Using Wildcard Searches in the Search Developer's Guide. |
three character word positions |
Index word positions for three-character wildcard queries. |
fast element character searches |
Enables wildcard searches and speeds up element-based wildcard searches. For more details about wildcard searches, see Understanding and Using Wildcard Searches in the Search Developer's Guide. |
trailing wildcard searches |
Faster wildcard searches with the wildcard at the end of the search pattern (for example, abc*). For more details about wildcard searches, see Understanding and Using Wildcard Searches in the Search Developer's Guide. |
trailing wildcard word positions |
Index word positions for trailing wildcard searches. |
fast element trailing wildcard searches |
Faster wildcard searches with the wildcard at the end of the search pattern within a specific element, but slower document loads and larger database files. |
word lexicon |
Maintains a lexicon of all of the words in a database, with uniqueness determined by a specified collation. Additionally, works in combination with the three character search index to speed wildcard searches. For more details about wildcard searches, see Understanding and Using Wildcard Searches in the Search Developer's Guide. |
two character searches |
Enables wildcard searches where the search pattern contains two or more consecutive non-wildcard characters (for example, ab*). This index is not needed if you have three character searches and a word lexicon. For more details about wildcard searches, see Understanding and Using Wildcard Searches in the Search Developer's Guide. |
one character searches |
Enables wildcard searches where the search pattern contains a single non-wildcard characters (for example, a*). This index is not needed if you have three character searches and a word lexicon. For more details about wildcard searches, see Understanding and Using Wildcard Searches in the Search Developer's Guide. |
uri lexicon |
Maintains a lexicon of all of the URIs used in a database. The URI lexicon speeds up queries that constrain on URIs. It is like a range index of all of the URIs in the database. To access values from the URI lexicon, use the cts:uris or cts:uri-match APIs. |
collection lexicon |
Maintains a lexicon of all of the collection URIs used in a database. The collection lexicon speeds up queries that constrain on collections. It is like a range index of all of the collection URIs in the database. To access values from the collection lexicon, use the cts:collections or cts:collection-match APIs. |
Rebalancer Settings
You can enable the database rebalancer to automatically distribute content evenly across forests in a database. The specifics of database rebalancing are described in Database Rebalancing.
| Database Setting | Description |
|---|---|
assignment policy |
Specifies how documents are to be distributed across the database forests. Both the rebalancing process and the document load/insert process follow this policy. For details on the document assignment policies, see Rebalancer Document Assignment Policies. |
rebalancer enable |
When set to true, the database rebalancer will automatically redistribute the content across the database forests. When set to false, rebalancing is disabled. |
rebalancer throttle |
Sets the priority of system resources devoted to rebalancing. Higher numbers give rebalancing a higher priority. |
Reindexing Settings
The reindexing settings enable or disable reindexing and allow you to force reindexing of older fragments.
| Database Setting | Description |
|---|---|
reindexer enable |
When set to true, index configuration changes automatically initiate a background reindexing operation on the entire database. When set to false, any new index settings take effect for future documents loaded into the database; existing documents retain the old settings until they are reloaded or until you set reindexer enable to true. For information on how the reindexer effects queries, see Query Behavior with Reindex Settings Enabled and Disabled. |
reindexer throttle |
Sets the priority of system resources devoted to reindexing. Higher numbers give reindexing a higher priority. |
reindexer timestamp |
Specifies the timestamp of fragments to force a reindex/refragment operation. Click the get current timestamp button to enter the current system timestamp. When you set this parameter to a timestamp and reindex enable is set to true, it causes a reindex and refragment operation on all fragments in the database that have a timestamp equal to or less than the specified timestamp. Note that if you restore a database that has a timestamp set, if there are fragments in the restored content that are older than the specified content, they will start to reindex as soon as they are restored. |
Document and Directory Settings
The document and directory settings affect the default settings for how documents and directories are created in the database.
| Database Setting | Description |
|---|---|
directory creation |
Specifies if directories should be automatically created when a document is created. If you are using the database to store documents accessible via a WebDAV server or as a Modules database, this setting should be set to automatic. The following are the settings:
|
maintain last modified |
Creates and updates the last-modified property each time a document is created or updated. The default is false. |
maintain directory last modified |
Creates and updates the last-modified property on a directory each time a directory is created or updated. If set to true, update operations on documents in a directory will also update the directory last-modified timestamp, which can cause some contention when multiple documents in the directory are being updated. If your application is experiencing contention during these type of updates (for example, if you see deadlock-detected messages in the error log), set this property to false. The default is false. |
inherit permissions |
When set to true, documents and directories automatically inherit permissions from their parent directory (if permissions are not set explicitly when creating the document or directory). If there are any default permissions on the user who is creating the document or directory, those permissions are combined with any inherited permissions. |
inherit collections |
When set to true, documents and directories automatically inherit collection settings from their parent directory (if collections are not set explicitly when creating the document or directory). If there are any default collections on the user who is creating the document or directory, those permissions are combined with any inherited collections. |
inherit quality |
When set to true, documents and directories automatically inherit any quality settings from their parent directory (if quality is not set explicitly when creating the document or directory). |
Memory and Journal Settings
The memory and journal settings are automatically configured at installation time. The memory settings configure the memory limits for the system, and the journal settings control the transactional journal, used for recovery if a database transaction fails. The default settings should be sufficient for most systems. Depending on the system workload, setting the memory settings incorrectly can adversely affect performance; if you need to change the settings and you have an active maintenance contract, you can contact MarkLogic Support for help.
Other Settings
The following are the remaining database configuration options.
Merge Control Settings
The merge control settings allow you to control when merges occur, set merge parameters, and set up blackout periods where you do not want merges to occur. You can access the merge control settings by clicking the Admin Interface menu item for Database > db_name > Merge Controls. Use caution when adjusting the merge parameters or using merge blackouts, as merges are necessary for optimal database performance. For explanations of the merge control settings and more details on controlling merges, see Understanding and Controlling Database Merges.
Example of Databases in MarkLogic Server
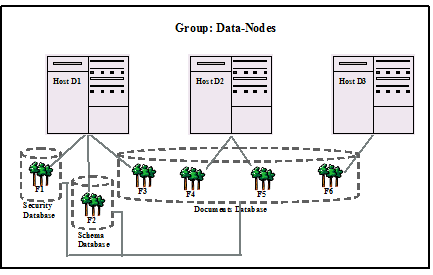
This section provides an example which demonstrates the concept of a database and the relationships between a database, a host and a forest in MarkLogic Server.
In the diagram below, Hosts D1, D2 and D3 belong to the Data-Nodes Group.
D1 is the first Host in Data-Nodes Group on which MarkLogic Server is loaded. Three Databases are created by default, Security Database, Schema Database and Documents Database. In the diagram below, 3 Forests, F1, F2 and F3 are configured on Host D1 and assigned to the Security Database, Schema Database and Documents Database respectively.
D2 is the second Host to join the Data-Nodes Group. Forests F4 and F5 are configured on D2 and attached to the Documents Database.
D3 is the third Host to join the Data-Nodes Group and has Forest F6, configured on it. F6 is also assigned to the Documents Database.
Creating a New Database
Follow the following steps to create a new database.
- Click the Databases icon in the left tree menu.
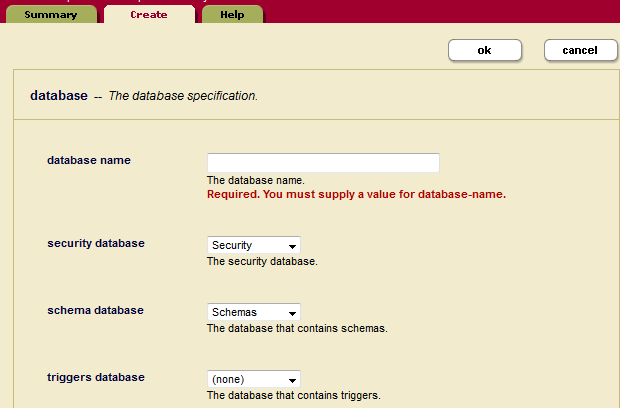
- Click the Create tab at the top right. The Create Database page displays:
- Enter the name of the database. This is the name the system will use to refer to this database.
- Select a security database to be associated with this database. We recommend selecting Security as the security database.
- Select a schema database to be associated with this database.
- You may leave the rest of the parameters unchanged or set them according to your needs.
- Click OK.
Your database is now created. You can now attach forests to the database. Creating a database is a hot admin task.
Attaching and/or Detaching Forests to/from a Database
In order to query content in a forest, it must be attached to a database. Forests can be moved from one database to another (detached from one database and attached to another). Detaching a forest from a database does not delete the forest; the forest remains on the host on which it was created with the data intact. Forests can be moved from one database to another (detached from one and attached to another). However, before you attach the forest to another database, ensure that the new database has the same configuration as the old database. If the configuration of the new database is different and the reindex enable setting is set to true on the new database, the forest will begin reindexing to match the database configuration as soon as it is attached.
If you attach a new forest to a database that makes use of the journal archiving feature described in Backing Up Databases with Journal Archiving, the forest will not participate in journal archiving until the next time the database is backed up. For details on how to do an immediate backup of a database, see Backing Up a Database Immediately.
You can also attach and detach forests from databases using the Forest Summary page, as described in Attaching and Detaching Forests Using the Forest Summary Page.
Perform the following steps using the Admin Interface to attach or detach one or more forests to a database:
- Click the database to which you want to attach forests.
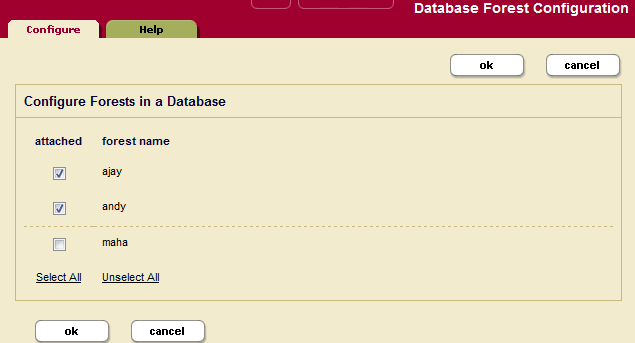
- Click the Forests icon for the database. The Database Forest Configuration Page appears.
- Check the box corresponding to forest(s) you want to attach to the database. You can also uncheck forests you want to detach from the database.
- Click OK.
The forests you attached or detached are now reflected in the database configuration. Attaching and detaching a forest to a database are hot admin tasks.
Viewing Database Settings
To view the settings for a particular database, perform the following steps:
- Click the Databases icon on the left tree menu.
- Locate the database for which you want to view settings, either in the tree menu or in the Database Summary table.
- Click the name of the database for which you want to view the settings.
- View the settings.
- Click Forests, Triggers, Content Processing, Fragment Roots, Fragment Parents, Element-Word-Query-Throughs, Phrase-Throughs, Phrase-Arounds, Element Indexes and Attribute Indexes to view settings specific to those aspects of the database.
Loading Documents into a Database
You can use the Admin Interface to load documents into the database. The documents will be loaded with the default permissions and added to the default collections of the user with which you logged into the Admin Interface.
To load a set of documents into a database, perform the following steps:
- Click the Databases icon on the left tree menu.
- Click on the database into which you want to load the documents.
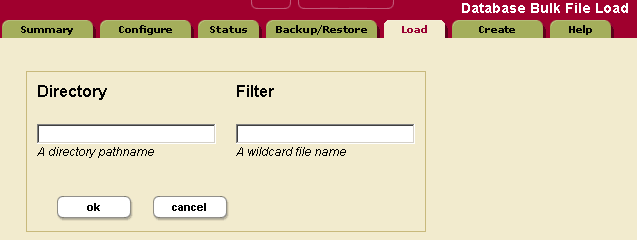
- Click on the Load tab near the top right.
- Enter the name of the directory in which the documents are located. This directory must be accessible by the host from which the Admin Interface is currently running.
- Enter a filter for the names of the documents to be loaded (for example,
*.xmlto load all files with an xml extension). For an exact match, enter the full name of the document. - Click OK to proceed.
- The load confirmation screen will list all documents in the specified directory matching the specified filter. Click OK to complete the load.
The documents are loaded into the database. The URI path of the documents are the same as your filesystem path.
Merging a Database
You can merge all of the forest data in the database using the Admin Interface. As described in Understanding and Controlling Database Merges, merging the forests in a database improves performance and is periodically done automatically in the background by MarkLogic Server. The Merge button allows you to explicitly merge the forest data for this database.
To explicitly merge the database, complete the following procedure:
- Click the Databases icon on the left tree menu.
- Decide which database you want to merge.
- Click the database name, either on the tree menu or the summary page.
- Click the Merge button on the Database Configuration page.
- Confirm that you want to merge the forest data in this database and click OK.
Merging data in a database is a hot admin task; the changes take effect immediately.
Reindexing a Database
You can reindex all of the document data in the database using the Admin Interface. As described in Text Indexing, text indexing accelerates the performance of a certain queries and is periodically done automatically in the background by MarkLogic Server. The reindex operation sets the reindexer timestamp to the current system timestamp, which causes a reindex and refragment operation on all fragments in the database that have a timestamp equal to or less than the timestamp (assuming reindexer enable is set to true). The Reindex button forces a complete reindex/refragment operation on the database.
To reindex the database, complete the following procedure:
- Click the Databases icon on the left tree menu.
- Decide which database you want to reindex.
- Click the database name, either on the tree menu or the summary page.
- Click the Reindex button on the Database Configuration page.
- Confirm that you want to reindex this database and click OK.
Reindexing data in a database is a hot admin task; the changes take effect immediately.
Clearing a Database
You can clear all of the forest content from the database using the Admin Interface. Clearing a database deletes all of the content from all of the forests in the database, but leaves the database configuration in tact.
To clear all data from a database, complete the following procedure:
- Click the Databases icon on the left tree menu.
- Decide which database you want to clear.
- Click the database name, either on the tree menu or the summary page.
- Click the Clear button on the Database Configuration page.
- Confirm that you want to clear the forest data from this database and click OK.
Clearing a database is a hot admin task; the changes take effect immediately.
Disabling a Database
You can disable a database using the Admin Interface. You can either disable only the database or the database along with all of its forests. Disabling only the database marks the database as disabled and unmounts all the forests from the database. However, the database forests remain enabled. Disabling the database and its forests marks the database and each forest as disabled, unmounts all the forests from the database, and clears all memory caches for all the forests in the database. The database remains unavailable for any query operations while it is disabled.
Disabling a database does not delete the configuration or document data. The database and forest can later be re-enabled by clicking Enable.
To disable a database, complete the following procedure:
- Click the Databases icon on the left tree menu.
- Decide which database you want to disable.
- Click the database name, either on the tree menu or the summary page.
- Click the Disable button on the Database Configuration page.
- Click either Disable Database to disable only the database, or Disable Database and Forests to disable the database and its forests.
Deleting a Database
A database cannot be deleted if there are any HTTP, WebDAV, or XDBC servers that refer to the database. Deleting a database detaches the forests that are attached to it, but does not delete them. The forests remain on the hosts on which they were created with the data intact. Perform the following steps to delete a database:
- Click the Databases icon on the left tree menu.
- Locate the database you want to delete, either in the tree menu or in the Database Summary table.
- Click the name of the database which you want to delete.
- Click on the Delete button near the top right.
Clicking the Clear button clears all of the forests attached to this database, removing all of the data from the forests. Clicking the Delete button removes the database configuration, but does not delete the data stored in the forests.
- Assuming that there are not any HTTP, WebDAV, or XDBC servers referring to the database, a delete confirmation screen appears. Click OK.
- If you want to delete the forests used by the database, follow the procedure described in Deleting a Forest from a Host for each forest.
The database is now permanently deleted. Deleting a database is a hot admin task.
Checking and Setting Permissions for a Document in a Database
You can use the Admin Interface to check the permissions of a document or directory in a database. You can also use the xdmp:document-get-permissions and xdmp:document-set-permissions APIs to get and set permissions. For details on document permissions, see Security Guide.
To check and/or set permissions on a document or directory in a database using the Admin Interface, perform the following steps:
- Click the Databases icon on the left tree menu.
- Locate the database for which you want to check or set permissions, either in the tree menu or in the Database Summary table.
- Click the name of the database where the document to which you want to check or set permissions is stored. The Database Configuration page appears.
- Click the Permissions link for the selected database in the left tree menu. The Permissions Admin page appears.
- Enter the URI of the document or directory and click OK.
- If you want to change the permissions, choose a role and capability from the drop-down lists. If you want to add more permissions, click the More Permissions button.
- To commit your changes, click OK. To cancel the action, press Cancel.
