Backing Up a Database Immediately
Follow these steps to initiate a database backup:
Log into the Admin Interface as a user with the
adminrole.Click the Databases link in the left menu of the Admin Interface.
Click the database name for the database you want to back up, either from the tree menu or on the summary page.
Click the Backup/Restore tab. The Backup/Restore screen appears.
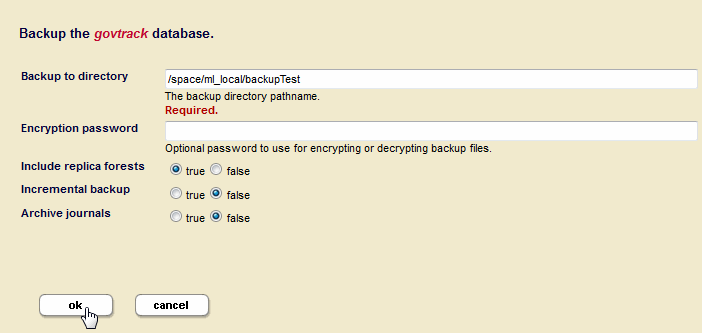
Enter the directory to which you want the database backed up in the Backup to directory field.
Note
The backup directory path must exist on all hosts that serve any forests in the database. The directory you specified can be an operating system mounted directory path, it can be an HDFS path, or it can be an S3 path. For details on using HDFS and S3 storage in MarkLogic, see Disk Storage Considerations in the Query Performance and Tuning Guide. Additionally, if you are using Windows and are backing up to a remote Windows path, you must set the registry settings and permissions as described in Windows Shared Disk Registry Settings and Permissions.
If you want to encrypt your backup, enter an encryption password.
If you have configured forests for local-disk failover, you can optionally set Include replica forests to true if you want to include the replica forests in the backup. For details on configuring forests for local-disk failover, see Configuring Local-Disk Failover for a Forest in the Scalability, Availability, and Failover Guide.
Set Incremental backup to true to create an incremental backup. The default is a full backup (false).
Set Archive Journals to true and set the Journal Archiving Lag Limit if you want to enable point-in-time recovery. The Journal Archiving Lag Limit is described in Backing Up Databases with Journal Archiving.
Note
If Journal Archiving is enabled, you cannot include auxiliary forests, as they should have their own separate backups.

Click OK.
If a directory creation error appears, then the directory is not writable. Either change the permissions on an existing directory or create a new directory with the proper permissions (readable and writable by the user running MarkLogic Server, by default
daemonon UNIX and the local System user on Windows) and click OK again.The Confirm backup screen appears and lists all the forest selected for back up.
Click OK to begin the backup immediately, or deselect forests that you do not want to back up.
Note
If you deselect any of the forests to backup, you might not have a completely consistent view of the database to restore. Only deselect any forests if you are sure you understand the implications of what you are backing up. To guarantee the exact same view of the database, backup all of the forests associated with the database, including the Schemas and Security database forests.
After the backup is underway, the Admin Interface redirects you to the Database Status page.
You can refresh the Database Status screen to view the progress of the backup. The Backups table lists when the backup was started, provides an estimate of the amount of time left, and lists other status information about the backup operation.
When the backup is complete, the entry in the backup table disappears.
If the status for any of the forests was something besides “completed,” then an error occurred during the backup operation. Check the Mark_Logic_Data/Logs/ErrorLog.txt file for any errors, correct them, and try the backup operation again.