
Administrator's Guide — Chapter 10
ODBC Servers
An ODBC server is one of several components that support SQL queries to MarkLogic Server. This chapter describes ODBC servers and provides procedures for configuring them. The following sections are included:
- ODBC Server Overview
- Procedures for Creating and Managing ODBC Servers
- ODBC Request Monitoring and Cancellation
This chapter describes how to use the Admin Interface to create and configure ODBC servers. For details on how to create and configure ODBC servers programmatically, see Creating and Configuring App Servers in the Scripting Administrative Tasks Guide.
ODBC Server Overview
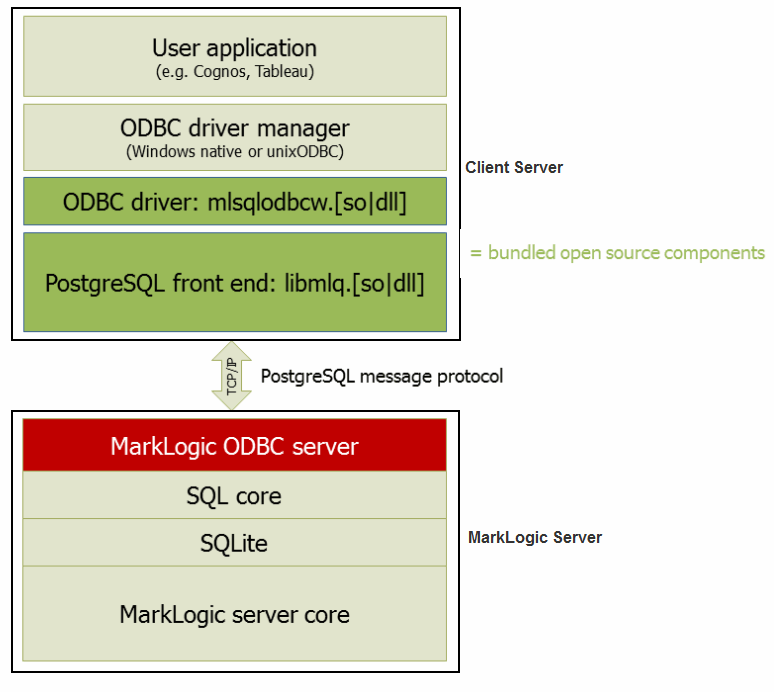
The basic purpose of an ODBC server is to return relational-style data resident in MarkLogic Server in response to SQL queries. The ODBC server returns data in tuple form and manages server state to support a subset of SQL and ODBC statements from Business Intelligence (BI) tools.
As shown in the figure below, an ODBC server connects with a PostgreSQL front end on the client by means of the PostgreSQL message protocol. The ODBC server accepts SQL queries from the PostgreSQL front end and returns the relational-style data needed by the BI applications to build reports.
Procedures for Creating and Managing ODBC Servers
Use the following procedures to create and manage ODBC servers:
- Creating a New ODBC Server
- Setting Output Options for an ODBC Server
- Viewing ODBC Server Settings
- Deleting an ODBC Server
- Canceling a Request
- ODBC Request Monitoring and Cancellation
Creating a New ODBC Server
To create a new server, complete the following steps:
- Click the Groups icon in the left tree menu.
- Click the group in which you want to define the ODBC server (for example, Default).
- Click the App Servers icon on the left tree menu.
- Click the Create ODBC tab at the top right. The Create ODBC Server page will display:
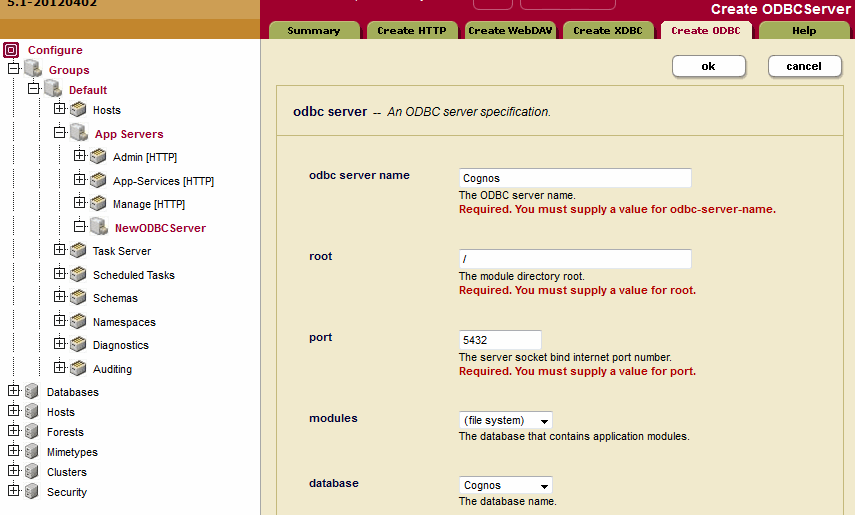
- In the Server Name field, enter a shorthand name for this ODBC server. MarkLogic Server will use this name to refer to this server on display screens in the Admin Interface.
- In the Root directory field, enter the name of the directory in which you will store your data. If the Modules field is set to a database, then the root must be a directory URI in the specified modules database.
If the Modules field is set to file system, then the root directory is either a fully-qualified pathname or is relative to the directory in which MarkLogic Server is installed. The following table shows the default installation directory for each platform:
Platform Program Directory Microsoft Windows C:\Program Files\MarkLogic
Red Hat Linux /opt/MarkLogic
Mac OS X ~/Library/MarkLogic
Unless you specify a shared drive, all hosts in the group will need to have a copy of the XQuery programs in the directory specified above.
Do not create ODBC server root directories named Docs, Data or Admin. These directories are reserved by MarkLogic Server for other purposes. Creating ODBC server root directories with these names can result in unpredictable behavior of the server and may also complicate the software upgrade process.
- In the Port field, enter the port number through which you want to make this ODBC server available. The default PostgreSQL listening socket port is 5432. The port number must be unique to this ODBC server and must not be assigned to any other ODBC, HTTP, XDBC or WebDAV server.
- In the Modules field, select the database to use as the modules database for your XQuery documents, or leave it at the default of storing your XQuery modules on the file system. For information on what a modules database is, see Modules Database.
- In the Database field, select the database to be accessed by this ODBC server. This database should be set up with the range indexes and schema views to support the SQL application. For details on how to set up a database to support SQL applications, see the SQL Data Modeling Guide. Multiple ODBC, HTTP, XDBC, and WebDAV servers can access the same database.
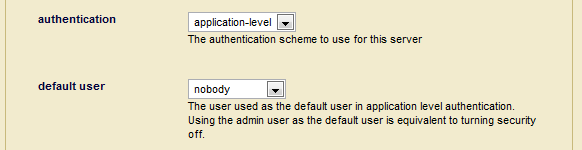
- Scroll to the Authentication field. Select an authentication scheme, as described in Types of Authentication in the Security Guide. The default is digest, which uses encrypted passwords.
If you select application-level authentication, you will also need to fill in a Default User. Any one accessing the ODBC server is automatically logged in as the Default User until the user logs in explicitly.
If you use an admin user (admin) as the Default User (an authorized administrator with the
adminrole), then everyone who uses this App Server is automatically a user with theadminrole, which effectively turns off security for this App Server. - Scroll to the Privilege field near the bottom of the screen. This field represents the privilege needed to access (login to) the server. You may leave this field blank.
A user accessing the ODBC server must have the execute privilege selected in order to access the ODBC server. If you chose application-level authentication above, you should ensure that the default user has the selected privilege.
- Set any other properties for this App Server, as appropriate to your needs:
- Last Login and Display Last Login are described in Storing and Monitoring the Last User Login Attempt.
- Backlog specifies the maximum number of pending connections allowed on the ODBC server socket.
- Threads specifies the maximum number of App Server threads.
- Request Timeout specifies the maximum number of seconds before a socket receives a timeout for the first request.
- Keep Alive timeout specifies the maximum number of seconds before a socket receives a timeout for subsequent requests over the same connection.
- Session Timeout specifies the maximum number of seconds before an inactive session times out.
- Max Time Limit specifies the upper bound for any request's time limit. No request may set its time limit (for example with xdmp:set-request-time-limit) higher than this number. The time limit, in turn, is the maximum number of seconds allowed for servicing a query request. The App Server gives up on queries which take longer, and returns an error.
- Default Time Limit specifies the default value for any request's time limit, when otherwise unspecified. A request can change its time limit using
xdmp:set-request-time-limit. The time limit, in turn, is the maximum number of seconds allowed for servicing a query request. The App Server gives up on queries which take longer, and returns an error. - Static Expires adds an "expires" ODBC header for static content to expire after this many seconds.
- Pre-commit Trigger Limit specifies the maximum number of pre-commit triggers a single statement against this App Server can invoke. For more information on triggers, see Using Triggers to Spawn Actions in the Application Developer's Guide.
- Pre-commit Trigger Depth specifies the maximum depth (how many triggers can cause other triggers to fire, which in turn cause others to fire, and so on) for pre-commit triggers that are executed against this App Server. For more information on triggers, see Using Triggers to Spawn Actions in the Application Developer's Guide.
- Collation specifies the default collation for queries run in this appserver. This will be the collation used for string comparison and sorting if none is specified in the query. For details, see Encodings and Collations in the Search Developer's Guide.
- Concurrent Request Limit specifies the maximum number of requests any user may have running at a specific time. 0 indicates no maximum. For details, see Managing Concurrent User Requests.
- Log Errors specifes whether to log uncaught errors for this App Server to the ErrorLog.txt file. This is useful to log exceptions that might occur on an App Server for later debugging.
- Debug Allow specifies whether to allow requests against this App Server to be stopped for debugging, using the MarkLogic Server debugging APIs.
- Profile Allow specifies whether to allow requests against this App Server to be profiled, using the MarkLogic Server profiling APIs. For details, see Profiling Requests to Evaluate Performance in the Query Performance and Tuning guide.
- Default XQuery Version specifies the default XQuery language for this App Server if an XQuery module does explicitly declare its language version.
- Multi Version Concurrency Control specifies how strict queries behave about getting the latest timestamp. This only affects query statements, not update statements. For details about queries and transactions in MarkLogic Server, see Understanding Transactions in MarkLogic Server in the Application Developer's Guide.
- The Error Handler and URL Rewriter fields are described in Controlling App Server Access, Output, and Errors in the Application Developer's Guide.
- The properties associated with SSL support are described in Configuring SSL on App Servers in the Security Guide.
- Scroll to the top or bottom and click OK.


The ODBC server is now created. Creating an ODBC server is a hot admin task; the changes take effect immediately. For information and setup instructions for managing user sessions and/or keeping track of login attempts, see Managing User Requests and Monitoring Login Attempts.
Setting Output Options for an ODBC Server
For each ODBC Server, you can set various default output options. These output options affect how data returned from the App Server is serialized. You can also set these options at the query level to override any default options. You can set serialization options to override the App Server defaults in XQuery with the declare option XQuery prolog, and in XSLT using the <xsl:output> instruction. For details on setting the serialization options in XQuery, see Declaring Options in the XQuery and XSLT Reference Guide. For XSLT output details, see the XSLT specification (http://www.w3.org/TR/xslt20#serialization).
To specify defaults for the App Server, complete the following steps:
- Click the Groups icon in the left tree menu.
- Click the group which contains the ODBC server you want to view (for example, Default).
- Click the App Servers icon on the left tree menu.
- Select the App Server to edit.
- Select the Output Options link in the left tree menu. The Output Options Configuration page displays.
- Set any options that you want to control for this App Server.
- Click OK to save your changes.
For more details about App Server output, see Controlling App Server Access, Output, and Errors in the Application Developer's Guide.
Viewing ODBC Server Settings
To view the settings for a particular ODBC server, complete the following steps:
- Click the Groups icon in the left tree menu.
- Click the group which contains the ODBC server you want to view (for example, Default).
- Click the App Servers icon on the left tree menu.
- Locate the ODBC server for which you want to view settings, either in the tree menu or on the summary page.
- Click the icon for the ODBC server.
- View the settings.
Deleting an ODBC Server
To delete the settings for an ODBC server, complete the following steps:
- Click the Groups icon in the left tree menu.
- Click the group which contains the ODBC server you want to delete (for example, Default).
- Click the App Servers icon on the left tree menu.
- Locate the ODBC server you want to delete, either in the tree menu or on the summary page.
- Click the icon for the ODBC server.
- Click Delete.
- A confirmation message displays. Confirm the delete and click OK.
Deleting an ODBC server is a cold admin task; the server restarts to reflect your changes.
Canceling a Request
You can cancel a request in the App Server Status page of the Admin Interface (Groups > group_name > App Servers > app_server_name > Status tab).
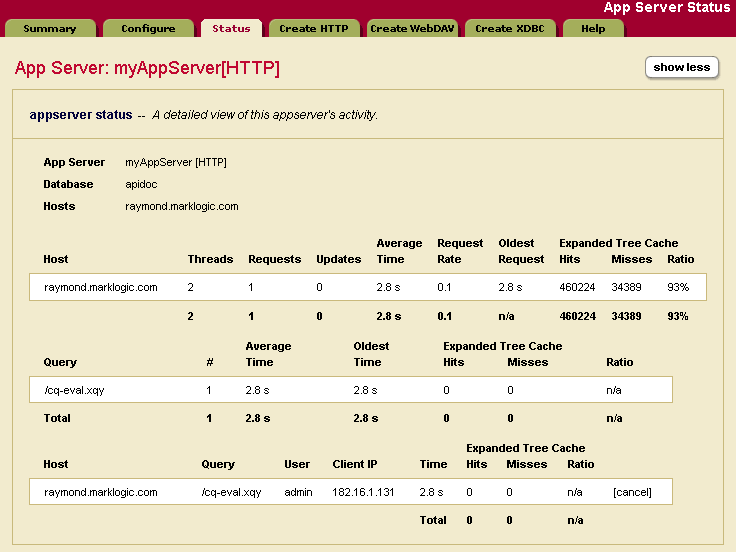
To cancel a long-running request (for example, a long-running query statement or update statement), perform the following steps:
- Click the Group menu item in the Admin Interface.
- Navigate to the App Server in which the request was issued, either from the tree menu or from the summary page.
- Click the Status tab.
- Click the Show More button.
- At the bottom right of the App Server Status page, click the cancel button on the row for the query you want to cancel.
- Click OK on the Cancel Request confirmation page. If the request is already completed when the confirmation page occurs, the page will indicate that the request cannot be found.
The request is canceled and the App Server Status page appears again.
ODBC Request Monitoring and Cancellation
Request monitoring is supported for the ODBC App server in MarkLogic 10.0-9 and later. The following ODBC meters will be recorded for ODBC Requests:
| Meter | Description |
|---|---|
| odbcRowsSent | The number of rows sent from the server over the network |
| odbcBytesSent | The total number of bytes sent from the server over the network |
Prior to this feature, the Modules database assigned to an ODBC server served no purpose. Now, a file named /default.api is looked for in the Modules root - whether that be the filesystem or a Modules database - and the configuration defined in that file is heeded to.
When a query comes in over ODBC, the odbcRowsSent and odbcBytesSent meters and their values are output in the ODBC App server request log, given that Request Monitoring is enabled in /default.api.
Request cancellation is now enabled for ODBC server as well. The /default.api will take in unsigned long values as limits for odbcRowsSent and odbcBytesSent. If the number of rows or bytes sent exceed the limits defined in /default.api, the sending of rows over the network ends prematurely and SQL-ODBCREQLIMIT is thrown. elapsedTime is also supported for cancellation, and XDMP-EXTIME is thrown if the time limit is exceeded. lockCount and readSize are not relevant for ODBC.
These values are purely e-node metrics, and are not recorded on any d-nodes.
With the following /default.api in the Modules root, a query will be cancelled if: