Administrator's Guide — Chapter 15
Fields Database Settings
This chapter describes how to configure fields in the database settings. Fields are used with the cts:field-word-query, cts:field-words, and cts:field-word-match APIs, as well as with the field lexicon APIs, and allow you to define a named field consisting of several elements over which you can search. The following topics are included in this chapter:
- Overview of Fields
- Understanding Field Configurations
- Field Word Lexicons and Field Value Lexicons
- Configuring Fields
This chapter describes how to use the Admin Interface to create and configure fields. For details on how to create and configure fields programmatically, see Adding a Database Field and Included Element in the Scripting Administrative Tasks Guide. For details on lexicons on fields, see Browsing With Lexicons in the Search Developer's Guide.
Overview of Fields
Fields provide a convenient mechanism for querying a portion of the database based on XML element QNames or JSON property names. Unlike collections or directories, which enable you to query portions of a database based on document URIs, fields enable you to query portions of a database based on XML element and JSON property names. This offers extra convenience for the application developer, and also offers a performance boost over other methods of querying a portion of the database. Fields are extremely useful when you have content in one or more elements or JSON properties that you want to query simply and efficiently as a single unit.
Field query is similar to word query (in its default configuration, with everything included), but instead of querying everything in the database, fields query only what is configured for the specified field. Fields have their own set of indexes, independent of the database indexes. Because fields have their own indexes, and a field is typically a small subset of the whole database, querying a field is often more efficient than querying those same XML element or JSON properties directly (with cts:word-query, for example).
Also, because fields have their own sets of indexes, relevance for fields is calculated based on the content in the field, not based on all of the content in the database. This provides finer-grain relevance for field searches than for other searches.
You can use fields to create portions of the content that you might want to query as a single unit. Additionally, you can configure a field with indexing options over and above the ones configured in the database. For example, consider a database containing many technical articles, each article containing a brief abstract. You might want to build an application that allows greater capabilities for searching through the abstracts than for searching through the rest of the articles. Assume your main content does not have wildcard indexes, but you want to be able to search through the abstracts using wildcard searches. You can create a field on the abstract, and then add wildcard indexes to that field. Because the field represents only a relatively small percentage of the content, the relative cost of the extra indexing is small.
Indexing of JSON and XML content differs slightly. This introduces differences in the behavior of field value queries and field range queries over the two types of content. For details, see How Field Queries Differ Between JSON and XML in the Application Developer's Guide.
Understanding Field Configurations
Field search of words and phrases in MarkLogic Server is based on the query constructor cts:field-word-query. You can control the behavior of these field searches by changing the database configuration for the field you query. You can exclude and/or include elements from path and root fields, and you can add extra indexing options for some elements. This section describes the options available in the configuration and includes the following parts:
- Overview of Field Configuration Options
- Root and Path Fields
- Metadata Fields
- Understanding the Index Option Configuration
Overview of Field Configuration Options
The following lists the main options you can set in the field query configuration to control how queries against the specified field are resolved:
- By default, no XML elements or JSON properties are included in the field query configuration and the indexing options are the same as the database indexing options. You must specify at least one element or property to include for the field to include anything.
- All field configurations are set on a per-database basis.
- The field configuration controls the behavior of the cts:field-word-query, cts:field-value-query, cts:field-range-query, cts:field-words, and cts:field-word-match APIs. This includes controlling the terms that get indexed as well as controlling the terms that are returned from the filter (evaluator) portion of query evaluation.
- Fields inherit the database index settings as a starting point for its index settings.
- You can add extra index options for each field. These added index options will not affect other queries (for example, cts:word-query, cts:element-word-query, cts:element-attribute-word-query, cts:json-property-word-query).
- If you check index options in a field that are enabled in the database, it will not change any behavior. However, if you subsequently disable a database index setting that is checked in the field setting, it will remain for the field.
- You can include and/or exclude named XML elements or JSON properties from path and root fields.
- For any XML element you include, you can optionally constrain it by a value for a specified XML element attribute.
- For any XML element or JSON property you include in a path or root field, you can optionally specify a weight. The weight is used when determining relevance scores, where a weight greater than 1.0 will boost scores and a weight lower than 1.0 will lower scores for matches within the element or property.
- Each field has its own set of indexes; it does not share the indexes with the word query indexes. Therefore, if you have a field with fewer elements than word query, there is a smaller amount of content to index and fewer I/O operations are needed to resolve the query from the indexes (index resolution phase of query processing).
There are three types of fields:
Root and Path fields are described in Root and Path Fields. Metadata fields are described in Metadata Fields.
Root and Path Fields
You can include and/or exclude elements from a root or path field. This is useful if you know you will never want to search some element content. This section describes how MarkLogic Server determines what content is included in the field and what is not when you include and/or exclude elements from the field configuration.
This section describes the options available in the configuration and includes the following parts:
- Root Fields
- Path Fields
- How Field Settings Determine What is Included and Excluded
- Adding a Weight to Boost or Lower the Relevance of an Included Element or Property
- Specifying An Attribute Value for an Included or Excluded Element
Root Fields
Root fields include and/or exclude document elements regardless of their relative positions in the document. In a root field, you can choose whether or not to include and exclude elements starting at the document root. By default, no element content (all text node children of elements) is included in a field.
Path Fields
In a path field, the included and excluded elements are constrained to the sub-tree identified by the path. For example, if the path for the field is /A/B/C, only elements in node C, such as A/B/C/D, A/B/C/D/E and /A/B/C/Z, are included or excluded from the field.
A path field may include one or more paths. Multiple paths are treated as the union of the paths. Consequently, each of them will identify a root of a field-instance in a given document.
If a path includes namespace prefixes on some elements, the namespaces must be defined in the same manner used for path range indexes, as described in Defining Namespace Prefixes Used in Path Range Indexes and Fields.
If a path for a field ends in a single node or an attribute, the include/exclude definitions are meaningless.
Each path is given a weight, which is used to boost or lower the relevance of text that is contributed by the path.
How Field Settings Determine What is Included and Excluded
Once you define a path or root field, you can select which document elements are included and excluded. When MarkLogic Server determines which elements to include/exclude, it walks the XML tree using the following rules (note that these are the same rules used for including/excluding elements in the word query configuration):
- Start at the root node of the document.
- If the field type is path, the explicitly included and excluded elements are constrained to the sub-tree identified by the path. All other elements are excluded.
- If the field type is root, and if the root element is included (either because it is explicitly included or because
include document rootis set to true), MarkLogic Server includes the immediate text node children of the document root element and then moves to its element children. If the root element is excluded, the text nodes are not included and MarkLogic Server moves down the XML tree to its element children. - If the parent element was included, MarkLogic Server keeps walking down the tree and including the text node children until it encounters an explicitly excluded element.
- If the parent element was not included, MarkLogic Server keeps walking down the tree, not including the text node children, until it encounters an explicitly included element.
- During this process, when an element is encountered that is neither included nor excluded, it inherits the included state (not included or included) from the parent element. MarkLogic Server keeps walking down the tree, including or not according to the state inherited from the parent element, until it encounters the next included element (if its parent is not included) or excluded element (if its parent is included).
- MarkLogic Server keeps walking down the XML tree using this logic to determine each element's included state, until it reaches the end of the document.
The only way to guarantee an element's text node children will be included (assuming you have any elements included and/or excluded) is to add it to the included list, and the only way to guarantee an element is not included is to add it to the excluded list.
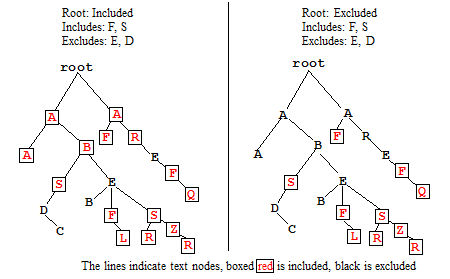
The following figure shows what is included for two possible root field configurations, one with the root node included and one with the root node excluded. Note that the includes and excludes are the same. The lines below the element names represent the text nodes, and the boxed red letters indicates that the content in the text node is included in word queries. The root represents the root node of an XML structure, with elements F and S included and elements E and D excluded. Elements that are not explicitly included or excluded (for example, A, B, and C) inherit from their parents.
Notice that the A, B, and R nodes, which is not explicitly included or excluded, sometimes is included and sometimes is not included, depending on the include state of its parent element.
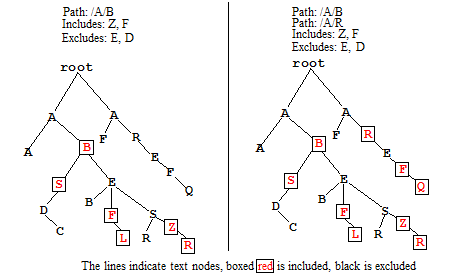
The following figure shows what is included for two possible path field configurations, one with a single path and the other with two paths. As with the previous figure for root field configurations, the includes and excludes are the same.
Adding a Weight to Boost or Lower the Relevance of an Included Element or Property
When you include an XML element or JSON property, one of the options is to add a weight to the included element or property specification. When you add a weight, all text in this element (including any text in all text node descendants of the element) are weighted by the specified value, changing the relevance at query time. Specifying a weight greater than 1.0 will boost scores and a weight lower than 1.0 will lower scores for matches within the element.
When you specify a weight, the term frequency for any tokens in that element (including tokens in descendant text nodes) is multiplied by that number. This happens during document load, update, or reindexing. For example, if you specify a weight of 2.0, each term will have a term frequency of 2.0, making it as if each term appeared twice (for score calculation purposes). Similarly, if you specify a weight of 0.5, each term will have a term frequency of 0.5.
Because the weight boosting affects term frequency, it will only affect relevance orders for scoring algorithms that include term frequency (for example, logtf/idf or logtf); scoring algorithms that do not consider weight will not be affected by these weights (for example, score-simple).
Adding a weight is useful to boost or lower scores on searches where the match occurs in a given element. For example, if you want matches in TITLE elements to contribute more towards the relevancy score than matches in other elements, you can specify a weight of 2.0 for the TITLE element. Conversely, if you want matches in TITLE elements to contribute less to the relevancy score than matches in other elements, you can specify a weight of 0.5 for the TITLE element. For details on how relevance is calculated, see the chapter Composing cts:query Expressions in the Search Developer's Guide.
If a field has two or more elements with different weights and, if one of those elements is a child of another element, then the weight of the parent element is used and the weight of the child element is ignored. For example, you have a field, named test, that includes elements A and B. A is given a weight of 10 and B is given a weight of 2. The returned results of a search query that includes cts:field-value-query("test",("Foo")), "unfiltered") will be computed based on a weight of 10 for the following document:
<A>
    <B>Foo</B>
</A>
Specifying An Attribute Value for an Included or Excluded Element
When you include an element, one of the options is to specify an attribute value. This option allows you to only include or exclude elements with a particular attribute/value pair. The attribute/value pair acts as a predicate on which to constrain the content. For example, consider the following XML snippet:
<chapter class="history">some text here</chapter>
<chapter class="mathematics">some more text here</chapter>
<chapter class="english">some other text here</chapter>
<chapter class="history">some different text here</chapter>
<chapter class="french">other text here</chapter>
<chapter class="linguistics">still other text here</chapter>
For the element chapter, if you specify the attribute/value pair of class and history, then only the following elements will be included:
<chapter class="history">some text here</chapter>
<chapter class="history">some different text here</chapter>
Similarly, you can specify an attribute value for an excluded element when you configure an excluded element.
Metadata Fields
Metadata fields are used by temporal documents to store valid and system timestamps and archival information, as described in the Temporal Developer's Guide. You can also use this capability to associate user-defined key-value metadata with non-temporal documents. Metadata fields are sometimes referred to as just metadata or as key-value metadata.
Metadata fields differ from root and path fields in that they do not define elements to be included or excluded from search. Instead, metadata fields define key/value combinations that are associated with a document, but stored outside of that document.
To search this type of metadata, you must explicitly create a field based on the metadata key you want to be able to search. For details on configuring a metadata field, see Configuring a New Metadata Field.
Metadata fields can be operated on using any API function that takes a field. For example, you can do all of the following operations on a metadata field:
- Query using a cts:field-word-query and cts:field-value-query function.
- Create a word lexicon on a metadata field and use it in a cts:field-words and cts:field-word-match function.
- Create a range index on a metadata field and use it in a cts:field-range-query, cts:field-values, cts:field-value-match, and cts:field-value-ranges function.
- Make a range index reference for a metadata field range index and use it in a cts:values, cts:value-match, cts:value-ranges, cts:value-co-occurrences, cts:value-tuples and
cts:orderingfunction. - Configure tokenizer-overrides.
- Configure stemmed-searches.
- Configure word-searches.
- Configure field-value-searches.
- Configure fast-phrase-searches.
- Configure fast-case-sensitive-searches.
- Configure fast-diacritic-sensitive-searches.
- Configure trailing-wildcard-searches.
- Configure three-character-searches.
- Configure two-character-searches.
- Configure one-character-searches.
Metadata for temporal documents is managed by the temporal APIs, as described in Managing Temporal Documents in the Temporal Developer's Guide. For non-temporal documents, metadata can be inserted along with the document by the xdmp.documentInsert or xdmp.documentLoad function. You can add or modify document metadata using the xdmp.documentPutMetadata and xdmp.documentSetMetadata functions. Document metadata can be returned using the xdmp.documentGetMetadata and xdmp.documentGetMetadataValue functions.
Metadata can also be associated with a document node. Node metadata is managed by means of the xdmp.nodeMetadata and xdmp.nodeMetadataValue functions.
Understanding the Index Option Configuration
The field configuration allows you to add some extra indexing options from the ones that are currently set in the database configuration. Adding any index options to the field configuration does not add those options to the element-based index options at the database level.
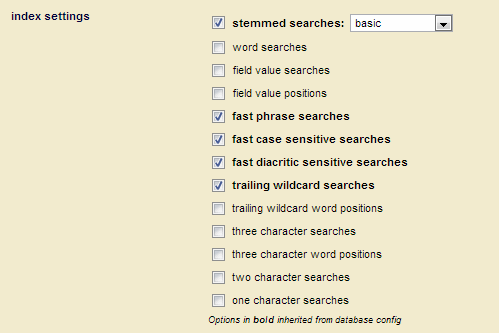
To add or remove a particular index option to a field, you check or uncheck the box corresponding to the index option. Adding any index options that are not enabled in the database configuration will cause new and updated documents to use the new indexing for the field, and will trigger a reindex operation if reindex enable is set to true in the database configuration.
Options that are enabled in the database configuration appear in bold in the field configuration. The field settings in the database configuration and the database field configuration are ORed together. For example, if you uncheck the box next to an option with bold-face type in the field configuration, it does not change the equivalent option in the database configuration. To disable a field setting for the database, both the database and field configurations for that option must be consistent.
Field Word Lexicons and Field Value Lexicons
As with word lexicons, you can create a word lexicon for each field. A field word lexicon is a list of all of the unique words in the database that occur in the field. The list is ordered in the specified collation. You can create multiple field lexicons on the same field with different collations. The field word lexicons are accessed with the cts:field-words and cts:field-word-match APIs.
As with element or attribute lexicons, you can create a value lexicon on a field. A field value lexicon is a list of all of the unique values in the database that occur in the field. To create a field value lexicon, define a field range index.
For more details about lexicons, see Browsing With Lexicons in the Search Developer's Guide.
Configuring Fields
This section provides procedures to create and modify field configurations in a database. For details on what the meaning of the various configuration options in fields, see Understanding Field Configurations. This section includes the following procedures:
- Configuring a New Path or Root Field
- Configuring a New Metadata Field
- Modifying an Existing Field
- Creating a Range Index on a Field
Configuring a New Path or Root Field
Use the Admin Interface to perform the following steps to add a new field configuration to a database.
- Navigate to and click the database for which you want to create a field, either from one of the summary tables or in the left tree menu.
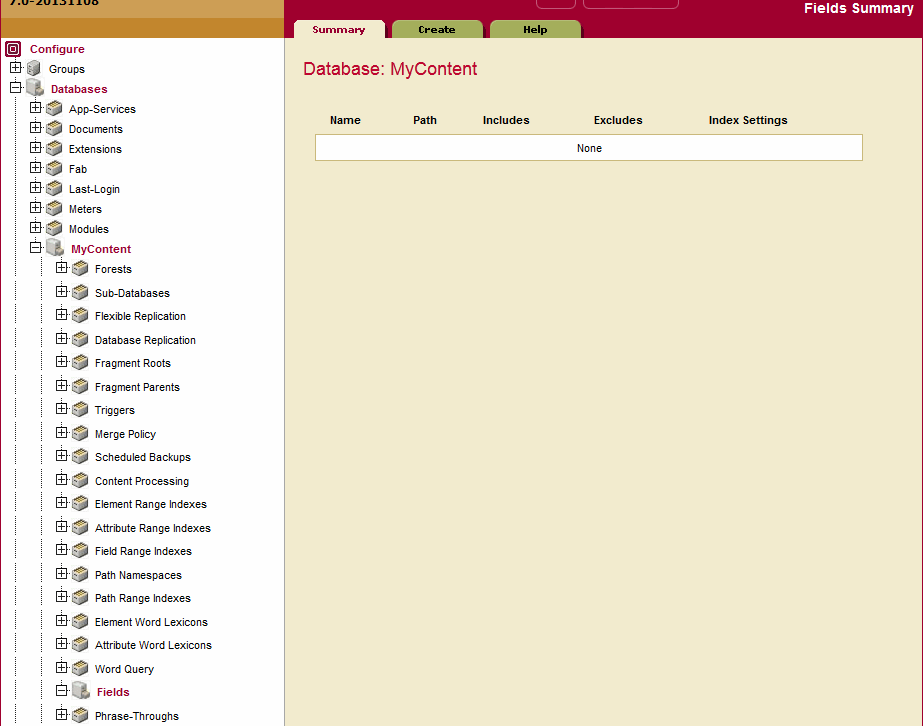
- Under the database in which you want to create the field, click the Fields link. The Field Summary page appears.
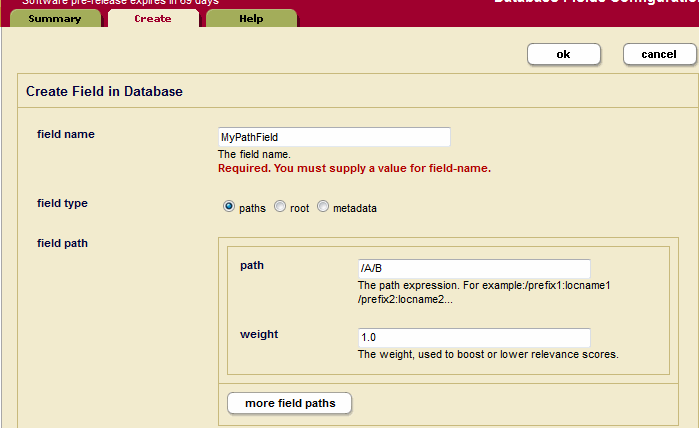
- Click the Create tab. The Create Field in Database page appears.
- Enter a name for the field.
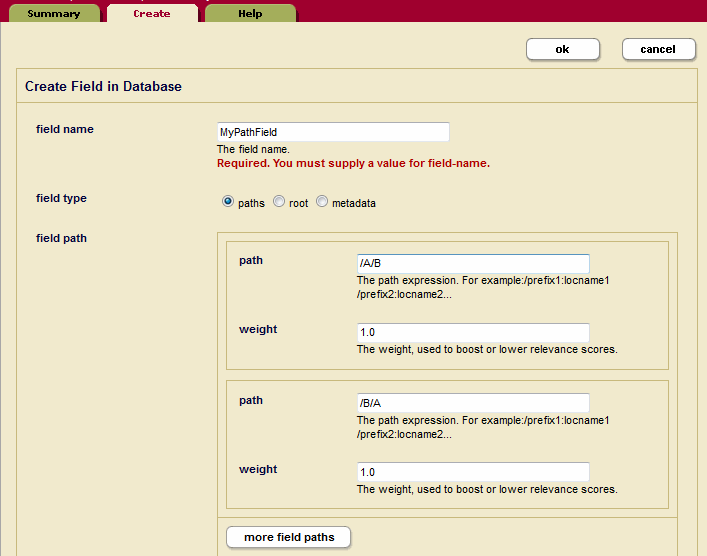
- By default, the field type is path. If creating a path field, enter the path expression. If you want to boost or lower the relevance contribution for matches within this path, specify a weight other than the default of 1.0. Weights greater than 1.0 will boost the relevance contribution and weights lower than 1.0 will lower the contribution. If you are defining multiple paths, click More Items.
- Enter as many paths as you need.
- [OPTIONAL] Create any Field Range Indexes or Tokenizer overrides. You can also go back and add these later.
- If you want the field to include any extra index options from the database, or if you want to remove some index options from the field, check or uncheck those index settings. Index settings shown in bold indicate the setting is inherited from the database setting. You can uncheck an inherited index setting to not inherit the setting from the database-level configuration. For details, see Understanding the Index Option Configuration.
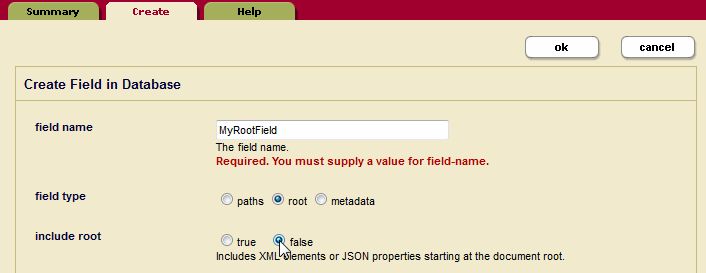
- Alternately, if creating a root field, set the field type to root. Note that in most cases, a path field will give you everything you need, and you are not likely to need to create a root field.
- If you want the root field to include the root element of the document, even if it is not explicitly included, click the
truebutton for include document root. Typically, you leave this set to the default offalse, unless your field will include most of the elements in the database. - Click OK. The configuration page with the field appears, adding the following parts to the bottom of the configuration page:
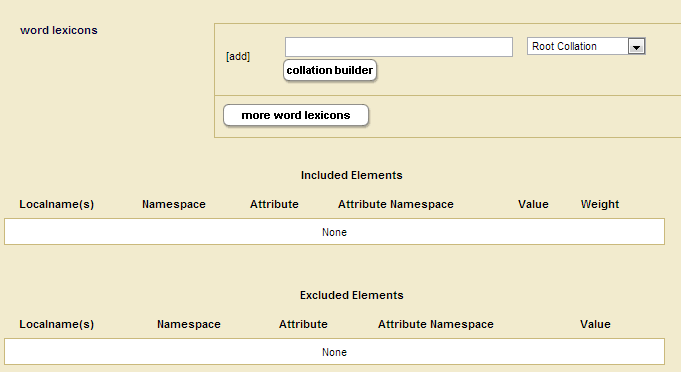
- If you want to add a word lexicon for the field, enter the collation URI next in the add text box. The URI for the UCA Default Collation,
http://marklogic.com/collation/, is useful for many applications. For details on collations, see the Language Support in MarkLogic Server chapter in the Search Developer's Guide. Click the OK button to add the field word lexicon (if you want to create one). If you want to create other field word lexicons with different collations, repeat this step specifying a different collation URI for the new lexicon. - Click the Includes tab to specify elements to include in the field.
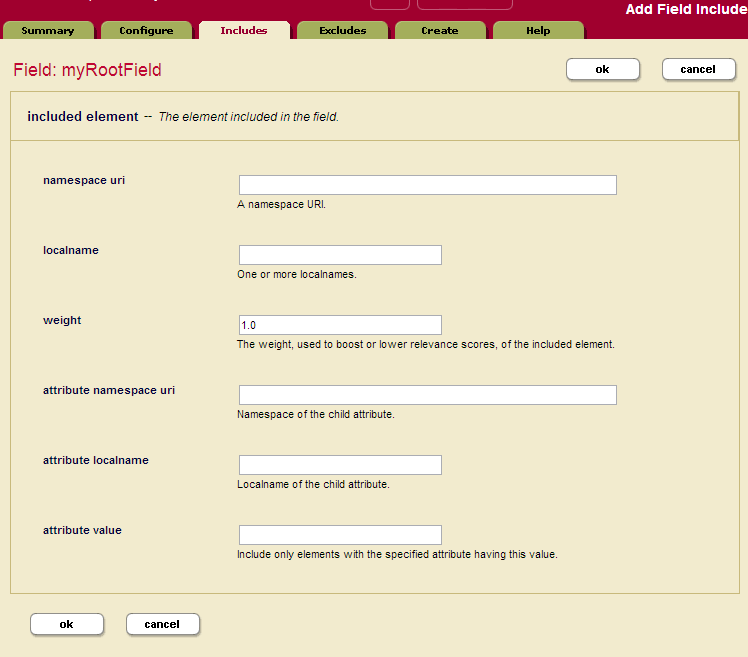
- On the Included Element page, specify a local name for the element to include. If the element is in a namespace, specify the namespace URI for the element to include.
- [OPTIONAL] If you want to boost or lower the relevance contribution for matches within this element, specify a weight other than the default of 1.0. Weights greater than 1.0 will boost the relevance contribution and weights lower than 1.0 will lower the contribution.
- [OPTIONAL] If you want to only include elements that have an attribute with a specified value, enter the attribute namespace URI (if needed), the attribute local name, and a value for the attribute. Then only elements containing attributes with the specified value will be included. You must specify the exact value; no wildcard characters are used.
- When you have specified everything for this element, click OK.
- Repeat steps 13 through 17 for each element you want to include.
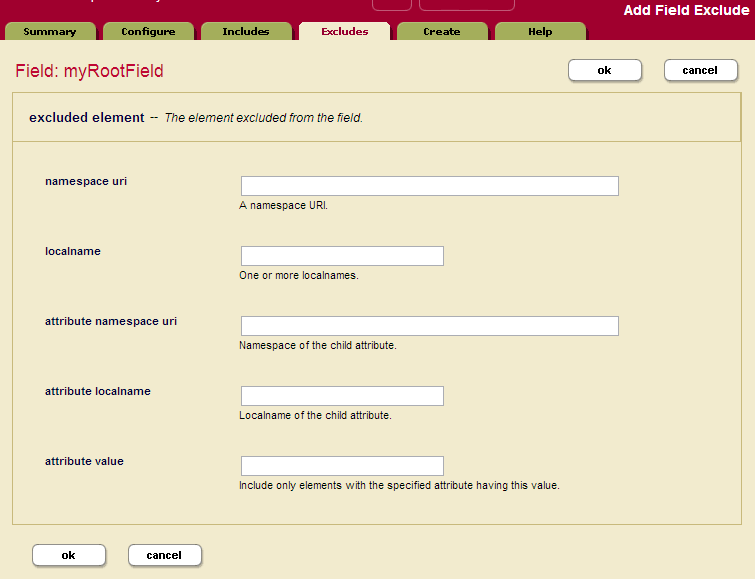
- If you want to exclude any elements from the field, click the Excludes tab.
- Enter the namespace URI (if needed) and the local name for the excluded element.
- [OPTIONAL] If you want to only exclude elements that have an attribute with a specified value, enter the attribute namespace URI (if needed), the attribute local name, and a value for the attribute. Then only elements containing attributes with the specified value will be excluded. You must specify the exact value; no wildcard characters are used.
- Click OK.
- Repeat steps 19 through 22 for each element you want to exclude.
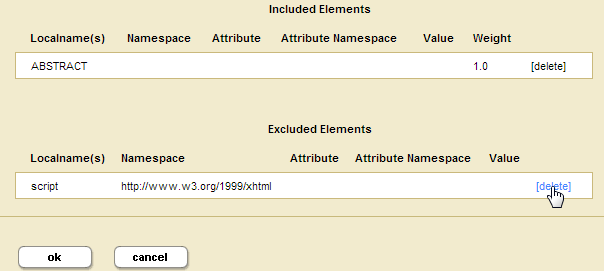
- You can delete any included or excluded fields from the tables at the bottom of the field configuration page.
Configuring a New Metadata Field
Use the Admin Interface to perform the following steps to add a new metadata field configuration to a database.
- Navigate to and click the database for which you want to create a field, either from one of the summary tables or in the left tree menu.
- Under the database in which you want to create the field, click the Fields link. The Field Summary page appears.
- Click the Create tab. The Create Field in Database page appears.
- Enter a name for the field.
- For field type, select metadata.
- If you want to add a word lexicon for the field, enter the collation URI next in the add text box. The URI for the UCA Default Collation,
http://marklogic.com/collation/, is useful for many applications. For details on collations, see the Language Support in MarkLogic Server chapter in the Search Developer's Guide. Click the OK button to add the field word lexicon (if you want to create one). If you want to create other field word lexicons with different collations, repeat this step specifying a different collation URI for the new lexicon. - [OPTIONAL] Create any Field Range Indexes or Tokenizer overrides. You can also go back and add these later.
- If you want the field to include any extra index options from the database, or if you want to remove some index options from the field, check or uncheck those index settings. Index settings shown in bold indicate the setting is inherited from the database setting. You can uncheck an inherited index setting to not inherit the setting from the database-level configuration. For details, see Understanding the Index Option Configuration.
The
field value positions,trailing wildcard word positions, andthree character word positionsoptions can be set, but they will have no effect on queries.
Modifying an Existing Field
Perform the following steps to modify an existing field:
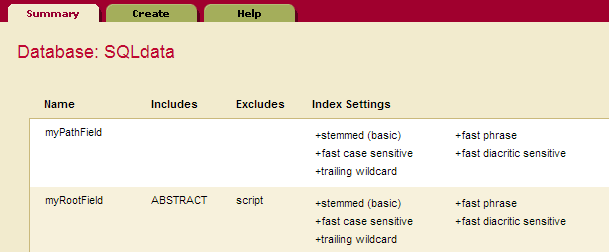
- To modify an existing field, click on the Fields link in the left tree menu. The Fields Summary page appears.
- Click on the name of the field you want to edit. The Field Configuration page appears.
- If you want to change any of the settings, make any desired modifications and click OK.
- The remainder of the procedure is the same as the previous procedure for creating a field, starting with step 12 to create a field word lexicon, and, in the case of path and root fields, continuing on to add/delete included and excluded elements.
Creating a Range Index on a Field
You can create a range index on a field for faster searches on the field data. You must first create a field before creating a range index on the field. The usual trade-offs between query speed and ingestion speed and server resources described in Understanding Range Indexes apply to field range index.
Perform the following steps to create a range index on a field:
- Navigate to and click the database for which you want to create a field range index, either from one of the summary tables or in the left tree menu.
- Click Field Range Index in the left tree menu.
- Click the Add tab. The Add Field Range Indexes page appears.
- Select the type for the range index.
- Enter the name of an existing field.
- Optionally, specify if you want the index to store position data. (Metadata fields are positionless, so position settings have no impact.)
- For Invalid Values, select
rejectto prevent the ingestion of documents with fields that do not match the type specified for the range index. Selectignoreto allow the ingestion of non-matching documents. - Click OK.
The index is created. If the reindexer enable setting is true for that database, then reindexing will begin immediately. The new index is not available for use in range and lexicon queries until the reindexing operation is complete.
