Upgrading an EC2 Instance
The process for performing a rolling upgrade in EC2 (AWS) is fairly simple. It is very similar to a normal update of the Cloud Formation templates. See Upgrading MarkLogic on AWS in the MarkLogic Server on Amazon Web Services (AWS) Guide for details about a normal update.
This example assumes an existing 3-node cluster running MarkLogic 8.0 from Cloud Formation templates. Before you upgrade your instance, you need to upgrade your Cloud Formation template to reference the new AMI (9.0 CF template). See MarkLogic on Amazon Web Services (AWS) for details about upgrading your templates.
Here are the additional steps:
Back up any important data before performing the upgrade.
Update the stack with your updated Cloud Formation template. Make sure the stack update is complete.

Note
We do not recommend that you automatically swap out the Cloud Formation template. Instead, make a copy of your existing template (if it contains the AMI IDs), edit just the AMI IDs, and then use that for the update. (If the AMI ID is passed as a parameter or other means, use those means).
In the EC2 dashboard, terminate one instance at a time and wait for it to be replaced with a new one. Starting with the “master” instance or node that contains the Security database. The host will automatically be restarted by the managed cluster feature.
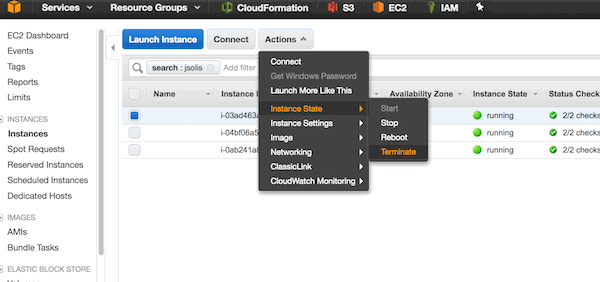
Wait for the host to come back up (with new host name).
In the EC2 dashboard, repeat the process and terminate node2.
When all nodes have been updated, check the cluster state from the Query Console using this query:
xquery version "1.0-ml";

  <hosts>{
  for $i in xdmp:host-name(xdmp:hosts())
    return (
       let $response := xdmp:http-get(concat("http://localhost:8002/manage/v2/hosts/",
         $i,"?view=status&format=json"),
        <options xmlns="xdmp:http">
          <authentication method="digest">
            <username>admin</username>
            <password>admin</password>
          </authentication>
          <headers>
            <content-type>application/json</content-type>
          </headers>
        </options>)
        return (
          <host>
          <name>{$response[2]//*:name/data()}</name>
          <host-software-version>
          {$response[2]//*:software-version/value/data()}
            </host-software-version>
          <cluster-effective-version>{$response[2]//*:
             effective-version/value/data()}
           </cluster-effective-version>
          </host>
        ) ) }</hosts>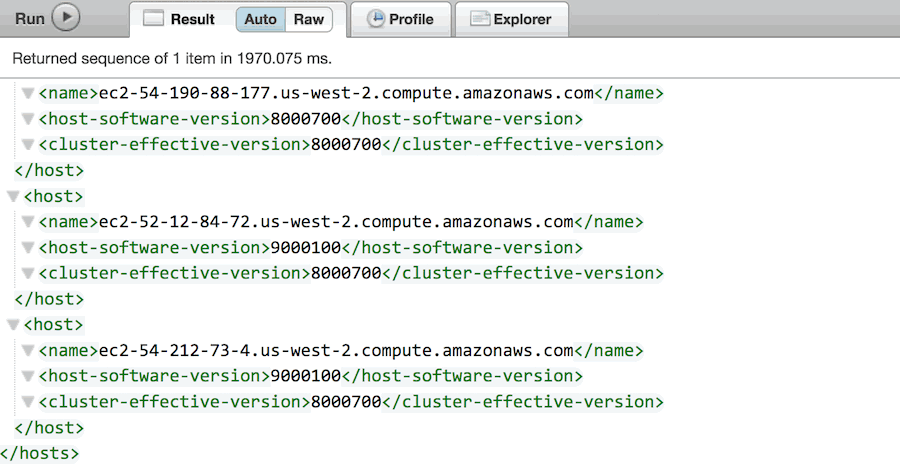
Make a call from 8001 to check host status. The URL pattern to check this is
http://{ec2-hostname}:8001/host-summary.xqy?section=host.When the node3 update is complete, check to verify that the upgrade is complete by checking the cluster effective version:
xquery version "1.0-ml";

  <hosts>{
	  for $i in xdmp:host-name(xdmp:hosts())
    return (
       let $response := xdmp:http-get(concat("http://localhost:8002/manage/v2/hosts/",
        $i,"?view=status&format=json"),
        <options xmlns="xdmp:http">
          <authentication method="digest">
            <username>admin</username>
            <password>admin</password>
          </authentication>
          <headers>
            <content-type>application/json</content-type>
          </headers>
        </options>)
        return (
          <host>
          <name>{$response[2]//*:name/data()}</name>
          <host-software-version>
          {$response[2]//*:software-version/value/data()}
          </host-software-version>
          <cluster-effective-version>
          {$response[2]//*:effective-version/value/data()}
          </cluster-effective-version>
          </host>
        )
    )
    }</hosts>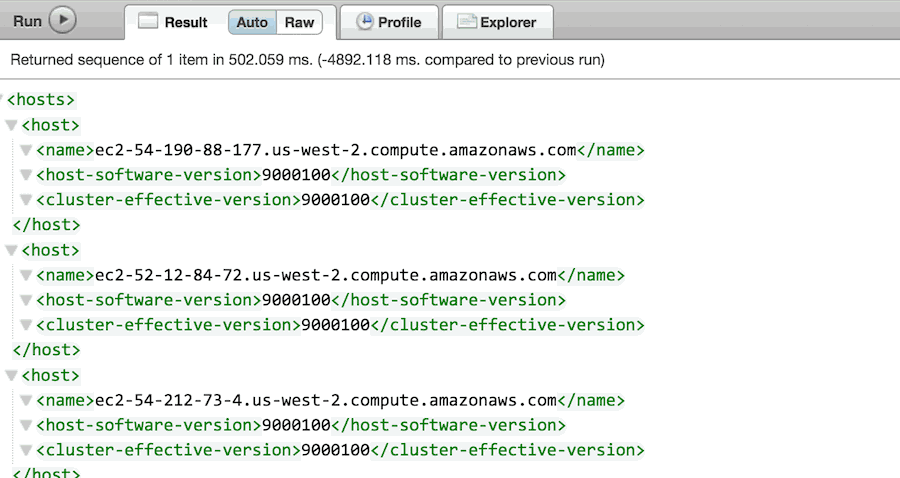
Navigating anywhere in the Admin Interface will prompt you to upgrade your Security database. To upgrade the Security database, go to
http://{ec2-hostname}:8001/security-upgrade.xqy. When that has been done, then the upgrade is complete.