MarkLogic Server 11.0 Product DocumentationFlexible Replication Guide — Chapter 3
Configuring Replication
This chapter describes how to configure your MarkLogic Servers for replication. The topics in this chapter assume you are familiar with the replication principles described in Understanding Flexible Replication and the basic configuration procedures described in the Flexible Replication Quick Start.
For details on how to write scripts to configure Flexible Replication, see Scripting Flexible Replication Configuration in the Scripting Administrative Tasks Guide.
This chapter includes the following sections:
- Replication Security
- Defining Replicated Domains
- Configuring Replication App Servers
- Configuring Push Replication
- Creating a Scheduled Replication Task
- Configuring Pull Replication
- Configuring Alerting With Flexible Replication
- Backing Up, Restoring, and Clearing the Master and Replica Databases
Replication Security
The flexrep-admin role is required to configure replication. The user who will access the Replica App Server when pushing, or access the Master App Server when pulling, requires the flexrep-user role. Though you will typically configure replication as the Admin user, you should create a unique replication user to be associated with the replication tasks. The replication user must be given the flexrep-user role and have the privileges necessary to update the domain content on both the Master and Replica App Servers.
If you configure your replication target to use any of the security schemes described in this section, the Target URL must start with https.
It is a best practice to create a secure credential, as described in Secure Credentials in the Security Guide, to communicate with the replication target. To do so, select the name of the secure credential from the credential id menu.
As an alternative to secure credentials and mostly to provide backward compatibility with previous versions of MarkLogic, you can configure SSL on your Master and Replica App Servers to encrypt the replicated data passed between them. For details on configuring SSL on App Server, see the Configuring SSL on App Servers in the Security Guide.
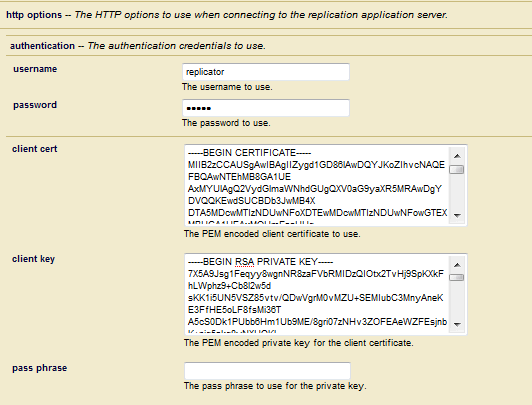
If SSL on the Replica App Server is configured to require a client certificate from the Master, paste the PEM-encoded client certificate and client key in the fields located at the bottom of the Database Replication Target Administration page. If the client key is encrypted, you must also specify a pass phase.
The same security configuration applies when configuring the Replica App Server for pull replication, if the Master App Server requires a client certificate from the Replica. For details on how to configure pull replication, see Creating a Pull Replication Task
Defining Replicated Domains
Before you can define replicated domains, you must enable CPF as described in Configuring a Flexible Replication Pipeline for the Master Database.
CPF domains are described in detail in the Understanding and Using Domains chapter in the Content Processing Framework Guide. The purpose of this section is to describe how to create a domain that defines the scope of the documents in the Master database to be replicated to the Replica database.
Each domain must contain a unique set of documents. No single document can be in more than one domain.
The following procedure describes how to create a new domain for defining the scope of the replicated documents. By default, CPF creates a Default Master domain to replicate from the / root directory of the Master database. The / root means that the document URIs must be preceded by a /, such as /foo.xml or /content/foo.xml. You can also set the Document Scope of the domain to replicate a user collection or an individual document.
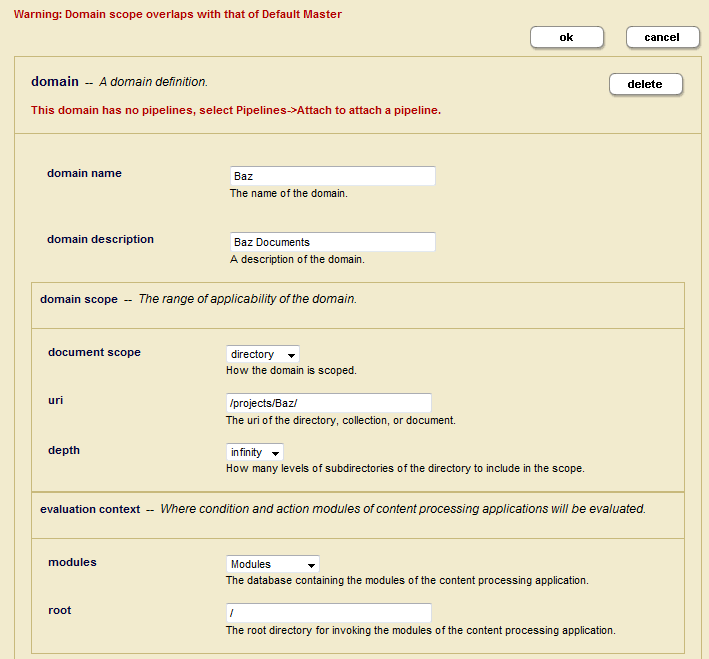
- To replicate a portion of a database, you can create another domain. For example, you can create a domain that specifies the documents in the
/projects/Baz/directory on the Master database, as shown below.You may receive a warning that this domain overlaps with the Default Master domain. This means that the both the Baz domain and the Default Master domain are configured to replicate the documents in the
/projects/Baz/directory. You cannot have any document that is in more than one domain, so you must either delete or modify the Default Master to resolve this conflict.If you want to create a domain to replicate the entire database, you can assign a default collection to all of your users and then set the Document Scope to Collections and the URI to the name of the default collection. For details on how to establish a default collection for a user, see Creating a User in the Administrator's Guide.
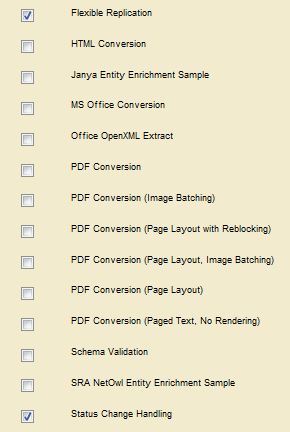
- Select Pipelines in the navigation frame and select the Flexible Replication and Status Change Handling pipelines. These are the minimum pipelines required for replication. You can select other pipelines, as required for your configuration.
Configuring Replication App Servers
As described in Creating a Replication App Server, in a push replication configuration, the Replica database must be connected to a Replication App Server. In a pull replication configuration, the Master database must be connected to a Replication App Server. This section goes into more detail on creating and configuring Replication App Servers.
- Create a Replication App Server by clicking Create in the Application Server section of the Flexible Replication Administration page:
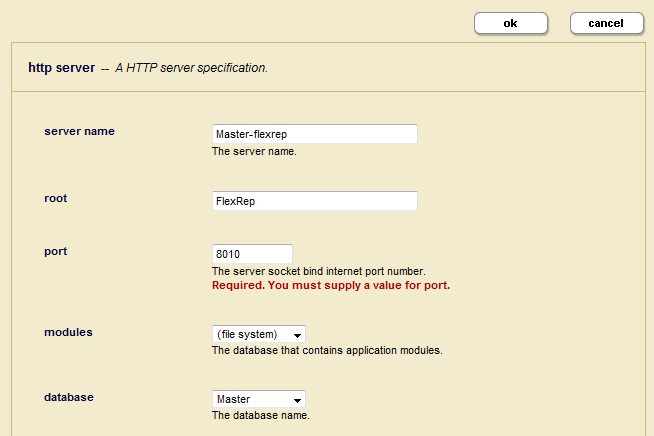
The Server Name, Root, and Database fields are preconfigured and should not be changed.
- Enter a unique port number for the App Server:
The purpose of the other fields in the HTTP Server Configuration page are described in Creating a New HTTP Server in the Administrator's Guide. If you are going to configure SSL on the App Server to require a client certificate, you must specify the certificate in the Database Replication Target Administration configuration page, as described in Replication Security.
For example, if you are configuring the Master database to push updates to a Replica App Server that requires a client certificate, you must include a client certificate in the Database Replication Target Administration configuration page for the Master database. If you are configuring a Replica App Server to pull updates from the Master database that requires a client certificate, you must you must include a client certificate in the Replication Pull configuration page for the Replica database. For details on providing a client certificate for either a push or pull replication configuration, see Replication Security.
Configuring Push Replication
This section describes how to configure your Master database for Push Replication.
Before you can configure a replication target, you must have content processing enabled for the Master database. After configuring push replication, you must create a scheduled task, as described in Creating a Push-Local-Forests Replication Task.
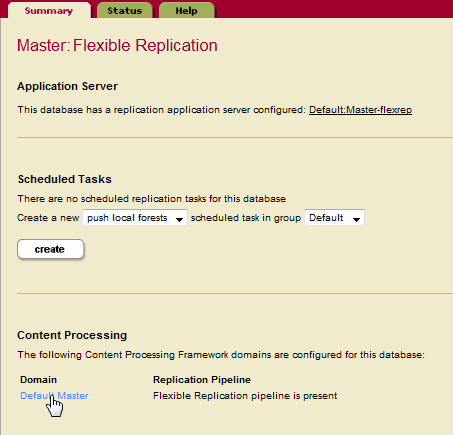
- Under Databases, click the Master database.
- Click Flexible Replication under the Master database.
- Locate the Content Processing section on the Flexible Replication Administration page and click on the domain name.
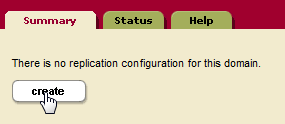
- Click Create to configure replication for the domain:
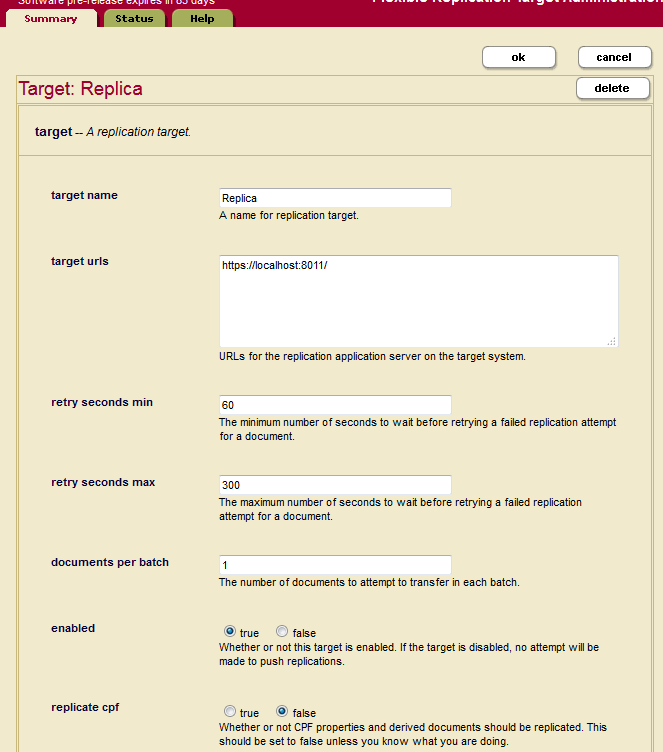
- Click Create to configure a replication target for the domain:
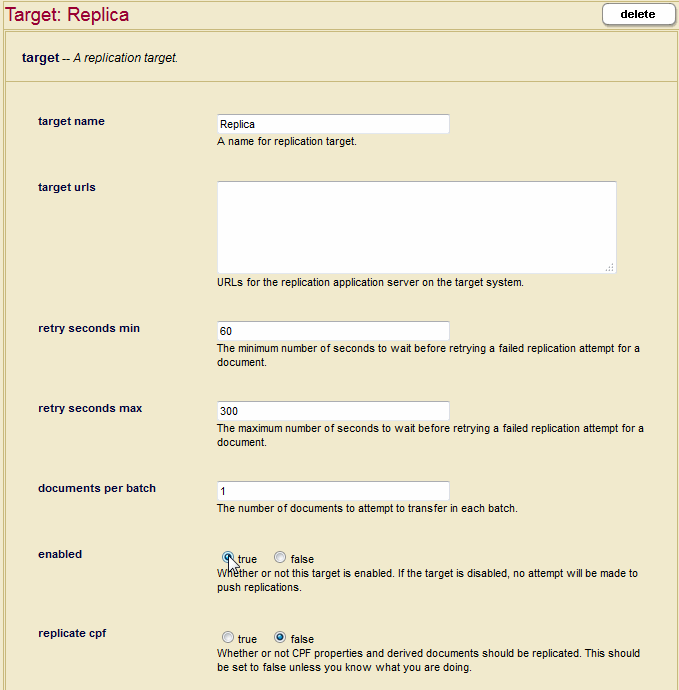
- In the Database Replication Target Administration page, specify a target name and one or more target URLs that include the hostname and port number you specified for your Replica App Servers in Creating a Replication App Server. The Retry Seconds Min/Max and Documents Per Batch setting are for scheduled tasks, as described in Creating a Scheduled Replication Task.
Under Authentication, specify the username and password for a user assigned the
flexrep-userrole. This user must have the same username/password as the user on the Master App Server who creates and updates the documents. This user needs to have sufficient permissions on the target system to insert and update the replicated documents.Because Flexible Replication passes through the permissions set on the Master App Server when replicating, the user on the target must have permissions to update the document later on. Permissions can either be configured by the administrator on both the Master and Replica App Server, or you can use a filter to adjust the document permissions so the target user can later update the document, as described in Adding Document Permissions.
You can optionally disable pushing replication to the target by setting
Enabledtofalse. Do not set theReplicate CPFoption totruewithout the direction from MarkLogic Customer Support. - If the Replica App Server requires a client certificate, the Target URL must start with HTTPS. Paste the client certificate, client key and pass phrase (if the client key is encrypted) in the fields located at the bottom of the Database Replication Target Administration page. For details on how to configure the Master to provide a client certificate, see Replication Security.
Creating a Scheduled Replication Task
Regardless of whether you configure replication as push or pull, you must create a scheduled task to periodically replicate updated content on the Master to the Replicas. A scheduled replication task does the following:
- Moves existing content that was on the Master before replication was configured (zero-day replication).
- Provides a retry mechanism in the event the initial replication fails.
- Replicates deletes on the Master to the Replica.
- Provides the ability to pull data from a Master server located outside a firewall.
There are three types of scheduled tasks, as described in the table below.
For all scheduled replication tasks, the replication retry configuration is a combination of the scheduled task frequency settings and the target settings, Retry Seconds Min, Retry Seconds Max, and Document Per Batch.
The task type in the Scheduled Task Configuration page indicates the interval at which each scheduled replication task is to run. In most configurations, the task type will be minutely. For details on configuring scheduled tasks, see Scheduling Tasks in the Administrator's Guide.
The Retry Seconds Min/Max settings in the Database Replication Target Administration page indicate the minimum and maximum number of seconds any documents that failed to replicate are eligible for replication retries. In a push configuration, the Documents Per Batch setting specifies how many documents that have failed to replicate are to be retried during each scheduled task interval. In a pull configuration, the Documents Per Batch setting specifies the total number of replicated documents (retries of failed documents and newly added or updated documents) that are to be pulled from the Master during each scheduled task interval.
For example, the retry minimum is 30 seconds, the retry maximum is 300 seconds (five minutes) and the scheduled replication task period is every one minute. If a document fails replication, it is eligible to be retried in 30 seconds. This means that MarkLogic Server will attempt to replicate the document at the next minute interval. The retry interval is doubled each time the document fails to replicate until the interval reaches the maximum retry setting, at which time the retry interval remains at the maximum. So, if the document in our example fails a second time, it will be eligible for retry in one minute. Should the document fail to replicate the second time, the retry interval is set to two minutes, and so on until the interval reaches the five-minute retry maximum setting, after which MarkLogic Server tries to replicate the document every five minutes.
The Documents Per Batch setting also plays a role with replication retries. For example, if the batch value is one and five documents have failed to replicate, then MarkLogic Server will only attempt to retry one failed document that is eligible for replication retries during each scheduled task interval. The document selected for replication retry is the earliest eligible document.
Though the Documents Per Batch setting is 1 by default, a more typical value is in the range of 10 - 100. If there is a large number of documents to be replicated in a zero-day fashion, you can maximize the load speed by closely matching the scheduled interval with the Documents Per Batch setting, so that the maximum number of documents are loaded within the time interval. For example, if your scheduled interval is one minute and you have determined that you can replicate a maximum of 250 documents per minute, then the optimum Documents Per Batch setting would be 250.
When a flexible replication domain includes multiple targets, the scheduled task will use the smallest of the configured Documents per Batch settings. So if one target has Documents per Batch set to 1, and another has Documents per Batch set to 100, the scheduled task will use a batch size of 1.
Creating a Push-Local-Forests Replication Task
This section describes how to configure a push-local-forests replication task to provide the Master with the means to replicate deletes to the Replica, retry replication on documents that have failed the initial attempt to replicate, and to replicate documents that were in the replicated domain before replication was configured.
A scheduled push-local-forests task should be run by a user assigned the flexrep-admin role or the admin role.
Do the following to create a push-local-forests scheduled replication task:
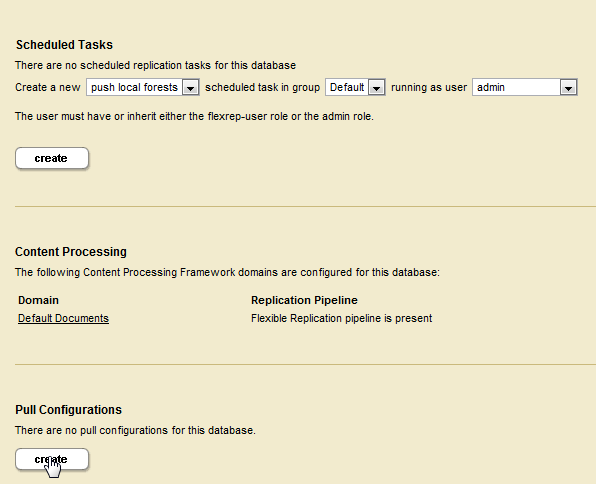
- For the Master database, navigate to Flexible Replication, select push local forests in the drop-down menu, select the group in which you want to schedule the task, and click Create under Scheduled Tasks:
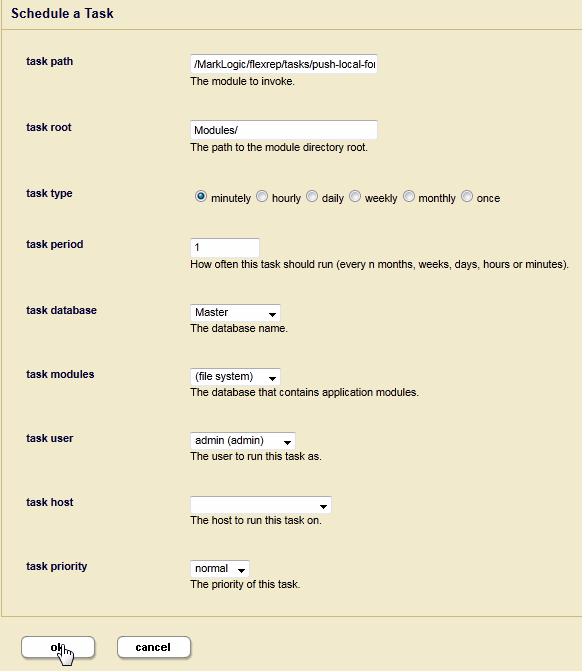
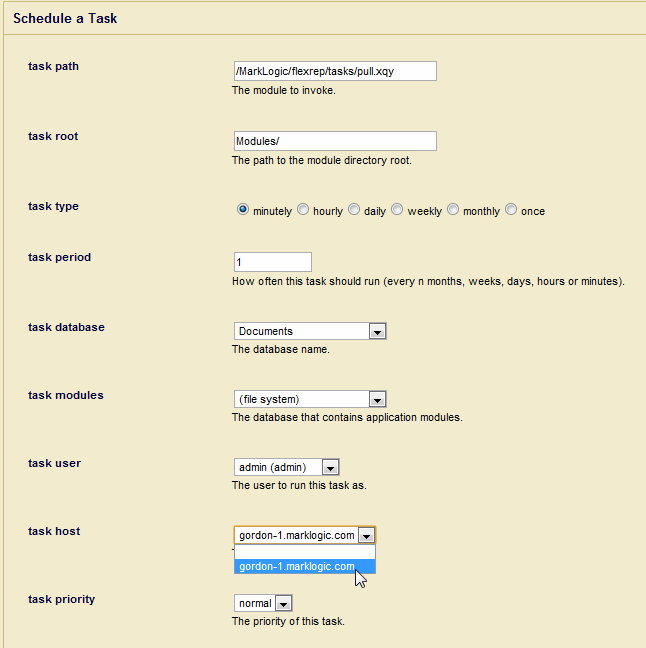
- Create a Scheduled Task that defines the frequency in which documents are to be replicated from the Master to the Replica (when using push-local-forests, this interval only defines the timeframe to wait before pushing the initial batch). You must also specify the task user.
Do not specify a host if you are creating a push-local-forests scheduled task.
Creating a Pull Replication Task
In a pull replication configuration, the Replicas pull updates from the Master. Unlike push replication, which replicates as soon as the documents on the Master are updated, the only way to configure pull replication is by means of a scheduled task.
- On the Replica, create a scheduled task to pull the content from the Master:
- Specify the pull frequency. In the task user pull-down menu, select the user with the
flexrep-userrole on a Replica host. Under task host, select a Replica host or leave the field empty so the task can run on any host in the cluster. Click OK.
Configuring Pull Replication
Pull Replication is useful when a Replica is behind a firewall that only allows its internal servers to pull from a Master server outside the firewall. This section describes how to configure your Replica database for Pull Replication.
If the Replica is to act as a Master for another Replica, then you must have CPF enabled on the Replica, as described in Configuring a Flexible Replication Pipeline for the Master Database. However, if the Replica has CPF installed and it is not to act as a Master, then you must disable the Flexible Replication pipeline on the Replica.
The procedure for configuring Pull Replication on the Master and Replica databases is as follows:
- On a Master host, define a replication target for the Master Content Processing Domain with push replication disabled. You can do this by either not defining a target URL in the target configuration page and enabling the replication target.
- Under Databases, click the Replica database.
- Click Flexible Replication under the Replica database.
- Create a Pull Replication Task, as described in Creating a Pull Replication Task.
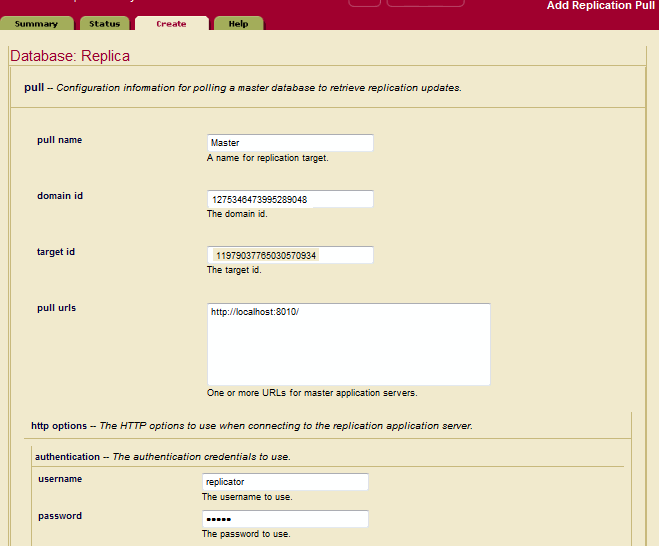
- Under Pull Configuration, click Create:
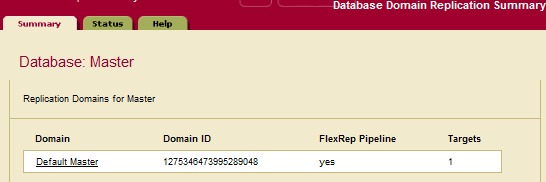
- On a Master host, obtain the Master domain id from the Database Domain Replication Summary page:
- On a Master host, obtain the Replica target id from the Database Domain Replication Administration page. If a Replica target does not exist, create one, as described in Configuring Push Replication, Step 5.
- In the Replication Pull Administration page on the Replica host, enter a pull name, the domain id of the Master, the target id of the Replica, and one or more pull URLs for the Master App Servers. Fill in the username and password fields required to access the Master App Servers.
- You can optionally specify a client certificate, if one is required by the Master App Server. For details on how to configure the Replica to provide a client certificate, see Replication Security.
Configuring Alerting With Flexible Replication
Combining alerting with flexible replication is often referred to as QBFR (Query-Based Flexible Replication). Query-based flexible replication enables customizable information sharing (using filters) between systems, allowing for the easy and secure distribution of portions of data even across disconnected, intermittent, and latent networks.
This type of replication is based on a query (an alert) that triggers because of an event that matches that query. A user can have more than one alert, in which case they would receive documents that match any of their alerts. In addition to queries, the permissions for a user are taken into account. The user will only receive replicated content that they have permission to view in the database. If the permissions change, the replica will be updated accordingly. Most often query-based flexible replication is a pull configuration, but it can also be set up as a push configuration.
By setting up alerts, replication takes place any time content in the database matches that query. Any new or updated content within the domain scope will cause all matching rules or alerts to perform their corresponding action. Query-based flexible replication can be used with filters to share specific documents or parts of documents. Filters can be set up in either a push or pull configuration.
To set up query-based flexible replication, you need to have the environment for flexible replication already configured. See Flexible Replication Quick Start for information on setting up flexible replication using the Admin UI. Configuring Query-based Replication using the REST API in the Scripting Administrative Tasks Guide explains how to set up query-based flexible replication including alerts using scripting and REST.
QBFR users should have the flexrep-user role. QBFR targets will only replicate documents for which the associated user has read permission, as in normal MarkLogic security. Your configuration will most likely have additional or more complex permissions on documents.
This section contains these topics:
Configuring Alerts
Query-based flexible replication requires an alert to trigger the replication. These steps use XQuery to access MarkLogic built-in functions to create and configure alerts. To see the complete scripted version of this process, see Configuring Query-based Replication using the REST API in the Scripting Administrative Tasks Guide.
To configure an alert for query-based flexible replication you need to:
- Create an alerting domain using alert:make-config
- Create an alerting action using alert:make-action
- Associate flexible replication with the alerting domain using flexrep:configuration-set-alerting-uri
After the flexible replication, alerting domain, alerting action, and alert(s) have been set up, you associate the target of the alert with a user and create an alerting rule.
- Associate the target of the alert with a user using flexrep:configuration-target-set-user-id
- Create an alerting rule with alert:make-rule
This section includes examples of these tasks using XQuery. See Configuring Query-based Replication using the REST API in the Scripting Administrative Tasks Guide for a complete scripting example using REST.
Create an Alerting Domain
Once you have your flexible replication environment configured, to set up query-based flexible replication you need to create an alerting domain. This example uses alert:make-config to create an alerting domain named http://acme.com/alerting containing alerting rules for query-based flexrep and then alert:config-insert is used to add it to the acme.com alert configuration:
xquery version "1.0-ml";
import module namespace alert = "http://marklogic.com/xdmp/alert"
  at "/MarkLogic/alert.xqy";
alert:config-insert(
  alert:make-config(
    "http://acme.com/alerting",
    "qbfr", "alerting rules for query-based flexrep",
<alert:options/>))
Create an Alerting Action
Next you would create an alerting action using alert:make-action. This example creates an alerting action named log:
xquery version "1.0-ml";
import module namespace alert = "http://marklogic.com/xdmp/alert"
  at "/MarkLogic/alert.xqy";
alert:action-insert("http://acme.com/alerting",
  alert:make-action(
    "log", "QBFR log action",
    xdmp:database("master-modules"), "/", "/log.xqy",
<alert:options/>))'
Traditional alerting in MarkLogic requires that log.xqy exist in the modules database so it can be called when the alert triggers. For QBFR log.xqy will not be called and therefore does not actually need to exist.
Associate Flexible Replication with the Alerting Configuration
Next you need to associated the alerting configuration with a CPF domain. Use flexrep:configuration-set-alerting-uri to associate the configure domain (my-cpf-domain in this example) to be used for flexible replication.
xquery version "1.0-ml";
import module namespace alert = "http://marklogic.com/xdmp/alert"
  at "/MarkLogic/alert.xqy";
let $domain := "my-cpf-domain"
let $cfg := flexrep:configuration-get($domain, fn:true())
let $domain-id :=
flexrep:configuration-insert(
  flexrep:configuration-set-alerting-uri($cfg,
    flexrep:domain-alerting-uri($domain-id)))
Associate the Target With a User
Once alerting has been set up, the next step is to associate the QBFR target with a user using flexrep:configuration-target-set-user-id.
xquery version "1.0-ml";
import module namespace flexrep =   "http://marklogic.com/xdmp/flexible-replication"
  at "/MarkLogic/flexrep.xqy";
let $domain := "my-cpf-domain"
let $cfg := flexrep:configuration-get($domain, fn:true())
let $target-id := flexrep:configuration-target-get-id($cfg, "QBFR target")
let $user-id := xdmp:user("User1")
flexrep:configuration-insert(
  flexrep:configuration-target-set-user-id(
$cfg, $target-id, $user-id))
The user can also be configured with flexrep:target-create when creating the target.
Create an Alerting Rule
The next step is to create an alerting rule for the replication using alert:make-rule. This example uses alert:make-rule to create an alert that says if any new content contains the words dna or rna send an email alert to me@somedomain.com.
xquery version "1.0-ml";
import module namespace alert = "http://marklogic.com/xdmp/alert"
  at "/MarkLogic/alert.xqy";
alert:make-rule(
  "nucleic acids email",
  "Alert me to anything concerning nucleic acids",
  0,
  cts:or-query((
    cts:word-query("dna"),
    cts:word-query("rna")
   )),
  "email",
  <alert:options>
    <alert:email-address>me@somedomain.com</alert:email-address>
  </alert:options>
)
See Configuring Query-based Replication using the REST API in the Scripting Administrative Tasks Guide for a complete scripting example, including how to create an alerting rule. For more details about creating an alert, see Creating Alerting Applications in the Search Developer's Guide.
Using QBFR
Query-based flexible replication is useful in circumstances where you need to share specific information (documentation, photographs, and so on) with many others in different locations. to improve security or reliability, flexible replication allows data to be transformed and filtered before replication. This enables control of what documents or parts of documents are shared, or how data should be presented. In remote locations you might have disconnected devices or intermittent connectivity, so a pull setup will be more effective.
Query-based flexible replication enables people in the field to have access to specific, targeted information in a timely manner, be able to update or add to that information, and then replicate the results back to headquarters, with all the security and reliability provided by MarkLogic. For example, geologists for oil and gas companies can take information that they need with them to remote locations, perform field analysis, take pictures, write up reports, and share that information when they reconnect to the network.
Safety inspectors could perform a quick search online to acquire the exact information they need to inspect a certain location and replicate the data to a laptop. When the on-site inspection has been performed, analysis and information can be updated locally. Once connection to the network has been established, the results are replicated and shared back the main office.
Researchers working in different company locations can share large data sets of information, with fast local access and the ability to independently update the data. The information can then be aggregated and shared, as appropriate, with others throughout the company.
QBFR does not guarantee the order in which documents will arrive, it only guarrantees that the final version will arrive.
With a push configuration, if the devices are disconnected, the server will continue to retry the operation to send the information. You could end up with a document error condition if you have too many retries in a row. The flexrep:document-reset function can be used to clear the error condition and schedule replication of the document. You can use flexrep:domain-target-status to query for documents that have had an error in replication.
Backing Up, Restoring, and Clearing the Master and Replica Databases
The configuration for flexible replication is stored in the Master and Replica databases. Clearing a Master database has the effect of deleting the target configurations, as well as all document-level information about target replication status. When you backup a Master database, you are also saving the replication configuration information. Should you restore that database to another cluster, the flexible replication configuration will also be present for the database in that cluster. Should you restore a database that is not configured for replication to one that was previously configured for replication, the replication configuration will be lost.
Before clearing or restoring a Master database, you can save the replication configuration by calling the flexrep:configuration-getfunction. Once the Master is cleared or restored, the replication configuration can be restored using the flexrep:configuration-insert function. Alternatively you can recreate the replication configuration programmatically, as described in Scripting Flexible Replication Configuration in the Scripting Administrative Tasks Guide.
Clearing a Replica database impacts the Master in that it no longer understands the status of the target. The same issues related to backing up and restoring the Master database described above also apply to backing up and restoring the Replica database. If the target status is lost on the Replica, new updates will replicate to the target, but the Master will not know that the older, unchanged documents are missing. Before clearing or restoring a Replica database, disable replication. After clearing or restoring the Replica database, delete the existing target on the Master, create a new target with the same configuration as the old one, and re-enable replication. The scheduled task will gradually populate the new target's database with all the documents in the domain.
If you have pull replication configured on the Replica, then you can save the configuration by calling the flexrep:pull-get function before clearing the database. After clearing or restoring the Replica database, you can restore the pull replication configuration by calling the flexrep:pull-insertfunction.
Interrupted replication
In flexible replication, a large binary is replicated in chunks to the replica. In normal circumstances, when all chunks are replicated, the replica will reassemble these chunks back into one large binary. If the master dies while replicating some of the chunks, the chunks that were already replicated will be left on the replica. When the master comes back online again, the process will resume.
In some cases the master may be permanently removed while the chunks are being replicated. To reclaim disk space, you can use the timestamp of the binary chunks to find and remove them. The flexrep:binary-chunk-uris(ts as xs:dateTime)function returns the URIs of all binary chunks that are older than the given wall clock time. This will list all of the binary chunks that are older than the time specified by ts.
xquery version "1.0-ml";
import module namespace flexrep = "http://marklogic.com/xdmp/flexible-replication"
  at "/MarkLogic/flexrep.xqy";
  flexrep:binary-chunk-uris(xs:dateTime("2014-10-01T08:00:00"))
  (: Returns the URIs of binary chunks that were created before
2014-10-01T08:00:00. :)
The flexrep:binary-chunk-uris API requires the flexrep-admin privilege and the URI lexicon must be enabled (by default it is enabled).
Once you have the list of URIs, you can use flexrep-delete to remove these binary chunks.
xquery version "1.0-ml";
import module namespace flexrep = "http://marklogic.com/xdmp/flexible-replication"
  at "/MarkLogic/flexrep.xqy";
let $delete :=
<flexrep:delete xmlns:flexrep="http://marklogic.com/xdmp/flexible-replication">
<doc:uri xmlns:doc="xdmp:document-load">/content/foo.xml</doc:uri>
<flexrep:last-updated>2010-09-28T14:35:12.714-08:00</flexrep:last-updated>
</flexrep:delete>
return flexrep:delete($delete)
(: Applies the specified delete element to /content/foo.xml.  This
effectively deletes the document from both the Master and Replica
databases. :)
To use theflexrep-delete function you need the flexrep-user privilege.


