
MarkLogic 9 Product DocumentationOps Director Guide — Chapter 7
CONSOLE SETTINGS View
The Console Settings view allows you to configure role-based access control to resources, manage user accounts, manage licensing, and define telemetry settings.
This chapter covers the following topics:
- Role Based Access Control (RBAC) Settings
- Resource Groups
- License Information
- Managed Clusters
- Configuring Email Notifications
Role Based Access Control (RBAC) Settings
Use RBAC (Role Based Access Control) Settings to define new roles that assign sub-roles to Resource Groups to control which users have access to the resources defined by those Resource Groups (Resource Scope). The roles you create in this view will be accessible in the Admin Interface.
When assigning Resource Groups to a role, the resources in those groups and inherited resources will be accessible to users assigned that role. For details how resource groups define access to resources, see Access Inheritance in Resource Groups.
For example, to see the cluster resources, you must create a Resource Group for this cluster and assign it to a role. A practical configuration would be to restrict access of a particular user to one cluster, which would imply access to that cluster's hosts, application servers, databases, and forests through the access inheritance mechanism in resource groups.
If you do not have permission to see a resource, that resource will be displayed as blank or, if the resource type is presented as a count, it will be displayed as 0. Additionally, if you do not have permission to see a resource that is presented in chart form, you will see charts, but those charts will have no data (lines) for the prohibited resource.
This section covers the following topics:
- Roles Tab
- Resource Access Tab
- Creating a Resource Group and Assigning it to a Role
- Editing or Deleting a Role
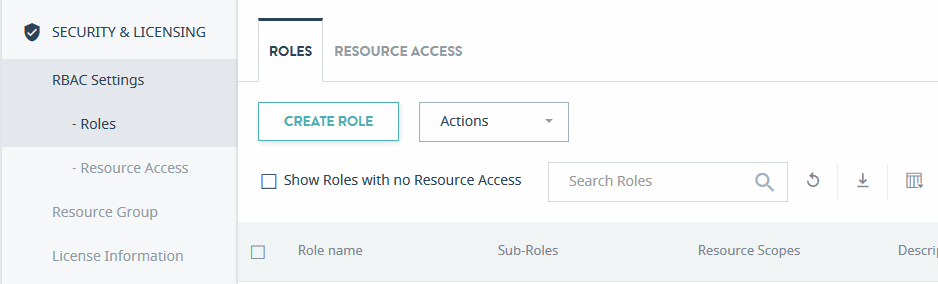
Roles Tab
The ROLES tab lists the available roles.The columns displayed for a role are described in the following table.
| Column | Description |
|---|---|
| Role name | The name of the Ops Director role. |
| Sub-Roles (optional) | The MarkLogic roles to be assigned to this role. For details, see Role-Based Security Model in the Security Guide and Appendix C: Pre-defined Roles in the Administrator's Guide. Do not assign opsdir-admin as a sub-role, as opsdir-admin has access to view all of the resources in Ops Director, which defeats the purpose of RBAC. |
| Resource Scopes (optional) | The resource group(s) to which this role controls access. |
| Description (optional) | The description of this role. |
You may export data from the ROLES tab as a CSV (Comma Separated Values) file by clicking the Export icon in the upper right corner. The following rules apply:
- The resulting CSV file will have the same columns as the Roles table in the UI.
- All available columns are exported, regardless of whether they are visible or hidden in the UI.
- All records that satisfy the set filter parameters are exported.
- Data types of the fields in the CSV file correspond to those in the UI. In case of boolean values, Yes/No in the UI corresponds to TRUE/FALSE in the CSV file.
You may then import the CSV file into other applications (such As Excel) for further processing or analysis.
Resource Access Tab
The RESOURCE ACCESS tab lists the resource groups and their assigned roles. The columns displayed are described in the following table.
| Column | Description |
|---|---|
| Resource Scope | The name of the resource group. |
| Roles | The roles assigned to the resource group. |
You may export data from the Resource Access tab as a CSV (Comma Separated Values) file by clicking the Export icon in the upper right corner. The following rules apply:
- The resulting CSV file will have the same columns as the Resource Access table in the UI.
- All available columns are exported, regardless of whether they are visible or hidden in the UI.
- All records that satisfy the set filter parameters are exported.
- Data types of the fields in the CSV file correspond to those in the UI. In case of boolean values, Yes/No in the UI corresponds to TRUE/FALSE in the CSV file.
You may then import the CSV file into other applications (such as Excel) for further processing or analysis.
Creating a Resource Group and Assigning it to a Role
The following procedure creates a Resource Group that represents all of the hosts in the Managed Clusters and then restricts access to monitor those hosts to only users with the opsdir-user role.
- In Ops Director, select the CONSOLE SETTINGS view.
- Select Resource Group in the left menu.
- In the right pane, click CREATE GROUP.
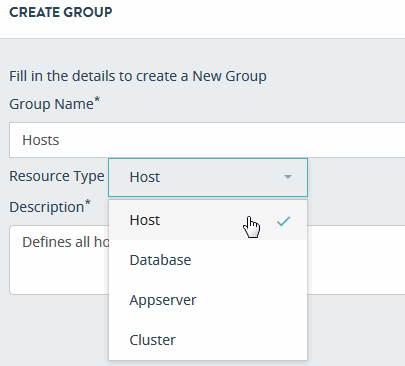
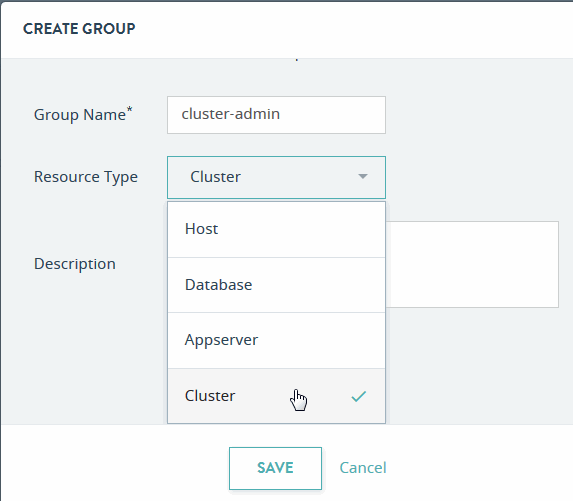
- In the CREATE GROUP dialog box, enter the Group Name, Description, and select Host from the Resource Type menu.
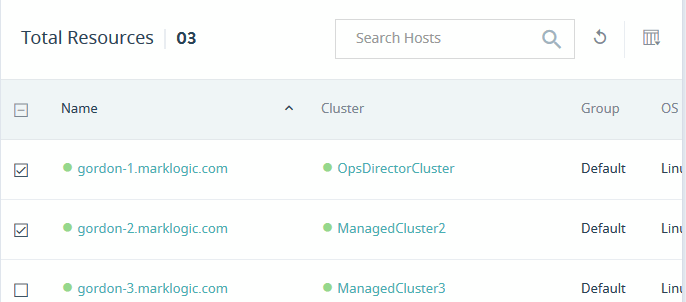
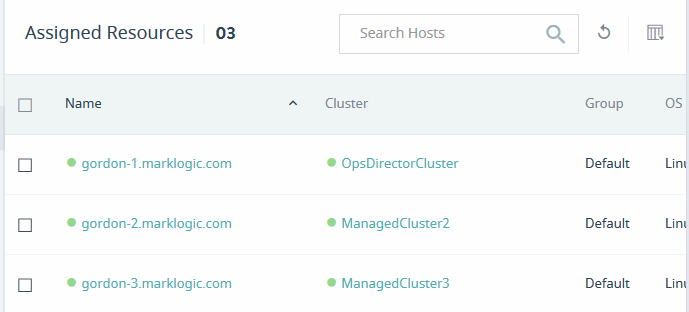
- After creating the group, select the group. In the Resource Groups page for the selected group, scroll down to the Total Resources section (which will likely be out of sight until you scroll down) and select the check boxes to the left of each host in the cluster that you want to belong to this group.
- Click ASSIGN to assign the selected resources to the group.
- The Resource Group lists the assigned resources.
- In the left menu, select Roles from under RBAC Settings.
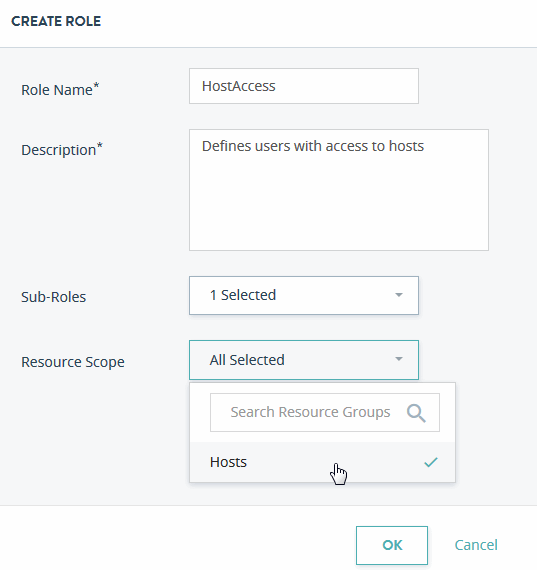
- In the ROLES tab, select CREATE ROLE.
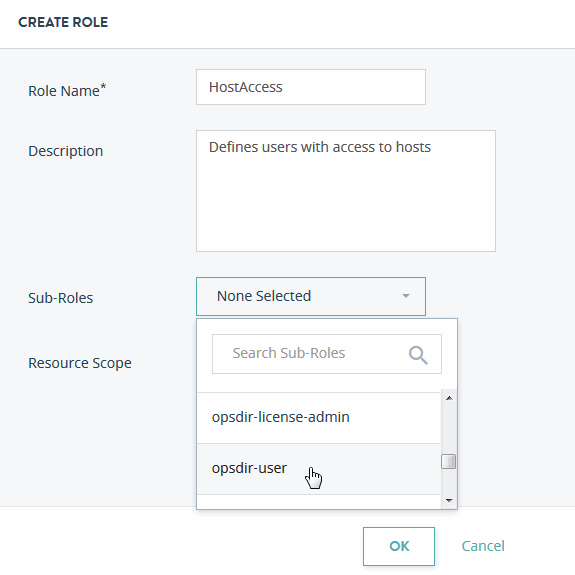
- In the Create Role dialog box, enter the Role Name (
HostAccess, in this example) and Description. Select opsdir-user from the Sub-Roles menu.

Editing or Deleting a Role
To edit or delete a role, click the Action icon next to that role and select the desired action.
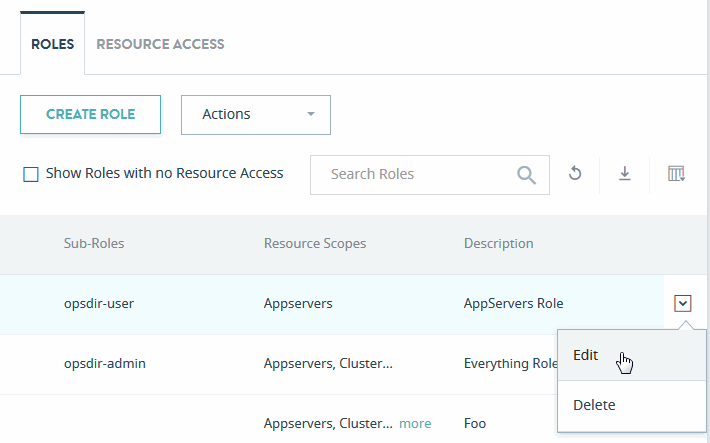
To delete multiple roles, select the checkboxes next to all roles you want to delete, then select Delete All Selected Roles in the ACTIONS menu.
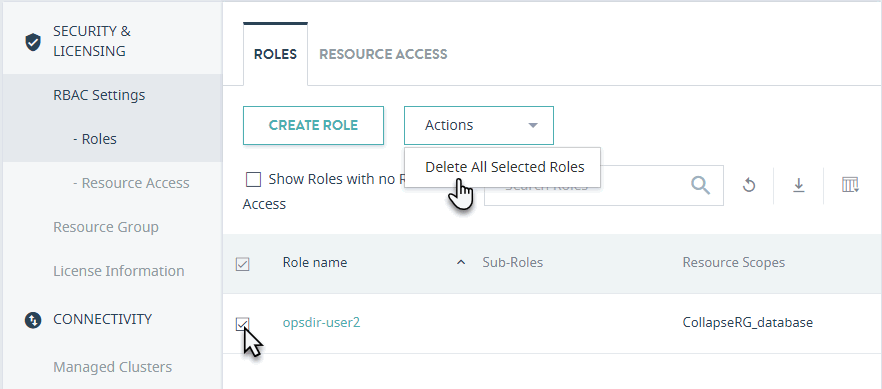
The Delete All Selected Roles option is enabled when at least one role is selected.
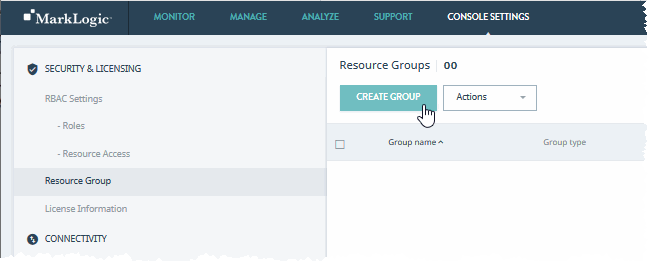
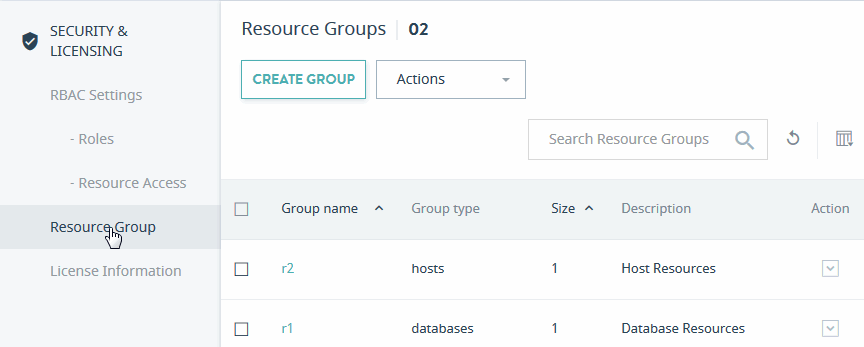
Resource Groups
You may want to establish roles and privileges at a finer and more ad hoc granularity than is provided by the pre-defined MarkLogic roles. It is likely that roles defined within the enterprise are fairly coarse-grained and that changing roles (in an external LDAP server, for example), may be considered too heavyweight for ad hoc groupings.
Resource Groups define sets of resources to which you can assign specific roles to customize user access to those resources. For details on how resource groups define access to resources, see Access Inheritance in Resource Groups.
The columns displayed are described in the following table.
You may export data from the Resource Groups tab as a CSV (Comma Separated Values) file by clicking the Export icon in the upper right corner. The following rules apply:
- The resulting CSV file will have the same columns as the Resource Groups table in the UI.
- All available columns are exported, regardless of whether they are visible or hidden in the UI.
- All records that satisfy the set filter parameters are exported.
- Data types of the fields in the CSV file correspond to those in the UI. In case of boolean values, Yes/No in the UI corresponds to TRUE/FALSE in the CSV file.
The Resource Groups CSV file, in addition to the columns from the Resource Groups table in the UI, has one additional column:
Resource Id. This column contains comma-separated list of identifiers of all resources in this group.
You may then import the CSV file into other applications (such as Excel) for further processing or analysis.
This section covers the following topics:
Creating a Resource Group
Do the following to create a Resource Group.
- Click CREATE GROUP.
- In the pop-up window, enter a Group Name, select a Resource Type (Host, Database, Appserver, or Cluster), and enter a description for the resource group.
- Click
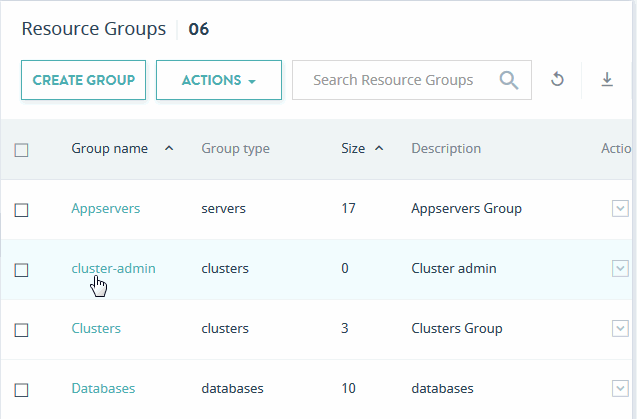
Save. The new Resource Group is added to the list of Resource Groups. - By default, no resources are included in the Resource Group. To include resources, click on the name of the newly created Resource Group.
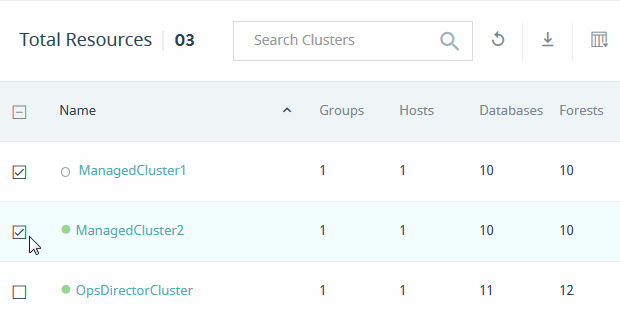
- Scroll down to the Total Resources section and select the resource to be included in the Resource Group. This view will differ for each type of Resource Group as described in Resource Group Views.
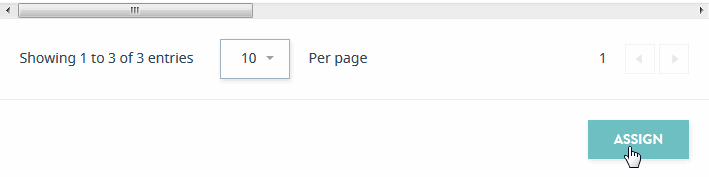
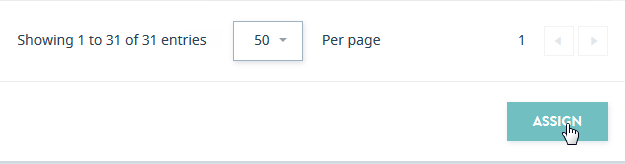
By default, you can view 10 resources per page. You can adjust how many resources to view in the Resource Group page by changing the number in the menu at the bottom of the page.
- When you have finished selecting resources for the Resource Group, click ASSIGN at the bottom of the page.

Editing or Deleting a Resource Group
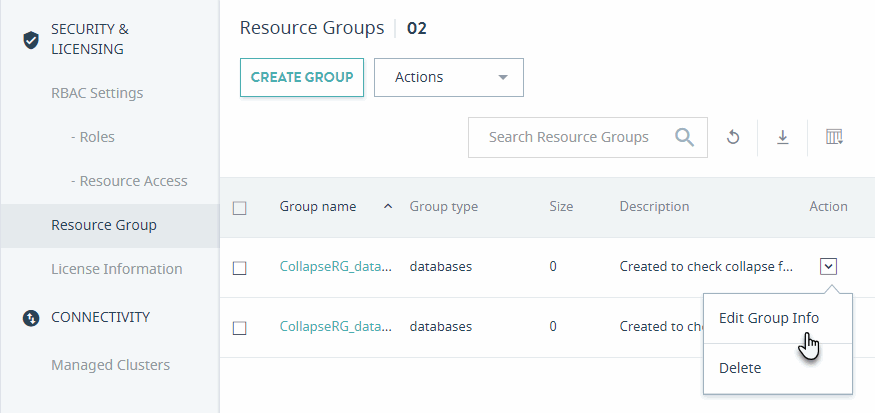
To edit or delete a resource group, click the Action icon next to that resource group and select the desired action.
To delete multiple resource groups, mark checkboxes next to all resource groups you want to delete and select Delete All Selected Groups in the Actions menu.
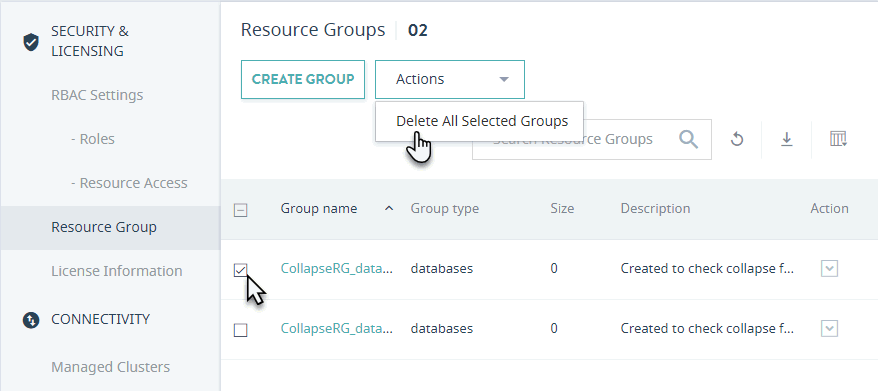
The Delete All Selected Groups option is enabled when at least one resource group is selected.
Resource Group Views
Click on a resource group to display the assigned and unassigned resources, as well as assign and deassign resources. The contents of each type of resource group are described in the following sections:
Host Groups
The columns displayed for a host group are described in the following table. These settings are described in the Hosts chapter in the Administrator's Guide.
| Column | Description |
|---|---|
| Name | The hostname of the host. |
| Cluster | The name of the cluster on which the host resides. |
| Group | The name of the group that contains the host. |
| OS | The name and version of the operating system on which the host runs. |
| Server Version | The version of MarkLogic Server running on the host. |
| Forests | The number of forests configured for the host. |
| Databases | The number of databases configured for the host. |
| App Servers | The number of App Servers configured for the host. |
| Disk Space | The amount of disk space (in MB) used on the host. |
| Uptime | The duration (Days Hrs:Min) the host has been available. |
| Maint. Mode | The host maintenance mode (normal or maintenance). For details, see Rolling Upgrades in the Administrator's Guide. |
| Zone | The Amazon Web Services (AWS) zone in which the host resides, if applicable. |
You may export data from the Host Groups tab as a CSV (Comma Separated Values) file by clicking the Export icon in the upper right corner. The following rules apply:
- The resulting CSV file will have the same columns as the Host Groups table in the UI.
- All available columns are exported, regardless of whether they are visible or hidden in the UI.
- All records that satisfy the set filter parameters are exported.
- Data types of the fields in the CSV file correspond to those in the UI. In case of boolean values, Yes/No in the UI corresponds to TRUE/FALSE in the CSV file.
You may then import the CSV file into other applications (such as Excel) for further processing or analysis.
Database Groups
The columns displayed for a database group are described in the following table. These settings are described in the Databases chapter in the Administrator's Guide.
| Column | Description |
|---|---|
| Name | The name of the database. |
| Cluster | The name of the cluster on which the database resides. |
| Forests | The number of forests configured for the database. |
| Disk Size (MB) | The amount of disk space used by the database forests, in megabytes. |
| Documents | The number of documents in the database. |
| Last Backup | The data-time of the last backup of the database. No value, if the database has never been backed up. For details on backing up a database, see Backing Up and Restoring a Database in the Administrator's Guide. |
| Encryption | Specifies whether or not encryption at rest should be enabled for the database. For details, see Encryption at Rest in the Security Guide. |
| HA | Specifies whether or not shared disk failover is enabled. For details, see High Availability of Data Nodes With Failover in the Scalability, Availability, and Failover Guide. |
| Replication | Specifies whether or not database replication is enabled (On/Off). For details, see the Database Replication Guide. |
| Security DB | The name of the security database used by the database. |
| Schemas DB | The name of the schema database used by the database. |
| Triggers DB | The name of the triggers database used by the database. |
You may export data from the Database Groups tab as a CSV (Comma Separated Values) file by clicking the Export icon in the upper right corner. The following rules apply:
- The resulting CSV file will have the same columns as the Database Groups table in the UI.
- All available columns are exported, regardless of whether they are visible or hidden in the UI.
- All records that satisfy the set filter parameters are exported.
- Data types of the fields in the CSV file correspond to those in the UI. In case of boolean values, Yes/No in the UI corresponds to TRUE/FALSE in the CSV file.
You may then import the CSV file into other applications (such as Excel) for further processing or analysis.
App Server Groups
The columns displayed for an Appserver group are described in the following table. These settings are described in the HTTP Servers, ODBC Servers, XDBC Servers, and WebDAV Servers chapters in the Administrator's Guide.
| Column | Description |
|---|---|
| Name | The name of the App Server. |
| Cluster | The name of the cluster on which the App Server resides. |
| Type | The App Server Type (HTTP, ODBC, XDBC, WebDAV). |
| Database | The content database used by the App Server. |
| Port | The App Server port number. |
| SSL | Whether the App Server has SSL enabled (Yes) or disabled (No). For details, see Configuring SSL on App Servers in the Security Guide. |
| Group | The name of the group that contains the App Server. |
| Modules DB+Root | The name of the modules database, or if file system, the root directory. |
| Security | The type of security (internal or external). |
You may export data from the App Server Groups tab as a CSV (Comma Separated Values) file by clicking the Export icon in the upper right corner. The following rules apply:
- The resulting CSV file will have the same columns as the App Server Groups table in the UI.
- All available columns are exported, regardless of whether they are visible or hidden in the UI.
- All records that satisfy the set filter parameters are exported.
- Data types of the fields in the CSV file correspond to those in the UI. In case of boolean values, Yes/No in the UI corresponds to TRUE/FALSE in the CSV file.
You may then import the CSV file into other applications (such as Excel) for further processing or analysis.
Cluster Groups
The columns displayed for a cluster group are described in the following table. These settings are described in the Clusters chapter in the Administrator's Guide.
| Column | Description |
|---|---|
| Name | The name of the cluster. |
| Groups | The number of groups in the cluster. |
| Hosts | The number of hosts in the cluster. |
| Databases | The number of databases in the cluster. |
| Forests | The number of forests in the cluster. |
| App Server | The number of App Servers in the cluster. |
| Server Version | The version of MarkLogic Server running on the hosts in the cluster. |
| OS | The name and version of the operating system on which the host runs. |
| Uptime | The duration (Days Hrs:Min) the cluster has been available. |
| Encryption | Specifies whether or not encryption at rest should be enabled for the database. For details, see Encryption at Rest in the Security Guide. |
You may export data from the Cluster Groups tab as a CSV (Comma Separated Values) file by clicking the Export icon in the upper right corner. The following rules apply:
- The resulting CSV file will have the same columns as the Cluster Groups table in the UI.
- All available columns are exported, regardless of whether they are visible or hidden in the UI.
- All records that satisfy the set filter parameters are exported.
- Data types of the fields in the CSV file correspond to those in the UI. In case of boolean values, Yes/No in the UI corresponds to TRUE/FALSE in the CSV file.
You may then import the CSV file into other applications (such as Excel) for further processing or analysis.
License Information
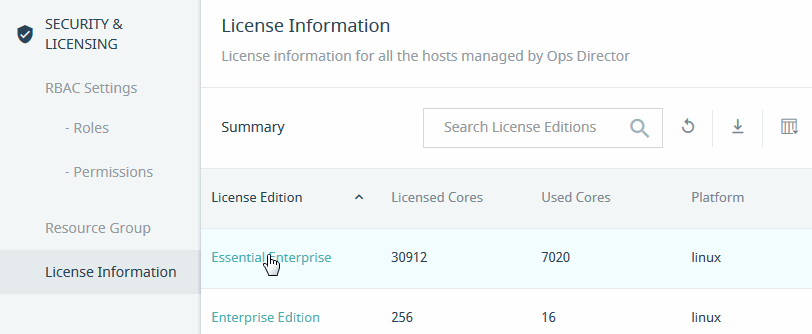
Click License Information for a summary of managed hosts running under one or more MarkLogic license editions, with a breakdown of licensed cores, used cores, and the operating system platforms on which MarkLogic is running.
The displayed columns are described in the following table.
| Column | Description |
|---|---|
| License Edition | The type of MarkLogic License. For details, see Pricing and Licensing on the MarkLogic website. |
| Licensed Cores | The number of licensed cores. For more information, see Scalability Considerations in MarkLogic Server in Scalability, Availability, and Forest-Level Failover. |
| Used Cores | The number of used cores. For more information, see Scalability Considerations in MarkLogic Server in Scalability, Availability, and Forest-Level Failover. |
| Platform | The host operating system. See Supported Platforms in the Release Notes. |
| Environment | The type of environment, such as production or test. |
You may export data from the License Information tab as a CSV (Comma Separated Values) file by clicking the Export icon in the upper right corner. The following rules apply:
- The resulting CSV file will have the same columns as the License Information table in the UI.
- All available columns are exported, regardless of whether they are visible or hidden in the UI.
- All records that satisfy the set filter parameters are exported.
- Data types of the fields in the CSV file correspond to those in the UI. In case of boolean values, Yes/No in the UI corresponds to TRUE/FALSE in the CSV file.
You may then import the CSV file into other applications (such as Excel) for further processing or analysis.
This section covers the following topics:
License Information By Host
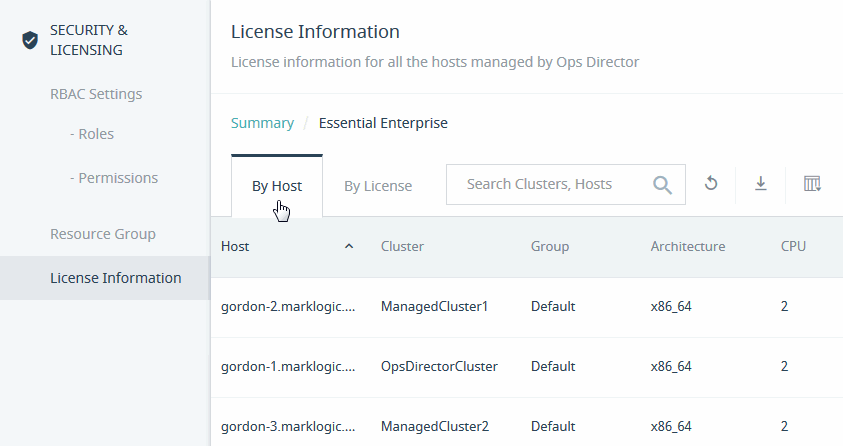
Select a specific MarkLogic License Edition to view details, broken down by host or by license edition, such as cluster name, group membership, processor architecture, and the number of CPUs, cores, and running threads.
The displayed columns are described in the following table.
| Column | Description |
|---|---|
| Host | The list of licensed hosts in your enterprise. |
| Cluster | The host cluster. |
| Environment | The MarkLogic environment. Typically, Development or Production. |
| Group | The host group. |
| Architecture | The type of CPU hardware on which the host is running. |
| CPU | The number of CPUs configured on the host hardware. |
| Cores | The number of cores configured on the host hardware. |
| Threads | The number of threads used by the host. |
| Licensed CPUs | The number of licensed CPUs for the host. |
| Licensed Cores | The number of licensed cores for the host. |
| Options | Your licensed options. For details, see Displaying License Options in the Administrator's Guide and Pricing and Licensing on the MarkLogic website. |
| Expiration | The license expiration date. |
| License Key | The license key. For details, see Entering a License Key in the Installation Guide. |
| Licensee | The name of the person or organization that holds the license. |
You may export data from the License Information by Host tab as a CSV (Comma Separated Values) file by clicking the Export icon in the upper right corner. The following rules apply:
- The resulting CSV file will have the same columns as the License Information by Host table in the UI.
- All available columns are exported, regardless of whether they are visible or hidden in the UI.
- All records that satisfy the set filter parameters are exported.
- Data types of the fields in the CSV file correspond to those in the UI. In case of boolean values, Yes/No in the UI corresponds to TRUE/FALSE in the CSV file.
You may then import the CSV file into other applications (such as Excel) for further processing or analysis.
License Information By License
Click the By License tab to view the license information by license key.
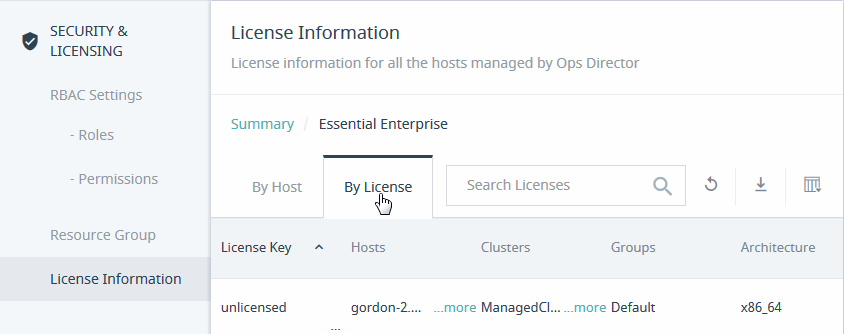
The displayed columns are described in the following table.
| Column | Description |
|---|---|
| Licensee | The name of the person or organization that holds the license. |
| Hosts | The hosts in your enterprise. |
| Clusters | The clusters in your enterprise. |
| Environment | The MarkLogic environment. Typically, Development or Production. |
| Groups | The groups in your enterprise. |
| Architecture | The type(s) of CPU hardware used by your enterprise. |
| CPU | The number of CPUs in your enterprise. |
| Cores | The number of cores in your enterprise. |
| Threads | The number of threads used by the enterprise. |
| Licensed CPUs | The number of licensed CPUs for the enterprise. |
| Licensed Cores | The number of licensed cores for the enterprise. |
| Options | Your licensed options. For details, see Pricing and Licensing on the MarkLogic website. |
| Expiration | The license expiration date. |
| License Key | The license key. For details, see Entering a License Key in the Installation Guide. |
You may export data from the License Information by License tab as a CSV (Comma Separated Values) file by clicking the Export icon in the upper right corner. The following rules apply:
- The resulting CSV file will have the same columns as the License Information by License table in the UI.
- All available columns are exported, regardless of whether they are visible or hidden in the UI.
- All records that satisfy the set filter parameters are exported.
- Data types of the fields in the CSV file correspond to those in the UI. In case of boolean values, Yes/No in the UI corresponds to TRUE/FALSE in the CSV file.
You may then import the CSV file into other applications (such as Excel) for further processing or analysis.
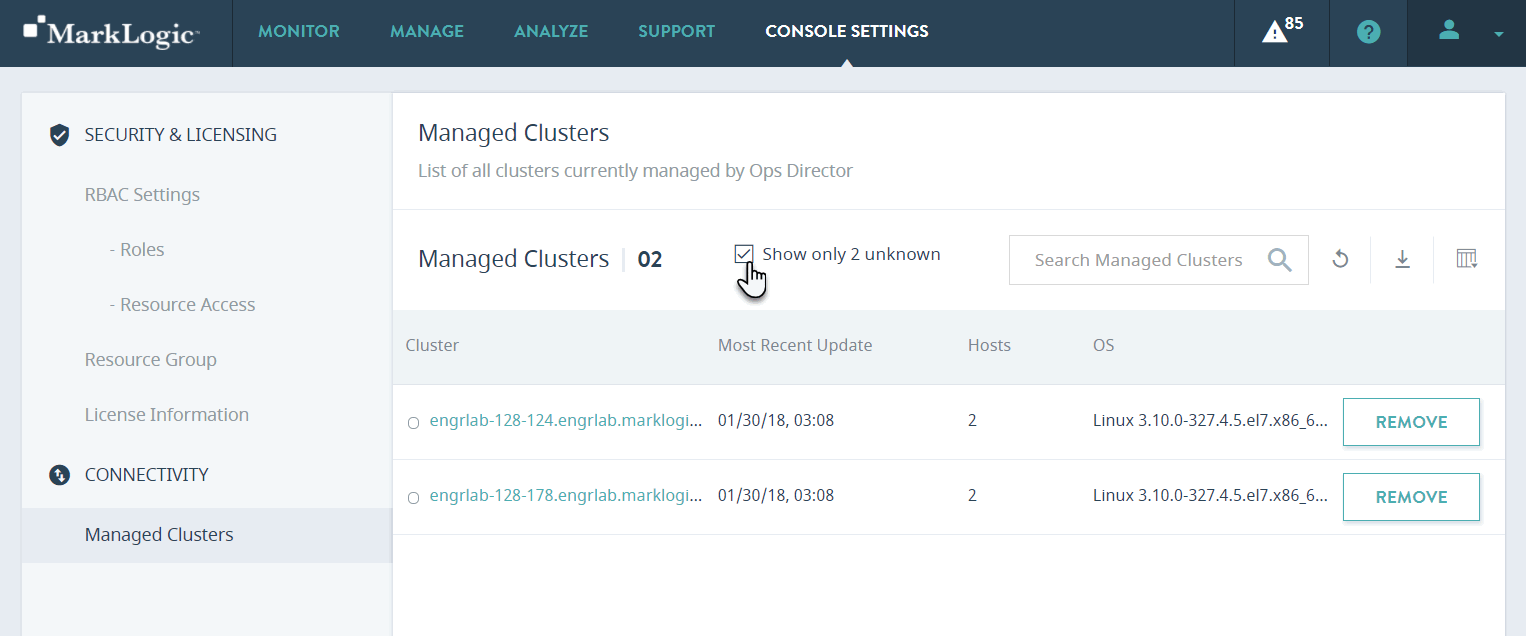
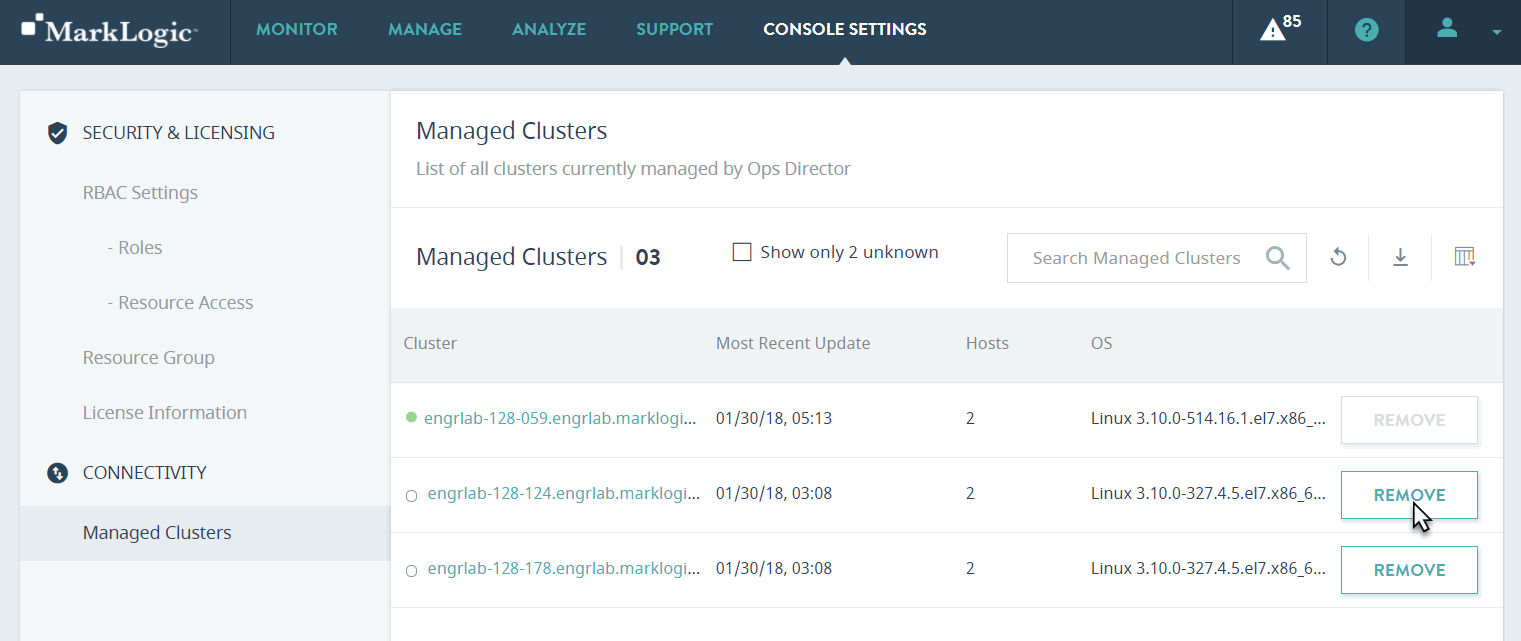
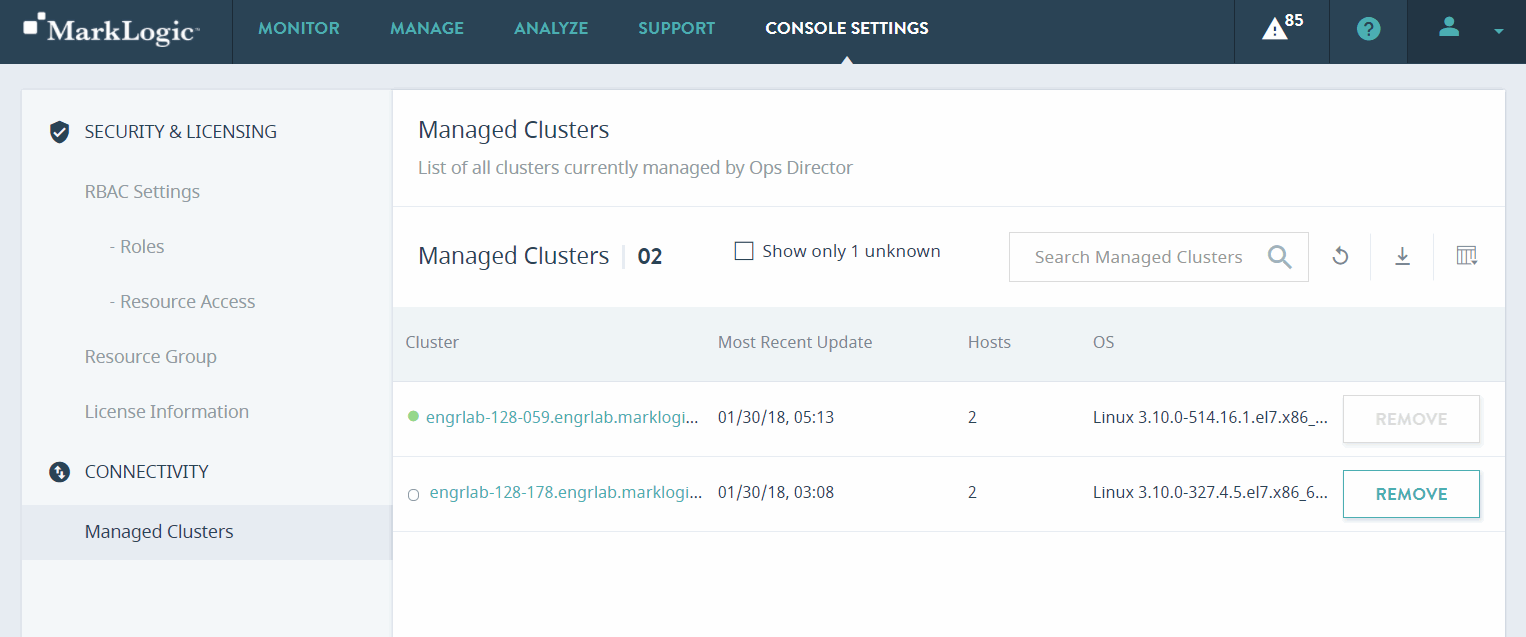
Managed Clusters
Under CONNECTIVITY, select Managed Clusters to view the list of clusters managed by Ops Director and remove clusters that are currently in the Unknown state.
This section covers the following topics:
- Viewing and Filtering the List of Managed Clusters
- Removing Unknown Managed Clusters from the List
- Reconnecting a Managed Cluster to Ops Director
Viewing and Filtering the List of Managed Clusters
Use the Managed Clusters page to view the list of all clusters currently managed by Ops Director, along with their health status.
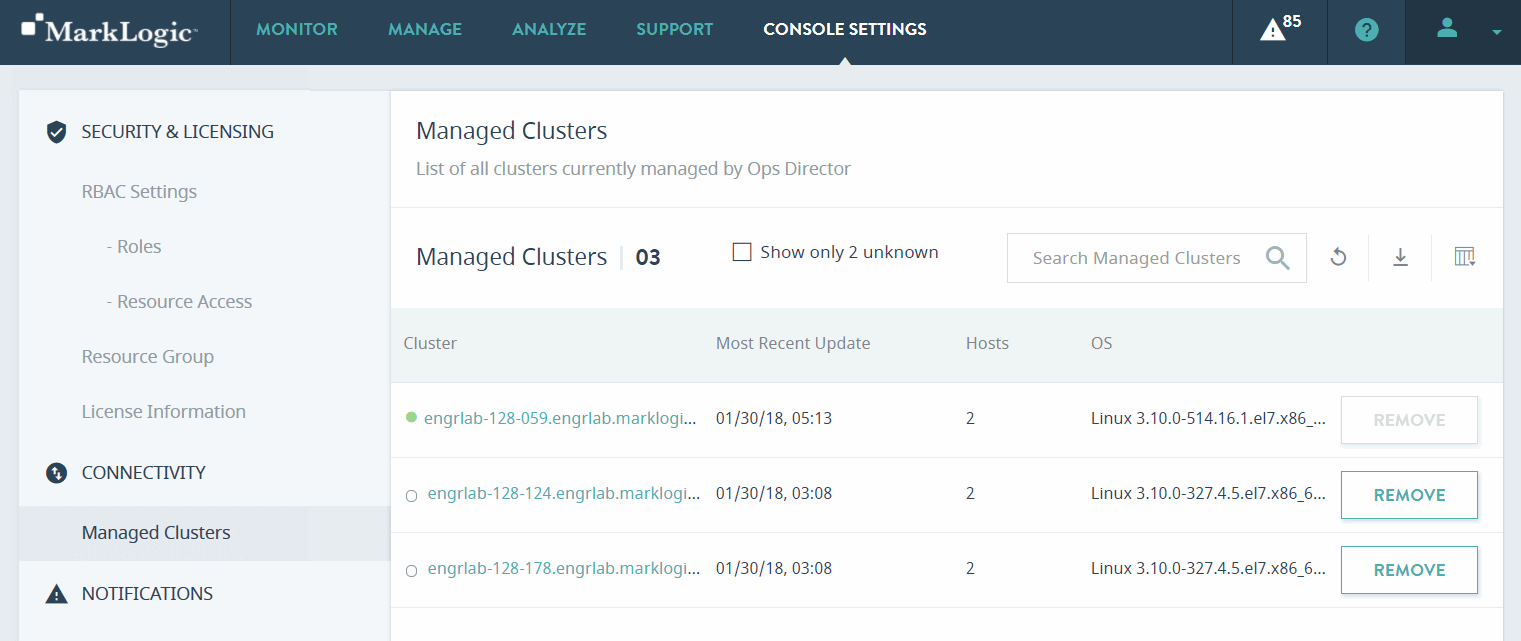
The columns displayed in the Managed Clusters tab are described in the following table.
You may export data from the Managed Clusters tab as a CSV (Comma Separated Values) file by clicking the Export icon in the upper right corner. The following rules apply:
- The resulting CSV file will have the same columns as the Managed Clusters table in the UI.
- All available columns are exported, regardless of whether they are visible or hidden in the UI.
- All records that satisfy the set filter parameters are exported.
- Data types of the fields in the CSV file correspond to those in the UI. In case of boolean values, Yes/No in the UI corresponds to TRUE/FALSE in the CSV file.
You may then import the CSV file into other applications (such as Excel) for further processing or analysis.
A managed cluster may become disconnected from the Ops Director, either due to temporary network unavailability or because MarkLogic Server had stopped on the hosts comprising the cluster. In this case, the cluster's state cannot be determined by Ops Director, and hence the cluster is assigned the Unknown state.
For additional reasons why a managed cluster might be assigned the Unknown state, see Security and Database Dependencies of Managed Clusters.
You may filter the list of the managed clusters to view only those clusters that are currently in the Unknown state by selecting the Show only unknown checkbox.
Removing Unknown Managed Clusters from the List
You may remove a managed cluster that is currently in the Unknown state from the list of clusters managed by Ops Director. Perform the following steps:
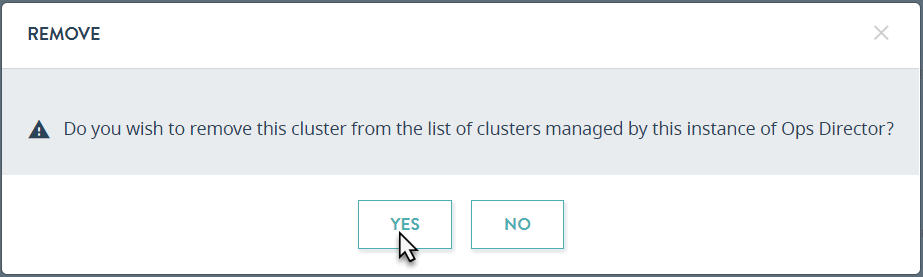
- Click REMOVE to the right of the cluster you want to remove from the list.
The Remove button is enabled only for clusters that are currently in the Unknown state.
- A confirmation box appears asking Do you wish to remove this cluster from the list of clusters managed by this instance of Ops Director? Click YES.
- The cluster is removed, and the updated list of managed clusters is displayed by Ops Director.
Reconnecting a Managed Cluster to Ops Director
If you removed a cluster from the list of clusters managed by Ops Director, you may want to reconnect this cluster later on, such as when the issue that caused the Unknown state is resolved.
To add the cluster back to the list of clusters managed by Ops Director from the Admin Interface, perform the following steps:
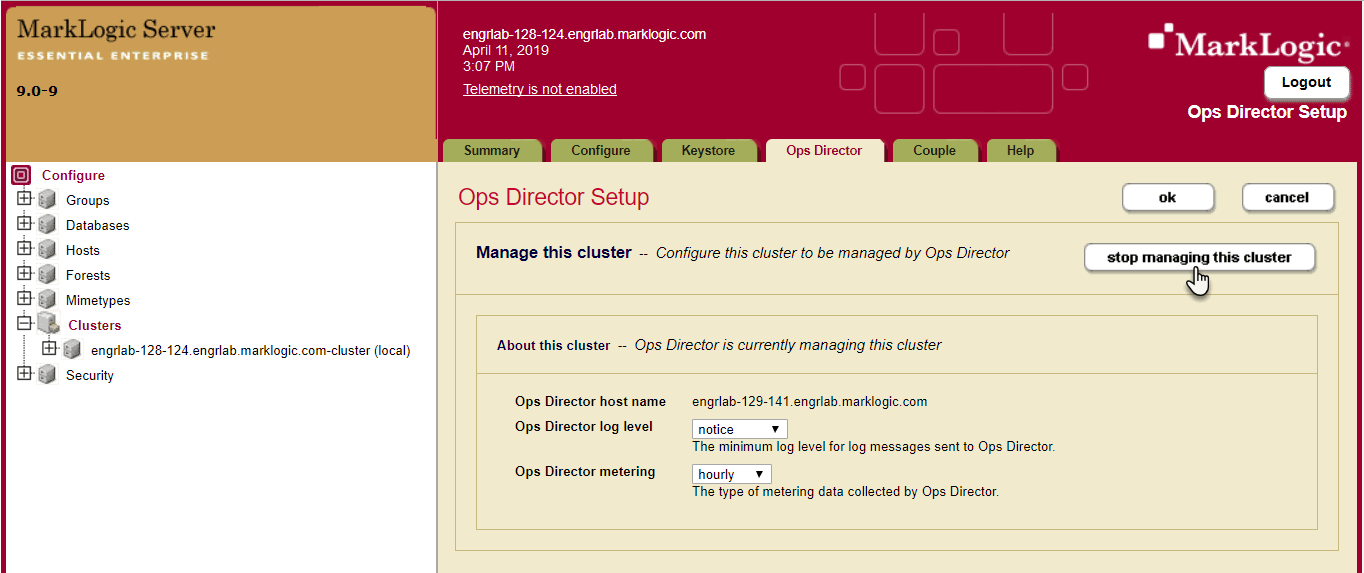
- Log into the Admin Interface on the cluster to be managed by Ops Director.
- In the left menu, select Configure > Clusters.
- Select the local cluster. The Edit Local Cluster Configuration page appears.
- Select the Ops Director tab at the top of the page.
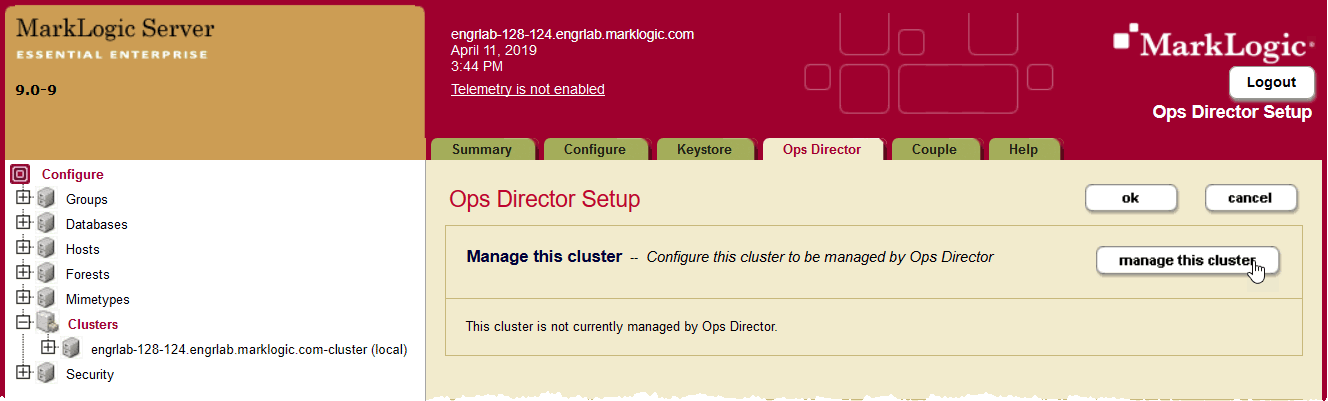
- The Ops Director Setup page is displayed. Select stop managing this cluster.
When you remove the cluster from the list of managed clusters in Ops Director, the cluster is not notified that it is no longer managed, because the connection between the cluster and the Ops Director is down at that point. Therefore, you must first update the cluster state by selecting stop managing this cluster from the Admin Interface.
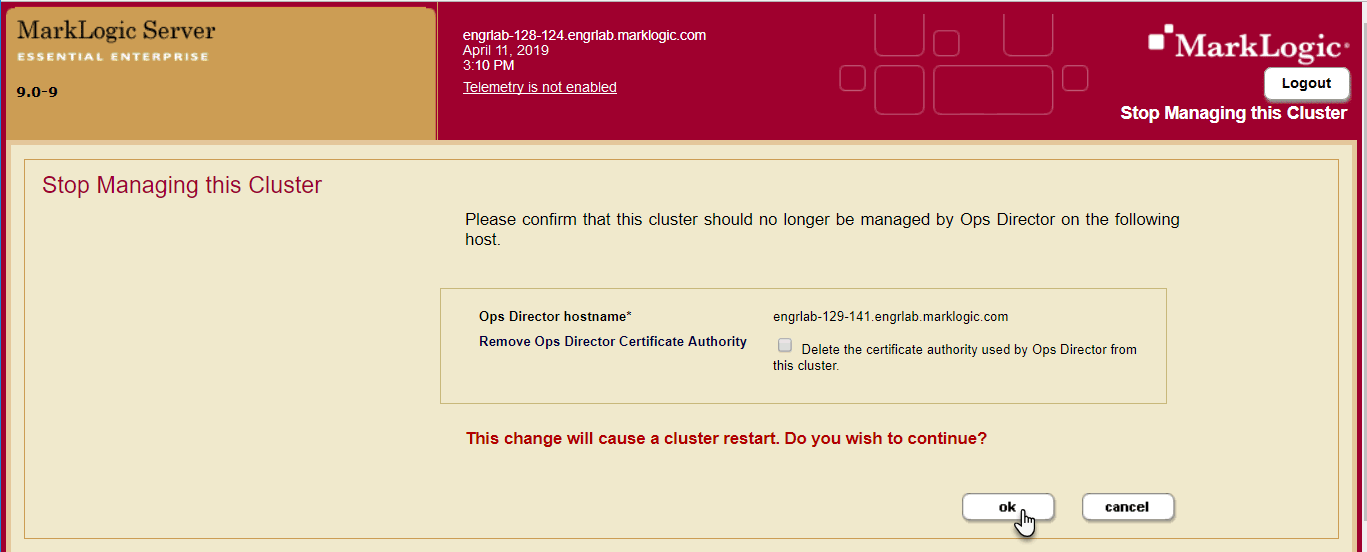
- On the Stop Managing this Cluster page, make sure the box to the left of Remove Ops Director Certificate Authority box is unchecked, then click ok.
You may stop managing and start managing a cluster without re-importing a certificate to it, in case the cluster will be managed by the same instance of Ops Director.
- The Server Restart page is displyed.The page informs you that MarkLogic Server is being restarted to load new Ops Director status configuration.
- When the restart is completed, the Ops Director Setup page is displayed again. Select manage this cluster.
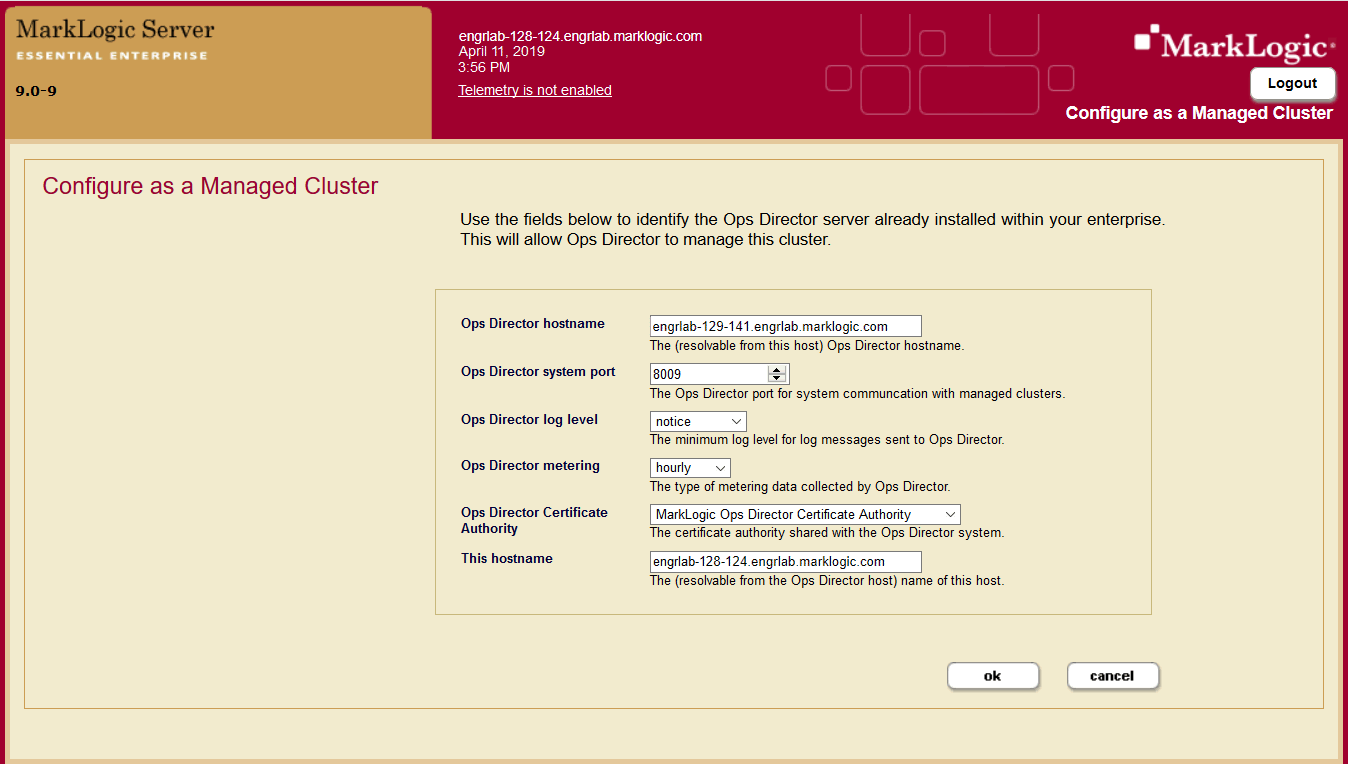
- The Configure as a Managed Cluster page is displayed.
- Enter the name of the host where your Ops Director application runs.
- From the Ops Director Certificate Authority menu, select MarkLogic Ops Director Certificate Authority.
You may optionally modify the level for log messages sent to Ops Director, as well as the frequency at which the metering data is collected.
- In Ops Director, select the CONSOLE SETTINGS tab. In the left menu under CONNECTIVITY, select Managed Clusters.
Refresh the page. The updated list of managed clusters is displayed, with the newly reconnected cluster among them.

Configuring Email Notifications
You can configure Ops Director to notify you by email when a specified type of event occurs, or when an alert is enabled or disabled.
Under NOTIFICATIONS, select Email Configuration to set up emailed notifications.
This section covers the following topics:
Setting Up Email Notifications
To set up Ops Director to notify you by email when a specific type of event occurs:
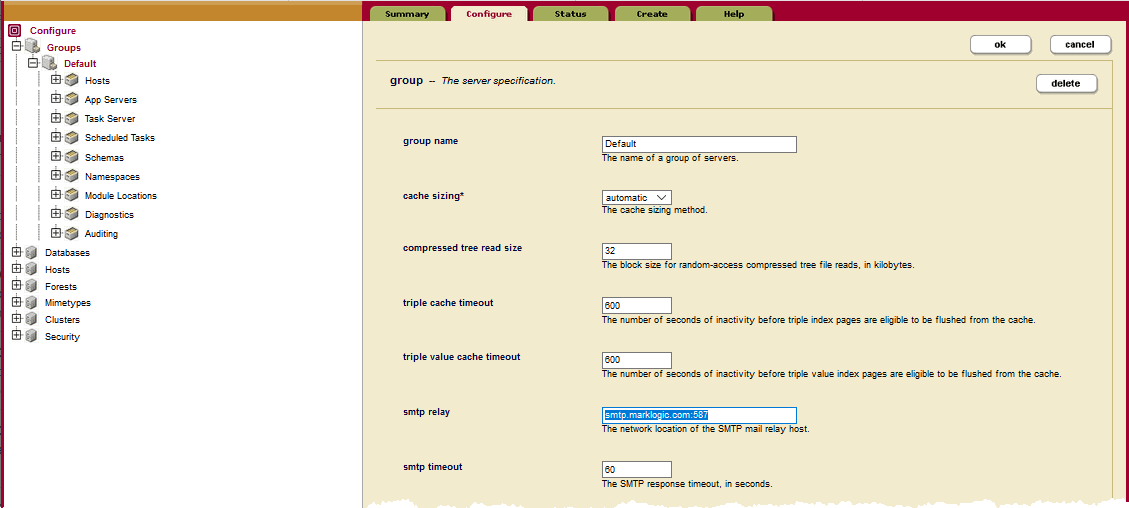
- Make sure you have set up your SMTP relay. In the Admin Interface, navigate to Configure > Groups > Default. In the right pane, select the Configure tab. Make sure the smtp relay field contains the correct name and port of the SMTP relay host. If it needs to be changed, make sure to click ok at the bottom of the pane to save your changes.
- Log into the XQuery console (port 8000) and submit the following query to update the From email address against the database OpsDirector and the server OpsDirectorApplication, replacing
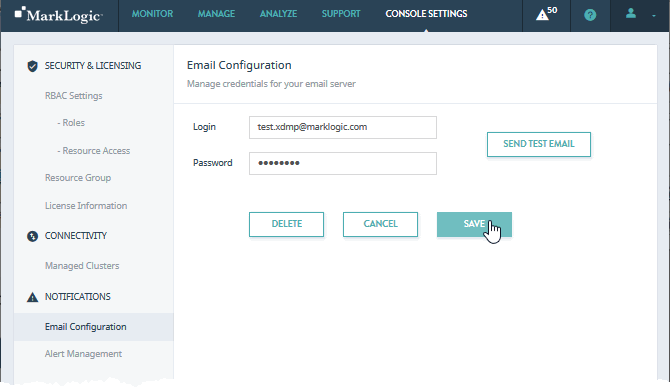
Test Userandtest-xdmp-email@marklogic.comwith the name and email address from which the alerts are to come:xquery version "1.0-ml"; import module namespace cfg="http://marklogic.com/v1/opsdirector/config" at "/common/config.xqy"; cfg:set-atomic-property("email-return-name", "Test User"), cfg:set-atomic-property("email-return-address", "test-xdmp-email@marklogic.com") - In the Ops Director interface, select CONSOLE SETTINGS. In the left menu, select Email Configuration. The Email Configuration page displays in the right pane.
- Enter the Login and Password credentials for the the SMTP relay server configured in the Admin UI in step 1. Click SAVE to save the credentials.
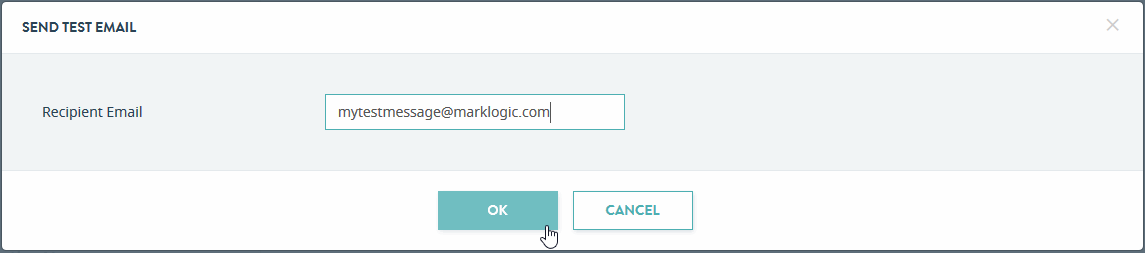
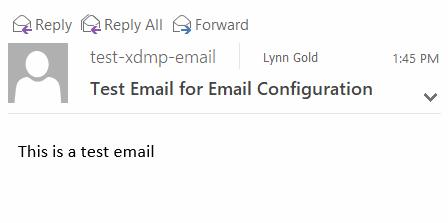
- To make sure the Ops Director email server is working correctly, click SEND TEST EMAIL. The SEND TEST EMAIL box displays.
- Enter an email address to receive the test message and click OK. You will receive a test email message similar to the following:
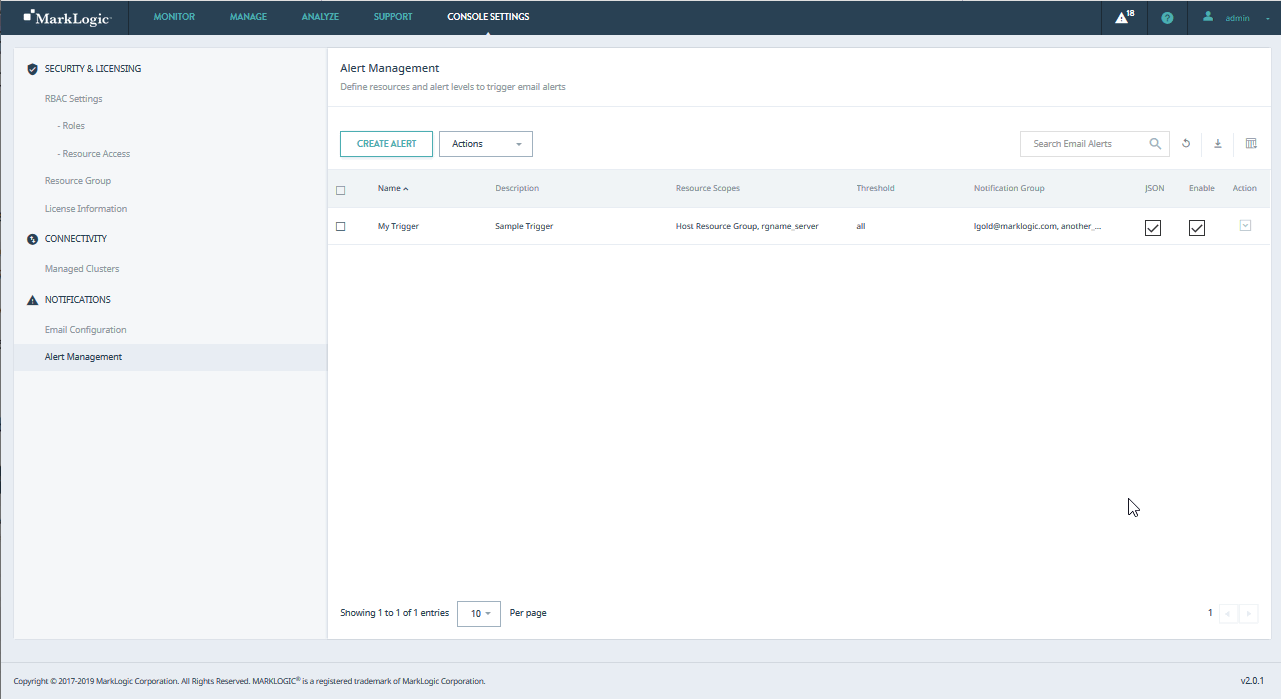
Setting up and Managing Alerts
The Alert Management page enables you to determine when email alerts are sent. To display the Alert Management page in the right pane, in the left menu, select Alert Management.
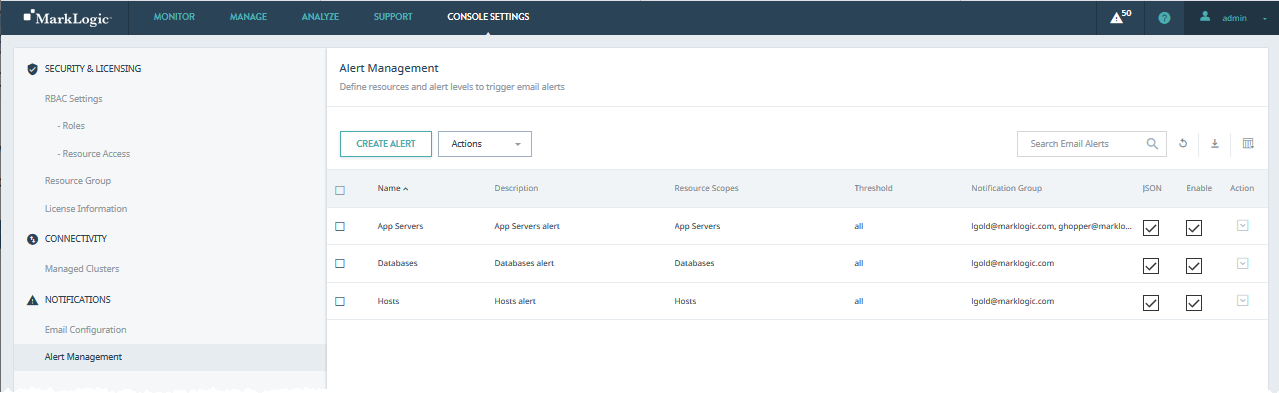
Creating an Email Alert
When you create or edit an email alert, make sure you consider the email recipient's RBAC (Role Based Access Control) settings. Make sure that email notifications with full alert details about MarkLogic components only be sent to users with full view of these components.
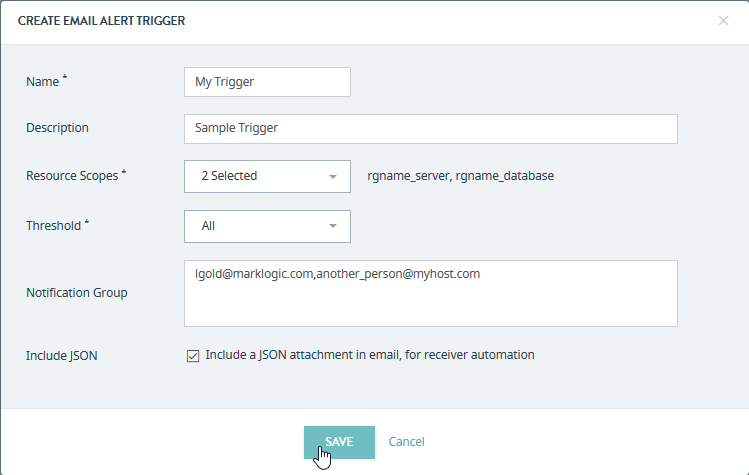
- In the Ops Director Alert Management page, click CREATE ALERT. The CREATE EMAIL TRIGGER ALERT window appears.
- In the CREATE EMAIL TRIGGER ALERT window:
- Enter the Name of the trigger. You may also add a Description.
- From the Resource Scopes menu, select one or more resource groups.
- From the Threshold menu, select one of Critical, At Risk, or All, depending upon the level of alerts you want to monitor.
- Check the Include JSON box if you want to include a JSON attachment in the email alert.
- Enter one or more email addresses in the Notification Group box.
Click SAVE. The new alert shows up in the Alert Management pane and is automatically enabled.
Anyone in the Notification Group will receive an email message similar to the following:
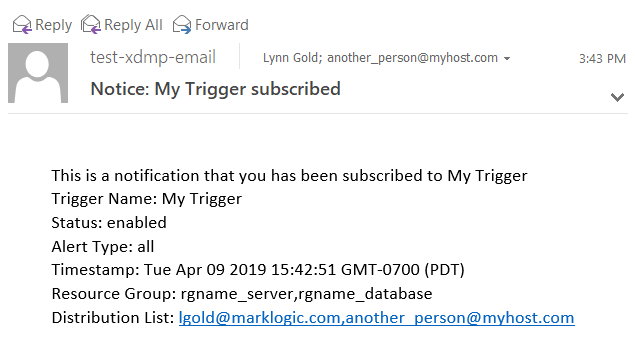
The fields in your email message are:
- Trigger Name: The name of the Ops Director alert.
- Status: Whether the alert is enabled or disabled.
- Alert Type: The alert threshold: one of critical, at risk, or all.
- Timestamp: When the email was sent.
- Resource Group: The resource groups involved in the alert
- Distribution List: The email addresses that receives this alert.
To disable a trigger, select the box to the right of the trigger in the Enable column so it is unchecked. If you are in the Notification Group, you will receive an email message similar to the following:
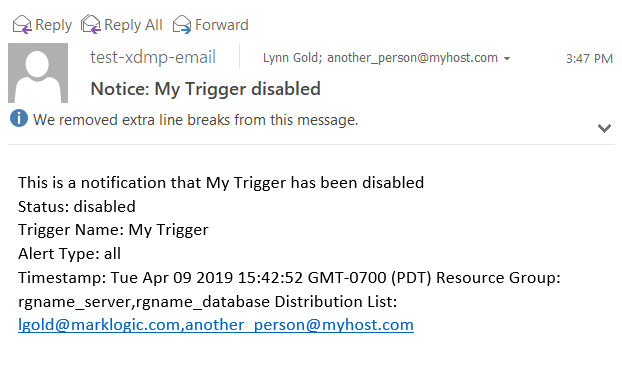
The fields that appear in this message are:
- Status: Whether the alert is enabled or disabled.
- Trigger Name: The name of the Ops Director alert.
- Alert Type: The alert threshold: one of critical, at risk, or all.
- Timestamp: When the email was sent.
- Resource Group: The resource groups involved in the alert
- Distribution List: The email addresses that received this alert.
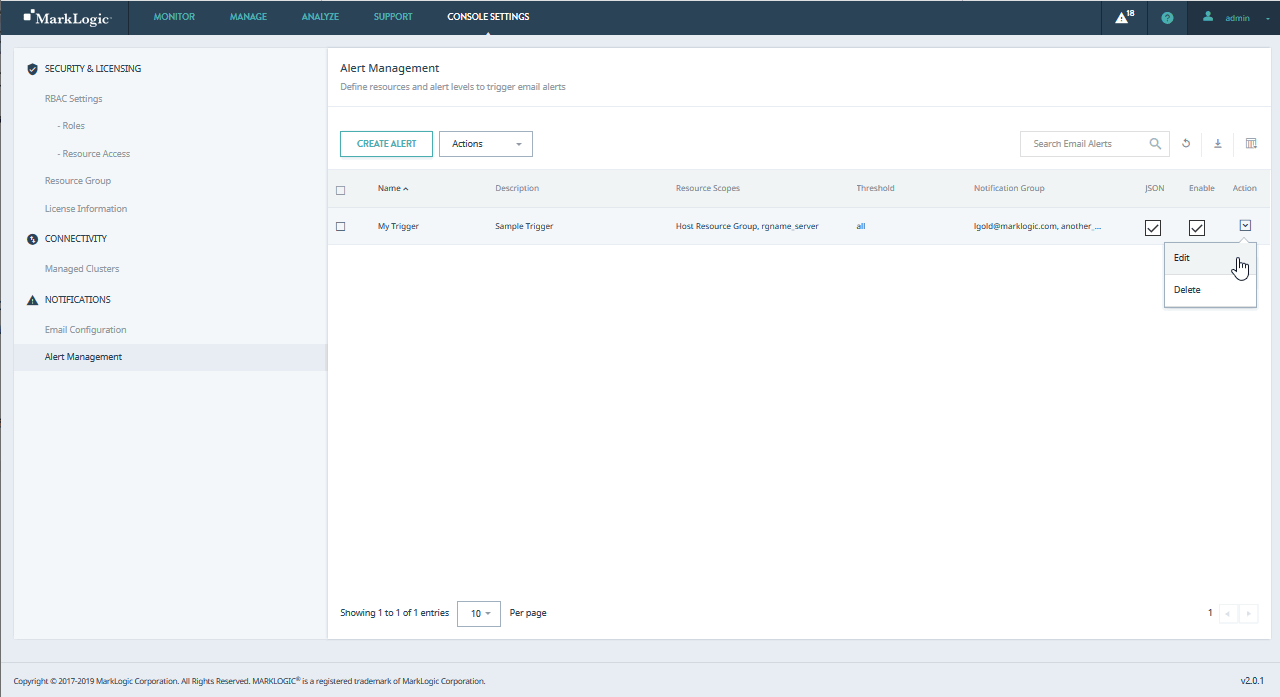
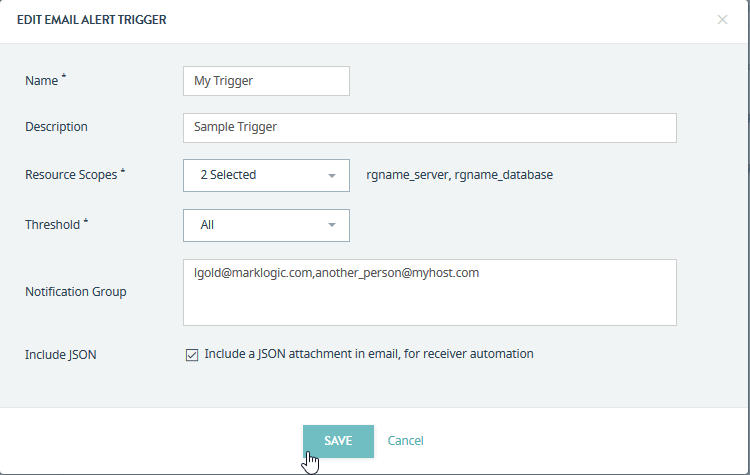
Editing an Email Alert
When you create or edit an email alert, make sure you consider the email recipient's RBAC (Role Based Access Control) settings. Make sure that email notifications with full alert details about MarkLogic components only be sent to users with full view of these components.
- To the right of the alert you want to edit, select the Action menu.
- From the Action menu, select Edit. The EDIT EMAIL ALERT TRIGGER window displays.
- Edit one or more of the following fields:
- The Name of the trigger.
- The Description of the trigger.
- From the Resource Scopes menu, you may select or deselect one or more resource groups.
- From the Threshold menu, you may select one of Critical, At Risk, or All, depending upon the level of alerts you want to monitor.
- Click the Include JSON box to include a JSON attachment in the alert email.
- Add or remove one or more email addresses in the Notification Group box.
Click SAVE to save your changes.
The SAVE button does not become operational until you edit either the Name, Description, or Notification Group field.
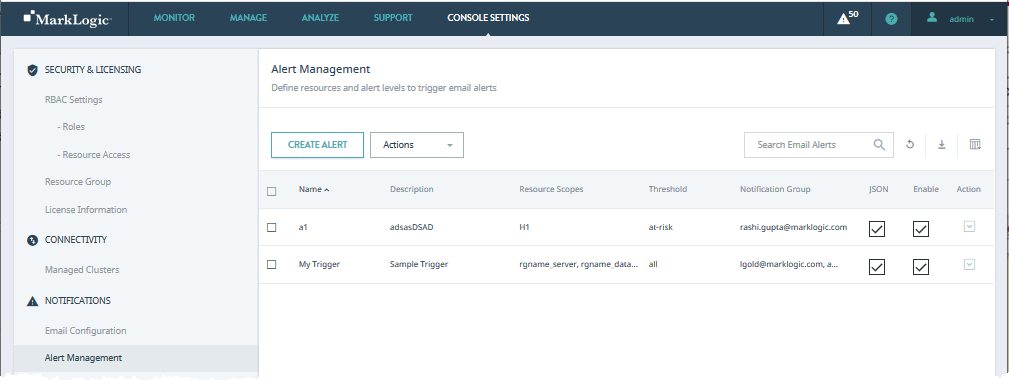
Viewing and Filtering the List of Alerts
Use the Alert Management page to view the list of all alerts currently managed by Ops Director.
The columns displayed in the Alert Notifications page are described in the following table.
You may export data from the Alert Management page as a CSV (Comma Separated Values) file by clicking the Export icon in the upper right corner. The following rules apply:
- The resulting CSV file will have the same columns as the Managed Clusters table in the UI.
- All available columns are exported, regardless of whether they are visible or hidden in the UI.
- All records that satisfy the set filter parameters are exported.
- Data types of the fields in the CSV file correspond to those in the UI. In case of boolean values, Yes/No in the UI corresponds to TRUE/FALSE in the CSV file.
You may then import the CSV file into other applications (such as Excel) for further processing or analysis.
Deleting an Email Alert
You can delete an email alert in one of the following ways:
- To the right of the alert you want to delete, select the Action menu. From the Action menu, select Delete.
- Select one or more alerts in the box column to the left of the Name column. To the right of CREATE ALERT, select Actions, then select Delete All Selected Triggers.
A DELETE EMAIL ALERT TRIGGER confirmation box displays. Click YES to delete all selected alerts.