
MarkLogic 9 Product Documentationmlcp User Guide — Chapter 2
Installation and Configuration
This chapter describes how to install mlcp and configure your client environment and MarkLogic for most effective use of the tool. The following topics are included:
- Supported Platforms
- Required Software
- Installing mlcp
- Configuring Your MarkLogic Cluster
- Security Considerations
- Configuring Distributed Mode
- Connecting to MarkLogic Using SSL
- Using mlcp With Kerberos
Supported Platforms
In local mode, mlcp is supported on the same platforms as MarkLogic Server, including 64-bit Linux, 64-bit Windows, and Macintosh OS X. For details, see Supported Platforms in the Installation Guide.
Required Software
The following software is required to use mlcp:
- MarkLogic Server 7.0-1 or later, with an XDBC App Server configured. MarkLogic 8 and later versions come with an XDBC App Server pre-configured on port 8000.
- Oracle/Sun Java JRE 1.8 or later.
Apache Hadoop only supports the Oracle/Sun JRE, though other JRE's may work. For details, see http://wiki.apache.org/hadoop/HadoopJavaVersions.
In distributed mode, mlcp requires access to an installation of one of the following Hadoop MapReduce distributions. The mlcp tool might work with other distributions based on Apache Hadoop v2.6.
- Cloudera's Distribution Including Apache Hadoop (CDH) version 5.8
- Hortonworks Data Platform (HDP) version 2.6
- MapR version 5.1. Using mlcp with MapR requires special setup. For details, see Using mlcp With MapR.
Installing mlcp
After downloading mlcp, follow these instructions to install mlcp.
- Download mlcp from http://developer.marklogic.com/products/mlcp.
- Unpack the mlcp distribution to a location of your choice. This creates a directory named
mlcp-version, where version is the mlcp version. For example, assuming/space/marklogiccontains zip file for mlcp version 1.3, then the following commands install mclp under/space/marklogic/mlcp-1.3/:$ cd /space/marklogic $ unzip mlcp-1.3-bin.zip
- Optionally, put the mlcp bin directory on your path. For example:
$ export PATH=${PATH}:/space/marklogic/
mlcp-1.3/bin - Put the
javacommand on your path. For example:$ export PATH=${PATH}:$JAVA_HOME/bin
- If you plan to use mlcp in distributed mode, you must have a Hadoop installation and must configure your environment so mlcp can find your Hadoop installation. For details, see Configuring Distributed Mode.
You might need to configure your MarkLogic cluster before using mlcp for the first time. For details, see Configuring Your MarkLogic Cluster.
On Windows, use the mlcp.bat command to run mlcp. On UNIX and Linux, use the mlcp.sh command. You should not use mlcp.sh in the Cygwin shell environment on Windows.
Configuring Your MarkLogic Cluster
The mlcp tool uses an XDBC App Server to communicate with each host in a MarkLogic Server cluster that has at least one forest attached to a database used in your mlcp job.
When you use mlcp with MarkLogic 8 or later on the default port (8000), no special cluster configuration is necessary. Port 8000 includes a pre-configured XDBC App Server. The default database associated with port 8000 is the Documents database. To use mlcp with a different database and port 8000, use the -database, -input_database, or -output_database options. For example:
mlcp.sh import -host myhost -port 8000 -database mydatabase ...
When using MarkLogic 8 or later with a port other than 8000, the port should connect to either an XDBC App Server or an App Server with a rewriter that is set up to handle XDBC traffic.
Hosts within a group share the same App Server configuration, but hosts in different groups do not. Therefore, if all your forest hosts are in a single group, you only need to configure one App Server to handle XDBC traffic. If your forests are on hosts in multiple groups, then you must configure an App Server for XDBC that listens on the same port in each group.
For example, the cluster shown below is properly configured to use Database A as an mlcp input or output source. Database A has 3 forests, located on 3 hosts in 2 different groups. Therefore, both Group 1 and Group 2 must make Database A accessible via XDBC on port 9001.

If the forests of Database A are only located on Host1 and Host2, which are in the same group, then you would only need to configure one XDBC App Server on port 9001.
If you use MarkLogic 8 or later and port 8000 instead of port 9001, then you do not need to explicitly create any XDBC App Servers to support the above database configuration because both group automatically have an XDBC App Server on port 8000. You might need to explicitly specify the database name (Database A) in your mlcp command, though, if it is not the default database associated with port 8000.
Security Considerations
When you use mlcp, you supply the name of a user(s) with which to interact with MarkLogic Server. If the user does not have admin privileges, then the user must have at least the privileges listed in the table below.
Additional privileges may be required. These roles only enable use of MarkLogic Server as a data source or destination. For example, these roles do not grant read or update permissions to the database.
By default, mlcp requires a username and password to be included in the command line options for each job. You can avoid passing a cleartext password between your mlcp client host and MarkLogic Server by using Kerberos for authentication. For details, see Using mlcp With Kerberos.
Configuring Distributed Mode
Distributed mode enables mlcp to distribute its workload across a Hadoop cluster. Using mlcp in distributed mode requires a Hadoop installation. For information on supported versions, see Required Software.
Hadoop does not have to be installed on the host where you run mlcp, but the Hadoop configuration files must be reachable by mlcp.
This sections covers the following topics related to using mlcp in distributed mode:
- Specifying the Hadoop Configuration File Location
- Setting Custom Hadoop Options and Properties
- Required Hadoop User Privileges
- Using mlcp With MapR
mlcp distributed mode has been deprecated for 9.0-13.
Some versions of Hadoop and HDFS have problems with pathnames that contain spaces, so it is recommended that you do not use mlcp in distributed mode with input or output file pathnames that contain whitespace.
Specifying the Hadoop Configuration File Location
You must tell mlcp where to find the Hadoop configuration files on the host where you run mlcp. Hadoop does not need to be installed on this host, but the Hadoop configuration files must be reachable.
Use one of the following methods to tell mlcp where to find your Hadoop configuration files locally:
- Set the mlcp command line option
-hadoop_conf_dir. For example:$ mlcp.sh command -hadoop_conf_dir /etc/hadoop/conf
- Set the environment variable
HADOOP_CONF_DIR. For example:$ export HADOOP_CONF_DIR=/etc/hadoop/conf
If your Apache Hadoop installation is on a remote host, you can copy the configuration files locally and set HADOOP_CONF_DIR (or -hadoop_conf_dir) to that directory.
Setting Custom Hadoop Options and Properties
Use the following mlcp options to pass Hadoop-specific configuration information through mlcp to your Hadoop installation. You can use these options to control mlcp's use of Hadoop in distributed mode.
-confconf_filename : Pass in a Hadoop configuration properties file.-Dproperty=value : Pass one Hadoop configuration property setting.
The property names and configuration file syntax is as dictated by Hadoop. For details, consult the documentation for your Hadoop distribution.
These Hadoop options must appear on the command line after -options_file (if present) and before any other mlcp-specific options.
Required Hadoop User Privileges
When you use distributed mode for import, the user your Hadoop tasks run as must have permission to access the directories or files specified by -input_file_path. Similarly, when you use distributed mode for export or extract, the user must have permission to create directories and files in the directory specified by -output_file_path.
Using mlcp With MapR
To use MapR as mlcp's Hadoop distribution, you must download the mlcp-mapr-version-bin bundle instead of the standard mlcp bundle. For example, download mlcp-mapr-9.0-bin.zip from developer.marklogic.com.
You must also separately download the maprfs Java JAR file from MapR and make it available to mlcp. You can use the following procedure:
- Download
maprfs-version-mapr.jarfromhttp://repository.mapr.com/nexus/content/groups/mapr-public/com/mapr/hadoop/maprfs/version-mapr/. Modify version to match your MapR version.For example, download
maprfs-5.1.0-mapr.jarfromhttp://repository.mapr.com/nexus/content/groups/mapr-public/com/mapr/hadoop/maprfs/5.1.0-mapr/. - Make the JAR file available to mlcp:
To avoid warnings about JCE policy files when using mlcp with MapR, you should also install the Java Cryptography Extension (JCE) Unlimited Strength Jurisdiction Policy Files compatible with your JRE.
For example, you can download the Java 8 policy files for the Oracle JRE from the following location:
http://www.oracle.com/technetwork/java/javase/downloads/jce8-download-2133166.html
Connecting to MarkLogic Using SSL
When you connect to a MarkLogic App Server with mlcp, you can use an SSL-enabled connection to secure the communications. This applies to the import, export, and copy mlcp commands.
Enabling SSL on Your App Server
You can only use SSL to connect to MarkLogic through an SSL-enabled App Server. For more details, see Configuring SSL on App Servers in the Security Guide.
If you want to use SSL with both the source (input) and destination (output) App Servers during an mlcp copy job, both App Servers must be SSL enabled.
Configuring mlcp to Use SSL
By default, mlcp does not connect to MarkLogic using SSL. Use one of the following options to specify that mlcp should connect via SSL:
| mlcp Command | Command Line Option | For more information |
|---|---|---|
| import | -ssl |
Import Command Line Options |
| export | -ssl |
Export Command Line Options |
| copy | -input_ssl and/or -output_ssl |
Copy Command Line Options |
All these options accept a boolean argument value. As described in Command Line Summary, true is assumed if you leave the argument off.
If you have disabled the default SSL protocol on your App Server, you must also use one of the following options to explicitly specify the SSL protocol that mlcp should use when connecting to MarkLogic:
| mlcp Command | Command Line Option | For more information |
|---|---|---|
| import | -ssl_protocol |
Import Command Line Options |
| export | -ssl_protocol |
Export Command Line Options |
| copy | -input_ssl_protocol and/or -output_ssl_protocol |
Copy Command Line Options |
The above SSL protocol options are ignored in some cases when you use the SSL configuration technique describe in Advanced SSL Configuration.
Advanced SSL Configuration
An advanced user can specify detailed SSL configuration options by following the procedure in this section.
Internally, mlcp uses the MarkLogic Connector for Hadoop to connect to MarkLogic and move data as required by your job. If you make an implementation of com.marklogic.mapreduce.SslConfigOptions available to the connector (through mlcp), then your mlcp job will use the configuration specified by that implementation.
Use the following procedure to create an SSL config class and use it with mlcp:
- Create a class that implements
com.marklogc.mapreduce.SslConfigOptionsfrom the MarkLogic Connector for Hadoop. Your implementation should use one of the techniques described in Accessing SSL-Enabled XDBC App Servers in the XCC Developer's Guide to supply anSSLContextobject through thegetSslContextmethod. - Create a configuration file that tells the connector to use your
SslConfigOptionsclass to configure SSL connections. See the example below. - Ensure your
SslConfigOptionsimplementation is on the classpath for your mlcp job. - Use the
-confmlcp command line option to tell mlcp where to find the configuration file from Step 2. For example:mlcp import -conf yourConfFile otherMlcpOptions
The following is an example of a MarkLogic Connector for Hadoop configuration for using a custom SSL configuration for an mlcp import job. Substitute your class name for yourSslOptions in the property value.
<property>
  <name>mapreduce.marklogic.output.ssloptionsclass</name>
  <value>yourSslOptions.class</value>
</property>
The following is an example configuration file for an export job. Substitute your class name for yourSslOptions in the property value.
<property>
  <name>mapreduce.marklogic.input.ssloptionsclass</name>
  <value>yourSslOptions.class</value>
</property>
For a copy job, set either or both of mapreduce.marklogic.output.ssloptionsclass or mapreduce.marklogic.input.ssloptionsclass, depending on which connections you wish to secure with SSL.
If you set the property mapreduce.marklogic.input.usessl or mapreduce.marklogic.output.usessl in the configuration file as well as using the -ssl mlcp option, the mlcp command line options take precedence over the configuration file property setting.
When you set the property mapreduce.marklogic.input.ssloptionsclass, mlcp ignores the -ssl_protocol (for import) and -input_ssl_protocol (for copy) command line options. Similarly, if you set the property mapreduce.marklogic.output.ssloptionsclass, mlcp ignores the -ssl_protocol (for export) and -output_ssl_protocol (for copy) command line options.
For an example of a custom SSL configuration implementation, see the ContentReader example for the MarkLogic Connector for Hadoop. The example source code is available in the following ways:
- Download the MarkLogic Connector for Hadoop distribution from http://developer.marklogic.com/products/hadoop,
- Browse or clone a copy of the sources in the GitHub
marklogic-contentpumpproject at http://github.com/marklogic/marklogic-contentpump.
Using mlcp With Kerberos
You can use mlcp in local mode with Kerberos to avoid sending cleartext passwords between your mlcp client host and MarkLogic Server. You cannot use mlcp with Kerberos in distributed mode.
Before you can use Kerberos with mlcp, you must configure your MarkLogic installation to enable external security, as described in External Security in the Security Guide.
If external security is not already configured, you will need to perform at least the following procedures:
- Create a Kerberos external security configuration object. For details, see Creating an External Authentication Configuration Object in the Security Guide.
- Create a Kerberos keytab file and install it in your MarkLogic installation. For details, see Creating a Kerberos keytab File in the Security Guide.
- Create one or more users associated with an external name. For details, see Assigning an External Name to a User in the Security Guide.
- Configure your XDBC App Server to use kerberos-ticket authentication. For details, see Configuring an App Server for External Authentication in the Security Guide.
The following topics touch on additional details specific to mlcp.
Creating Users
Before you can use Kerberos for authentication, you must create at least one MarkLogic user with which mlcp can use Kerberos authentication to connect to MarkLogic Server, as described in Assigning an External Name to a User in the Security Guide.
This user must also be assigned roles and privileges required to enable your mlcp operations.
For example, if you're using mlcp to import documents into a database, then the user must have update privileges on the target database, as well as the minimum privileges required by mlcp. For details on the minimum privileges required by mlcp, see Security Considerations.
Configuring an XDBC App Server for Kerberos Authentication
The mlcp tool communicates with MarkLogic through an XDBC App Server. Configure your XDBC App Server to use Kerberos for external security, as described in Configuring an App Server for External Authentication in the Security Guide.
Configure your XDBC App Server to use kerberos-ticket authentication.
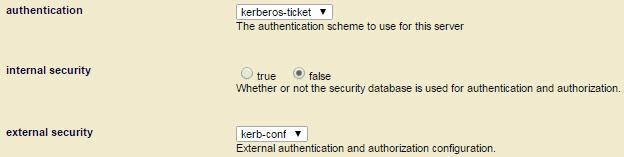
For example, if you create a configuration named kerb-conf, then configure your XDBC App Server with the following values for the authentication, internal security, and external security configuration settings in the Admin Interface:
You can use an existing XDBC App Server or create a new one. To create a new XDBC App Server, use the Admin Interface, the Admin API, or the REST Management API. For details, see Procedures for Creating and Managing XDBC Servers in the Administrator's Guide.
Configure the App Server to use kerberos-ticket authentication and the Kerberos external security configuration object you created following the instructions in Creating an External Authentication Configuration Object in the Security Guide.
When you install MarkLogic, an XDBC App Server and other services are available port 8000. Changing the security configuration for the App Server on port 8000 affects all the MarkLogic services available through this port, including the HTTP App Server and REST Client API instance.
Invoking mlcp
Once you configure your XDBC App Server and user for Kerberos external security, then you can do the following to use Kerberos authentication with mlcp:
- Use
kinitor a similar program on your mlcp client host to create and cache a Kerberos Ticket to Get Tickets (TGT) for a principal you assigned to a MarkLogic user. - Invoke mlcp with no
-usernameand no-passwordoption from the environment in which you cached the TGT.
For example, suppose you configured an XDBC App Server on port 9010 of host ml-host to use kerberos-ticket authentication. Further, suppose you associated the Kerberos principal name kuser with the user mluser. Then the following commands result in mlcp authenticating with Kerberos as user kuser, and importing documents into the database as mluser.
kinit kuser
...
mlcp.sh import -host ml-host -port 9010 -input_file_path src_dir
You do not necessarily need to run kinit every time you invoke mlcp. The cached TGT typically has a lifetime over which it is valid.