MarkLogic 10 Product DocumentationScalability, Availability, and Failover Guide — Chapter 9
Other Failover Configuration Tasks
This chapter describes the other failover procedures for configuring failover for a forest. The tasks here apply to both local-disk and shared-disk failover. For details about how failover works and the requirements for failover, see High Availability of Data Nodes With Failover. For details on configuring local-disk failover, see Configuring Local-Disk Failover for a Forest. For details on configuring shared-disk failover, see Configuring Shared-Disk Failover for a Forest. This chapter includes the following sections:
- XDQP Timeout, Host Timeout, and Host Initial Timeout Parameters
- Disabling Failover for a Group or a Forest
- Configuring the Security and Auxiliary Databases to Use Failover Forests
XDQP Timeout, Host Timeout, and Host Initial Timeout Parameters
The XDQP port is the port in which each host in the cluster listens for communication with the other hosts in the cluster. This communication happens over the XDQP port, which is set to 7999 by default. The XDQP port must be open on the network so that all other hosts in the cluster can communicate over it. If the XDQP port is not available, then hosts can get XDMP-FORESTMNT and other errors when trying to start up. For more details about communication between nodes in a cluster, see Communication Between Nodes.
Each group configuration has an xdqp timeout, a host timeout, and a host initial timeout setting. These settings monitor activity over the XDQP port, and govern the time periods which will induce failover in various scenarios.
The xdqp timeout is the time, in seconds, after which communication between e-node and d-node hosts (which happens over an internal MarkLogic Server protocol named XDQP) will time out if the host is unresponsive. If an xdqp timeout is reached during a request (for example, during a query), a message is logged to the ErrorLog.txt file and the request is retried until the host timeout is reached, after which time, if the d-node host is still unresponsive, the request will fail with an exception. The host timeout is the time, in seconds, after which a host will time out if the host is responsive, and then it will be disconnected from the cluster. The xdqp timeout must be less than the host timeout, and should typically be about one-third the value of the host timeout. This allows the system to restart the connection with the unresponsive host after the xdqp timeout occurs but before the host is disconnected from the cluster. The host timeout is what can trigger a forest to fail over. For details on when a forest will fail over, see Scenarios that Cause a Forest to Fail Over.
The default settings for xdqp timeout and host timeout should work well for most configurations. If, however, you are seeing hosts disconnect from the cluster because of timeouts, you can raise these limits (keeping the 1 to 3 ratio between xdqp timeout and host timeout).
Bear in mind, however that if the hosts are timing out, there might be other issues that are causing these timeouts such as:
- A network problem
- A disconnected cable
- Node overload. During false failover events in MarkLogic Server the affected node is so busy that it is unable to communicate its status to the other nodes in the cluster. This overloaded node cannot prevent the other nodes from voting to remove it from the cluster. See High Availability & False Failovers.
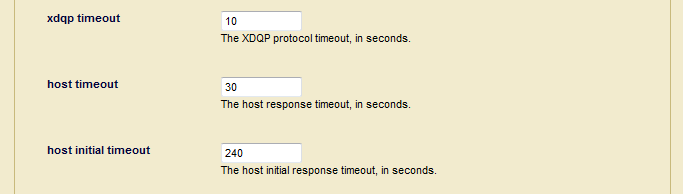
The host initial timeout is the time, in seconds, that an instance of MarkLogic Server will wait for another node to come online when the cluster first starts up before deciding that the node is down. This setting is designed to allow for staggered cluster startups, where one machine might take a little longer to reboot than another, and avoid unneeded failover of forests during this initial system startup period. The default setting is 4 minutes, and is based on the amount of time it might take for an entire system to reboot (after a power outage, for example). Failover for any forests on a particular host will not be initiated during that cluster startup for this time period. If you know that your machines take more or less time to start up, you can change the host initial timeout accordingly.
Disabling Failover for a Group or a Forest
You can disable failover at two levels of granularity: you disable failover for a group, or you can disable failover for an individual forest. To disable failover, navigate to the group or the forest and set failover enable to false. Then, if a primary host fails, it will not fail over.
Configuring the Security and Auxiliary Databases to Use Failover Forests
The Security database and all of the other auxiliary databases (Schemas, Modules, and Triggers) are set up by default to use private forests, which are forests that store their data in the default data directory. If you want to configure these databases to use shared-disk failover, then you must first move their forests to public forests (forests that have a directory specified) that store their data on a supported CFS.
In a MarkLogic Cluster, the Security database should be configured without a schemas database and without a triggers database.
The following procedure attaches the failover-enabled forest to the Security database. This procedure will work similarly for the other auxiliary database (Schemas, Modules, and Triggers).
To move an existing private forest (a forest that uses the default data directory) to a public directory, perform the following steps:
- On the database configuration page, set rebalancer enable to true, as described in Configuring the Rebalancer on a Database in the Administrator's Guide.
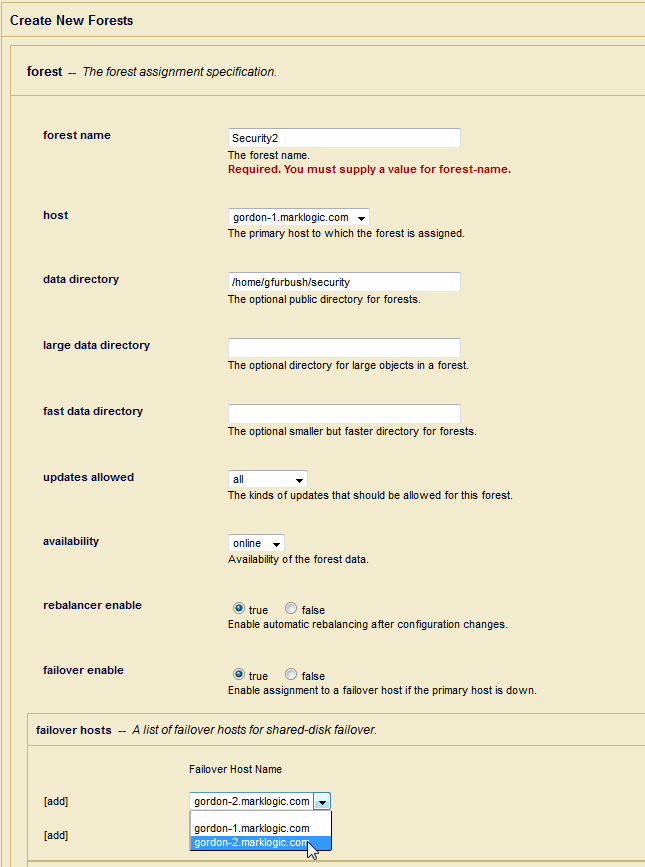
- Create a new forest. For example one named,
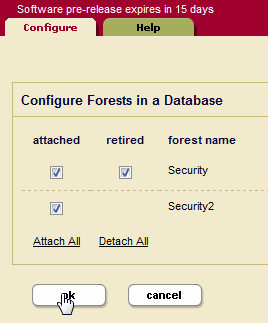
Security2. For the new forest: - Attach the public forest to the database that uses the private forest. For example, for a forest named
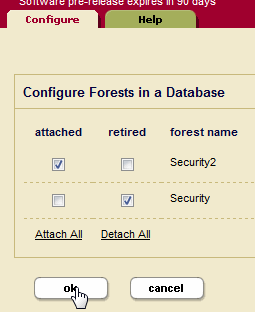
Security2, navigate to theSecuritydatabase in the Admin Interface, select the Forests link in the tree menu, and check the attached button corresponding to the forest namedSecurity2. - Retire the private forest from the database, as described in Retiring a Forest from the Database in the Administrator's Guide. For example, for the
Securityforest in theSecuritydatabase check the retired button. - Click OK. This will cause the data to be migrated from the private forest (
Security) to the public forest (Security2). You can check the status of the migration operation, as described in Checking the Rebalancer Status in the Administrator's Guide. - Once the data has migrated from the private forest to the public forest, detach your original private forest from the database. For example, for the
Securityforest, uncheck the attached button. Then click OK to detach it. - Optionally, delete the original private forest.