MarkLogic Server 11.0 Product DocumentationContent Processing Framework Guide — Chapter 2
Getting Started with a Simple CPF Application
This chapter describes the basic procedures for creating a simple CPF application. The procedures include creating two action modules and a pipeline, and how to configure a database to make use of the pipeline.
This chapter includes the following topics:
- Overview of Example CPF Application
- Create the Action Modules
- Insert the Action Modules into the Modules Database
- Create the Pipeline
- Configure a Database for Content Processing
- Insert and Update a Document in the Database
- View the Properties Document
- Extend the CPF Application
Overview of Example CPF Application
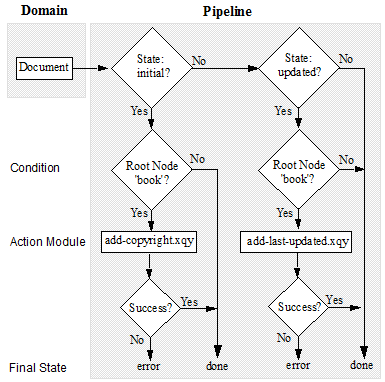
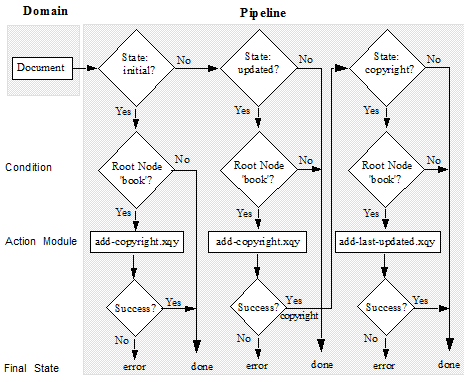
The pipeline portion of this CPF application detects when a document is initially inserted into the database and when a document is updated in the database and calls an action module to perform processing on the document. If a document is inserted into the database and has a root node of book, the pipeline calls an action module to insert a copyright node as a child of the root node. If a document is updated in the database and has a root node of book, the pipeline calls a different action module to insert a last-updated node as a child of the root node.
The following figure illustrates the logical flow of the example CPF application:
Create the Action Modules
The simple pipeline you create in Create the Pipeline will call two action modules:
- add-copyright.xqy -- inserts a
copyrightnode into the document node. - add-last-updated.xqy -- inserts a
last-updatednode into the document node.
Create a directory, named copyright, somewhere in your file system. You will later use this location to load the CPF application files into MarkLogic Server.
add-copyright.xqy
The add-copyright.xqy action module inserts a copyright node as a child of the document's book node. Copy the code below into a text editor and save as add-copyright.xqy in the copyright directory.
xquery version "1.0-ml";
import module namespace cpf = "http://marklogic.com/cpf"
  at "/MarkLogic/cpf/cpf.xqy";
declare variable $cpf:document-uri as xs:string external;
declare variable $cpf:transition as node() external;
if (cpf:check-transition($cpf:document-uri,$cpf:transition)) then try {
  let $doc := fn:doc( $cpf:document-uri )
  return
      xdmp:node-insert-child(
        $doc/book,
        <copyright>
          <year>2010</year>
          <holder>The Publisher</holder>
        </copyright>),
      xdmp:log( "add copyright ran OK" ),
      cpf:success( $cpf:document-uri, $cpf:transition, () )
}
catch ($e) {
  cpf:failure( $cpf:document-uri, $cpf:transition, $e, () )
}
else ()
add-last-updated.xqy
The add-last-updated.xqy action module inserts a last-updated node as a child of the document's book node. Copy the code below into a text editor and save as add-last-updated.xqy in the copyright directory.
xquery version "1.0-ml";
import module namespace cpf="http://marklogic.com/cpf"
  at "/MarkLogic/cpf/cpf.xqy";
declare variable $cpf:document-uri as xs:string external;
declare variable $cpf:transition as node() external;
if (cpf:check-transition($cpf:document-uri,$cpf:transition)) then try {
  let $doc := fn:doc($cpf:document-uri)
  return
      xdmp:node-insert-child(
        $doc/book,
        <last-updated>{fn:current-dateTime()}</last-updated>
      ),
  xdmp:log( "add last-updated ran OK" ),
  cpf:success($cpf:document-uri, $cpf:transition, ())
} catch ($e) {
  cpf:failure($cpf:document-uri, $cpf:transition, $e, ())
}
else ()
Insert the Action Modules into the Modules Database
CPF locates the action modules in the modules database specified in the domain configuration set in Configure a Database for Content Processing, Step 6. In this example, the modules are placed in the Modules database.
Insert the add-copyright.xqy and add-last-updated.xqy modules in the copyright directory into the Modules database under the URI /copyright/module_name.xqy. For example, using Query Console, set the content-source to the Modules database and enter:
xquery version "1.0-ml";
xdmp:document-load("C:\copyright\add-copyright.xqy",
    <options xmlns="xdmp:document-load">
      <uri>/copyright/add-copyright.xqy</uri>
    </options>),
xdmp:document-load("C:\copyright\add-last-updated.xqy",
    <options xmlns="xdmp:document-load">
      <uri>/copyright/add-last-updated.xqy</uri>
    </options>)
Create the Pipeline
When CPF is enabled on a database, every document inserted into the database is given a CPF state. The CPF state is simply a label, stored as a document property, that identifies where the document is in relation to a set of processing steps. A pipeline manages the action modules applied to a document by transitioning the document from one state to another. A state transition says something like whenever a document is moved into state A, do Y and then move the document into state B.
CPF uses a special pipeline, called the Status Change Handling pipeline, to keep track of the status of a document during content processing and to set specific states on the document. For example, the Status Change Handling pipeline sets the state of a document to initial when it is first inserted into the database, to updated when it is updated, and cleans up links when it is deleted.
The example pipeline shown below detects when a document is in the initial state and calls the add-copyright.xqy module. When a document is in the updated state, the pipeline calls the add-last-updated.xqy module. If the document is successfully modified by an action module, the pipeline transitions the document to the done state; otherwise it transitions the document to the error state. Though it is a good practice to call an action module when an error occurs, this is omitted from this example for the sake of simplicity.
Copy the pipeline code below into a text editor and save as copyright.xml in the copyright directory.
<pipeline xmlns="http://marklogic.com/cpf/pipelines">
<pipeline-name>Copyright Pipeline</pipeline-name>
<pipeline-description>Pipeline to test CPF</pipeline-description>
<success-action>
  <module>/MarkLogic/cpf/actions/success-action.xqy</module>
</success-action>
<failure-action>
  <module>/MarkLogic/cpf/actions/failure-action.xqy</module>
</failure-action>
<state-transition>
  <annotation>
    When a document containing 'book' as a root element is created,
    add a 'copyright' statement.
  </annotation>
  <state>http://marklogic.com/states/initial</state>
  <on-success>http://marklogic.com/states/done</on-success>
  <on-failure>http://marklogic.com/states/error</on-failure>
  <execute>
    <condition>
      <module>/MarkLogic/cpf/actions/namespace-condition.xqy</module>
      <options xmlns="/MarkLogic/cpf/actions/namespace-condition.xqy">
        <root-element>book</root-element>
        <namespace/>
      </options>
    </condition>
    <action>
      <module>add-copyright.xqy</module>
    </action>
  </execute>
</state-transition>
<state-transition>
  <annotation>
    When a document containing 'book' as a root element is updated,
    add a 'last-updated' element
  </annotation>
  <state>http://marklogic.com/states/updated</state>
  <on-success>http://marklogic.com/states/done</on-success>
  <on-failure>http://marklogic.com/states/error</on-failure>
  <execute>
    <condition>
      <module>/MarkLogic/cpf/actions/namespace-condition.xqy</module>
      <options xmlns="/MarkLogic/cpf/actions/namespace-condition.xqy">
        <root-element>book</root-element>
        <namespace/>
      </options>
    </condition>
    <action>
      <module>add-last-updated.xqy</module>
    </action>
  </execute>
</state-transition>
</pipeline>
Configure a Database for Content Processing
This section describes how to create and configure a database that makes use of Content Processing. All of the basic procedures for creating and configuring a database are described in the Databases chapter in the Administrator's Guide.
Perform the following steps to create a database that uses CPF:
- Create a forest named
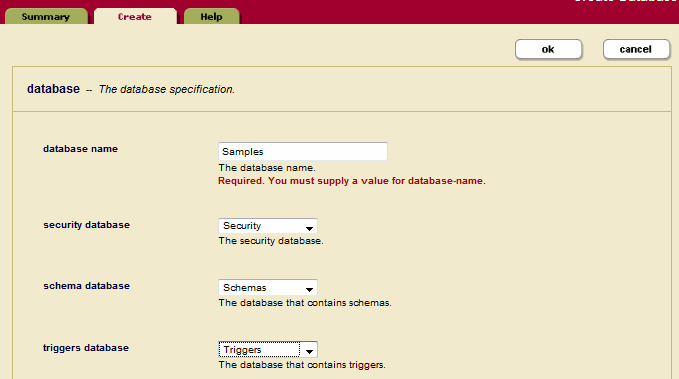
Samples. - Create a database named
Samples, specifyingTriggersas the triggers database, and attach theSamplesforest to theSamplesdatabase. - In the left tree menu, click
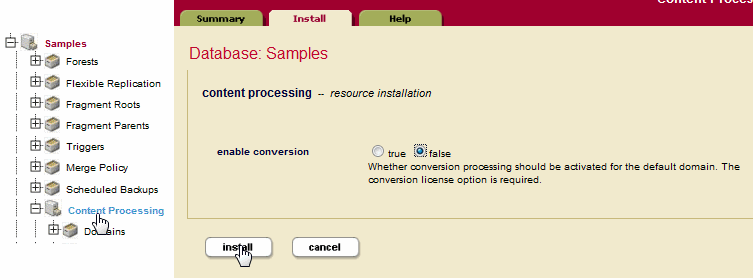
Content Processingunder theSamplesdatabase. - Click the
Installtab, selectfalsefor enable conversion, and click theInstallbutton to install content processing for theSamplesdatabase. This will enable content processing without the default conversion option. - In the left tree menu, expand
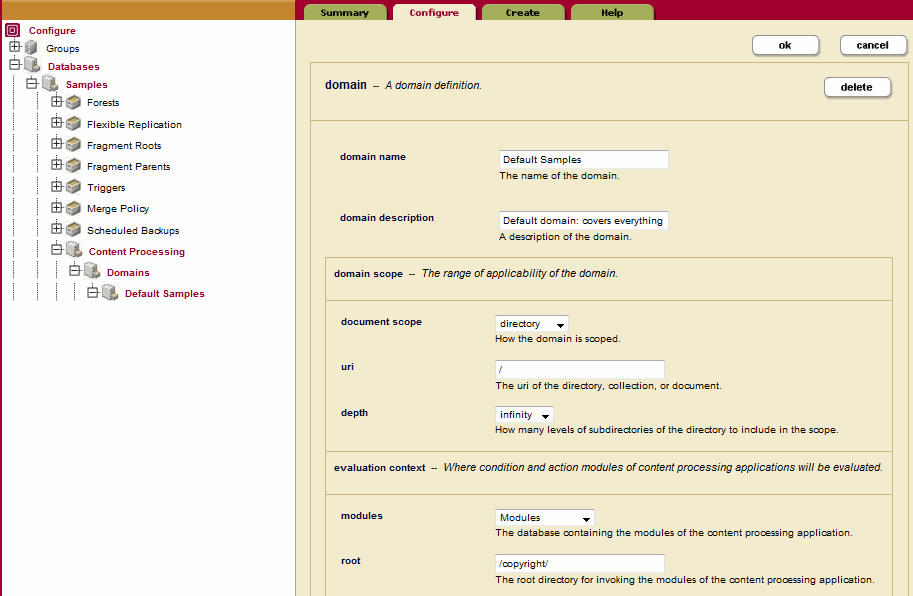
Content Processingunder theSamplesdatabase, expandDomainsand clickDefault Samples. - In the evaluation context section at the bottom, confirm that modules is set to Modules. In the root field, enter /
copyright/to identify the base path of the action modules in the Modules database. ClickOK. - In the left tree menu, under the
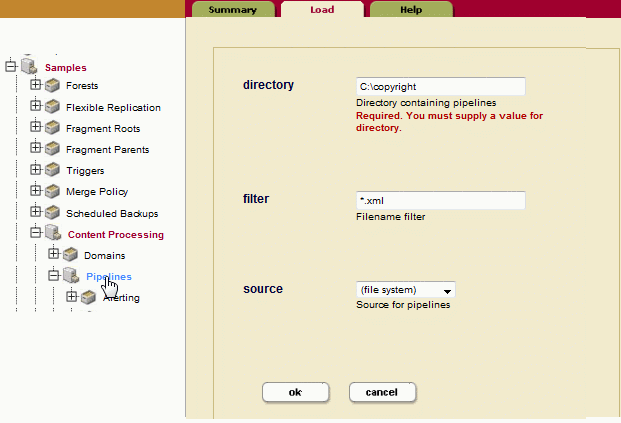
Samplesdatabase, clickPipelines. In the directory field, identify the path to the directory in which you saved thecopyright.xmlfile created in Create the Pipeline. Make sure the source is(filesystem). ClickOKto load the pipelines located in thesamplesdirectory into theTriggersdatabase. - In the left tree menu, expand
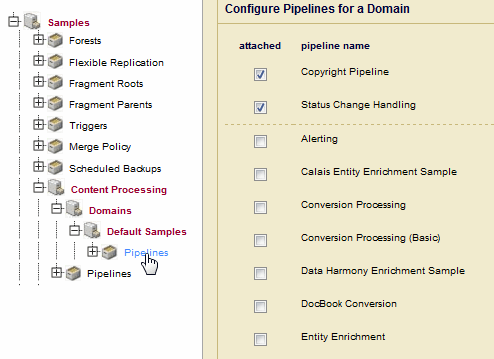
DomainsandDefault SamplesunderContent Processingand clickPipelines. Select theStatus Change HandlingandCopyright Pipelineto attach the pipelines to theDefault Samplesdomain. ClickOKwhen done.
Your CPF application is now configured and ready to respond to updates to the Samples database.
Insert and Update a Document in the Database
To see the results of the CPF pipeline, insert a document into the Samples database. For example, from Query Console, execute the following query against the Samples database.
The action modules will only enrich documents that have book as their root node.
xquery version "1.0-ml";
let $contents :=
<book>
  <bookTitle>All About George</bookTitle>
  <chapter1>
    <chapterTitle>Curious George</chapterTitle>
    <para>
       George Washington crossed the Delaware to see what was on the other side.
    </para>
  </chapter1>
</book>
return
  xdmp:document-insert("/content/george.xml", $contents)
The pipeline detects that the document is in the initial state and calls the add-copyright.xqy action to insert a copyright node as a child of the book node. The george.xml document stored in the Samples database will look like the following:
<book>
  <bookTitle>All About George</bookTitle>
  <chapter1>
    <chapterTitle>Curious George</chapterTitle>
    <para>
       George Washington crossed the Delaware to see what was on the other side.
    </para>
  </chapter1>
  <copyright>
    <year>2010</year>
    <holder>The Publisher</holder>
  </copyright>
</book>
Re-insert the document into the Samples database. The pipeline detects that the document is in the updated state and calls the add-last-updated.xqy action to insert a last-updated node as a child of the book node. The george.xml document stored in the Samples database will look like the following:
<book>
  <bookTitle>All About George</bookTitle>
  <chapter1>
    <chapterTitle>Curious George</chapterTitle>
    <para>
       George Washington crossed the Delaware to see what was on the other side.
    </para>
  </chapter1>
  <last-updated>2009-11-10T13:28:20.144-08:00</last-updated>
</book>
View the Properties Document
Every document in MarkLogic Server is associated with a properties document. If a document has been processed by CPF, its properties document will hold the CPF status information for that document. If an error occurred while a document was being processed by CPF, the error information will be captured in the properties document.
For example, from Query Console, execute the following query against the Samples database to view the properties for the george.xml document:
xquery version "1.0-ml";
xdmp:document-properties("/content/george.xml")
If there were no CPF errors, the document properties will look like:
<?xml version="1.0" encoding="UTF-8"?>
<prop:properties xmlns:prop="http://marklogic.com/xdmp/property">
  <cpf:processing-status xmlns:cpf="http://marklogic.com/cpf">done</cpf:processing-status>
   <cpf:property-hash xmlns:cpf="http://marklogic.com/cpf">d41d8cd98f00b204e9800998ecf8427e</cpf:property-hash>
   <cpf:last-updated xmlns:cpf="http://marklogic.com/cpf">2010-12-07T15:01:44.177-08:00</cpf:last-updated>
   <cpf:state xmlns:cpf="http://marklogic.com/cpf">http://marklogic.com/states/done</cpf:state>
   <prop:last-modified>2010-12-07T15:01:44-08:00</prop:last-modified>
</prop:properties>
Extend the CPF Application
A CPF pipeline often executes more than one action module to process a document. For example, you might want your CPF application to add both the copyright and last-updated nodes to documents when they are updated.
The example pipeline described in this section introduces a new state, copyright, which is set after the updated state-transition node successfully executes the add-copyright.xqy module. An additional state-transition node detects the copyright state and executes the add-last-updated.xqy module.
The following figure illustrates the logical flow of the extended CPF application:
Copy the pipeline code below into a text editor and save as ex-copyright.xml in the copyright directory.
Changes to the previous pipeline example are highlighted in bold.
<pipeline xmlns="http://marklogic.com/cpf/pipelines">
<pipeline-name>Extended Copyright Pipeline</pipeline-name>
<pipeline-description>Pipeline to test CPF</pipeline-description>
<success-action>
  <module>/MarkLogic/cpf/actions/success-action.xqy</module>
</success-action>
<failure-action>
  <module>/MarkLogic/cpf/actions/failure-action.xqy</module>
</failure-action>
<state-transition>
  <annotation>
    When a document containing 'book' as a root element is created,
    add a 'copyright' statement.
  </annotation>
  <state>http://marklogic.com/states/initial</state>
  <on-success>http://marklogic.com/states/done</on-success>
  <on-failure>http://marklogic.com/states/error</on-failure>
  <execute>
    <condition>
      <module>/MarkLogic/cpf/actions/namespace-condition.xqy</module>
      <options xmlns="/MarkLogic/cpf/actions/namespace-condition.xqy">
        <root-element>book</root-element>
        <namespace/>
      </options>
    </condition>
    <action>
      <module>add-copyright.xqy</module>
    </action>
  </execute>
</state-transition>
<state-transition>
  <annotation>
    When a document containing 'book' as a root element is updated,
    add a 'copyright' element. When done, set the state to
    ...Äòcopyright'.
  </annotation>
  <state>http://marklogic.com/states/updated</state>
  <on-success>http://marklogic.com/states/copyright</on-success>
  <on-failure>http://marklogic.com/states/error</on-failure>
  <execute>
    <condition>
      <module>/MarkLogic/cpf/actions/namespace-condition.xqy</module>
      <options xmlns="/MarkLogic/cpf/actions/namespace-condition.xqy">
        <root-element>book</root-element>
        <namespace/>
      </options>
    </condition>
    <action>
      <module>add-copyright.xqy</module>
    </action>
  </execute>
</state-transition>
<state-transition>
  <annotation>
    When the state is set to 'copyright', add a 'last-updated'
    element.
  </annotation>
  <state>http://marklogic.com/states/copyright</state>
  <on-success>http://marklogic.com/states/done</on-success>
  <on-failure>http://marklogic.com/states/error</on-failure>
  <execute>
    <condition>
      <module>/MarkLogic/cpf/actions/namespace-condition.xqy</module>
      <options xmlns="/MarkLogic/cpf/actions/namespace-condition.xqy">
        <root-element>book</root-element>
        <namespace/>
      </options>
    </condition>
    <action>
      <module>add-last-updated.xqy</module>
    </action>
  </execute>
</state-transition></pipeline>
To see the results of this new pipeline, do the following:
- Load the
ex-copyright.xmlpipeline the same way you loaded thecopyright.xmlpipeline in Configure a Database for Content Processing, Step 7. - In the Default Samples domain Pipelines configuration page, un-attach the Copyright Pipeline and attach the Extended Copyright Pipeline, as described in Configure a Database for Content Processing, Step 8.
- Insert and update the document as described in Insert and Update a Document in the Database and view the results.
