
Installation Guide for All Platforms — Chapter 2
Procedures
This section describes the following procedures to install MarkLogic on your system.
- Upgrading from Previous Releases
- Installing MarkLogic
- Starting MarkLogic Server
- Configuring the First and Subsequent Hosts
- Entering a License Key
- Checking for the Correct Software Version
- Configuring MarkLogic Server on UNIX Systems to Run as a Non-daemon User
- Removing MarkLogic
Upgrading from Previous Releases
If you have previously installed MarkLogic on a machine, you must uninstall the old release before proceeding with the new installation. For information on removing the software, see Removing MarkLogic or the Installation Guide from the previous release. This section describes the following information and upgrade paths:
- Note That Reindexing is On By Default
- Upgrading from Release 8.0-1 or Later
- Upgrading from Release 7.0, 6.0, Or 5.0
- Upgrading from Release 4.2 or earlier
If you are upgrading a cluster to a new release, see Upgrading a Cluster to a New Maintenance Release of MarkLogic Server in the Scalability, Availability, and Failover Guide. The security database and the schemas database must be on the same host, and that host should be the first host you upgrade when upgrading a cluster.
Note That Reindexing is On By Default
Before upgrading to MarkLogic 8 from MarkLogic 5, be aware that database reindexing is enabled by default.
If you are upgrading from MarkLogic 6 or MarkLogic 7, a reindex is not required, so you can skip this section.
If you have a very large database, or if you have many databases configured, they will start reindexing after you install MarkLogic 8, as soon as you accept the license key. Reindexing is a CPU and disk-intensive process, and it can take some time. Consequently, it can slow down the machine, particularly if the machine has a slow disk system (for example, a development laptop).
If you want to delay reindexing, set reindex enable to false in your database configurations before you install MarkLogic 8 (that is, you must set reindex enable to false in MarkLogic 5). MarkLogic 8 will then run in 5.0 compatibility mode until reindexing is enabled and completes. To re-enable indexing, set reindex enable to true in each of your database configurations after completing the installation (that is, after accepting the license key and after performing the configuration and security database upgrades). After reindexing has been enabled, it will commence immediately and continue until it is done, or until reindexing is disabled. For details about database compatibility, see Upgrades and Database Compatibility.
Upgrading from Release 8.0-1 or Later
This section does not apply to Early Access (ea) releases.
To upgrade from release 8.0-1 or later to the current MarkLogic 8 release (for example, if you are installing a maintenance release of MarkLogic 8), perform the following basic steps:
- Shut down MarkLogic 8 (as described in step 1 of Removing MarkLogic).
- Uninstall the old MarkLogic 8 release (as described in Removing MarkLogic).
- Install the new MarkLogic 8 release (as described in Installing MarkLogic).
If you want to install MarkLogic 8.0-8 or later version 8 release, and you plan to use the converters package with it, you will have to perform a two-step installation: first install MarkLogic Server and then install MarkLogic Converters. For more detail, see MarkLogic Converters Installation Changes in Version 8 Releases Starting at 8.0-8 and Installing MarkLogic.
If you are upgrading a cluster to a new release, see Upgrading a Cluster to a New Maintenance Release of MarkLogic Server in the Scalability, Availability, and Failover Guide. The security database and the schemas database must be on the same host, and that host should be the first host you upgrade when upgrading a cluster.
If you are upgrading two clusters that make use of database replication to replicate the security database on the master cluster, then you must enter the following to manually upgrade the security database configuration files on the machine that hosts the replica security database:
http://host:8001/security-upgrade-go.xqy?force=true
There is no direct upgrade path from Early Access releases of MarkLogic 8 to this release. If you need to move any data from an Early Access release to this release, you must re-create the data in the current release.
Upgrading from Release 7.0, 6.0, Or 5.0
MarkLogic 8 installs in the same default directory as MarkLogic 7, MarkLogic 6, and MarkLogic 5, so there is no need to move any old files around. The upgrade to MarkLogic 8 does incorporate an automatic update to the Security database and to the configuration files. The Security database upgrade occurs when you first access the Admin Interface after the MarkLogic 8 installation.
Uninstalling a previous release of MarkLogic does not remove or delete the user data files (the forests and configuration information). When upgrading to MarkLogic 8, you must first uninstall previous releases of MarkLogic Server.
If you are upgrading a cluster of two or more servers, you must first upgrade the server in which the Security database is mounted. The Security database must be available before subsequent hosts can join the cluster.
The basic steps to upgrade from MarkLogic 7, MarkLogic 6, or MarkLogic 5 to MarkLogic 8 are as follows:
- As a precaution, perform database backups on your MarkLogic Server 7.0, 6.0, or 5.0 databases.
- If you are upgrading from MarkLogic 5 and do not want to reindex a database, disable reindexing for that database before installing the new release (for example, set
reindexer enabletofalseon the Database Configuration page of the Admin Interface in MarkLogic 5). The entire database will be reindexed after upgrading to MarkLogic 8 unless you disable reindexing. For details, see Upgrades and Database Compatibility. You can always reindex the database later by settingreindexer enabledatabase configuration option totrue. - Shut down MarkLogic 7, MarkLogic 6, or MarkLogic 5 (as described in step 1 of Removing MarkLogic).
- Uninstall MarkLogic 7, MarkLogic 6, or MarkLogic 5 (as described in Removing MarkLogic).
- Install MarkLogic 8 (as described in Installing MarkLogic).
If you want to install MarkLogic 8.0-8 or later version 8 release, and you plan to use the converters package with it, you will have to perform a two-step installation: first install MarkLogic Server and then install MarkLogic Converters. For more detail, see MarkLogic Converters Installation Changes in Version 8 Releases Starting at 8.0-8 and Installing MarkLogic.
- Start MarkLogic 8 (as described in Starting MarkLogic Server).
- Open the Admin Interface in a browser (http://localhost:8001/).
- When the Admin Interface prompts you to upgrade the Security database and the configuration files, click the button to confirm the upgrade.
- If you have CPF installed in any database and you want to use any of the new pipelines in MarkLogic 8, then you must reinstall CPF for those databases. To reinstall CPF for a database, in the Admin Interface navigate to Databases -> database-name -> Content Processing, click the Install tab, and click the Reinstall button. This loads all of the new pipelines into the triggers database configured for that database.
There are some known application incompatibilities between MarkLogic 8 and MarkLogic 7, as well as some incompatibilities between 6.0 and 5.0. Some of the incompatibilities might require minor code changes to your applications. For details on these incompatibilities, see the Release Notes.
Upgrading from Release 4.2 or earlier
MarkLogic 8 only supports upgrading from Release 5.0 or later; it does not provide a direct upgrade path for previous releases of MarkLogic Server. If you are upgrading from a 4.2 or earlier release of MarkLogic Server, either install this release as a clean installation or upgrade your existing release to the latest Release 5.0, 6.0, or 7.0 before installing this release. For details on upgrading a Release 4.2 or earlier release, see the Installation Guide for MarkLogic Server 4.2. If you are upgrading from 4.2 and do not want to reindex your content, set the reindexer enable to false before upgrading. You can run MarkLogic 8 in either 4.2 or 5.0 compatibility mode, as described in Upgrades and Database Compatibility.
Installing MarkLogic
This section describes the procedure for installing MarkLogic Server on each platform. Perform the procedure corresponding to the platform to which you are installing.
If you are upgrading a cluster to a new release, see Upgrading a Cluster to a New Maintenance Release of MarkLogic Server in the Scalability, Availability, and Failover Guide. The security database and the schemas database must be on the same host, and that host should be the first host you upgrade when upgrading a cluster.
| Platform | Perform the following: |
|---|---|
| Windows x64 |
|
| Red Hat Linux x64 |
|
| Sun Solaris x64 |
|
| Mac OS X |
|
It is not recommended to install the converters while MarkLogic Server is running. The reason for this is that the server checks the converters presence and version number only upon start-up. So the server will not have accurate information about the converters in this case. The recommended installation procedure is to stop the server if it is running, install or upgrade the server, install the converters, then start the server.
The following table shows the installation directory (<marklogic-dir>) and the default data directory for each platform:
The default forest directory is the same as the default data directory if the optional data directory is not specified during forest creation. On UNIX platforms, if you want MarkLogic Server to use another location for its default data directory, make your data directory (/var/opt/MarkLogic on Linux and /var/opt/MARKlogic on Solaris) a soft link to the alternate location.
In MarkLogic 8.0-8 and later version 8 releases, MarkLogic Converters installation directory remains the same as in previous releases, namely:
| Platform | Converters Installation Directory |
|---|---|
| Windows | c:\Program Files\MarkLogic\Converters |
| Red Hat Linux | /opt/MarkLogic/Converters |
| Mac OS X | ~/Library/MarkLogic/Converters |
When a new node joins an existing cluster, the server does not try to figure out automatically whether the MarkLogic Converters package is needed or not. An XDMP-CVTNOTFOUND error will be thrown if converters/filters built-in functions are called on nodes that do not have MarkLogic Converters installed.
Starting MarkLogic Server
MarkLogic Server will automatically start when the computer reboots. To start MarkLogic Server without rebooting, perform the following command for the platform on which you are running:
This starts all of the App Servers that are configured on your MarkLogic Server.
Verifying Converters Installation In MarkLogic Version 8 Releases Starting at 8.0-8
In MarkLogic 8.0-8 or later version 8 releases, after starting MarkLogic Server, you may verify whether the converters package was installed with use of the XQuery API function xdmp:host-status or the JavaScript API function xdmp.hostStatus.
Suppose you want to verify whether converters are installed on a node with hostname englab.marklogic.com.
Open Query Console URL in a browser:
http://englab.marklogic.com:8000/qconsole/
Perform steps described in one of the following sub-sections, depending on your API of choice.
Obtaining Converters Version with XQuery API
In the Query Console, select XQuery as Query Type.
xquery version "1.0-ml";
xdmp:host-status(xdmp:host("englab.marklogic.com"))
In the response, look for the converters-version element, for example:
<converters-version>8.0-8</converters-version>
If converters are not installed, the above element will have an empty value.
Obtaining Converters Version with JavaScript API
In the Query Console, select JavaScript as Query Type.
'use strict';
xdmp.hostStatus(xdmp.host("englab.marklogic.com"))
In the response, look for the convertersVersion element, for example:
"convertersVersion" : "8.0-8"
If converters are not installed, the above element will have an empty string as its value.
Configuring the First and Subsequent Hosts
The following configuration procedures different depending on if you run MarkLogic Server in a cluster configuration or on a single host. The procedures are as follows:
- Configuring a Single Host or the First Host in a Cluster
- Configuring an Additional Host in a Cluster
- Leaving a Cluster and Becoming a Single Host
If you are configuring MarkLogic Server as a standalone host, or if this is the first host in a cluster configuration, follow the installation instructions in Section 2.4.1. Otherwise, follow the installation instructions in Section 2.4.2.
If you are upgrading a cluster to a new release, see Upgrading a Cluster to a New Maintenance Release of MarkLogic Server in the Scalability, Availability, and Failover Guide. The security database and the schemas database must be on the same host, and that host should be the first host you upgrade when upgrading a cluster.
Configuring a Single Host or the First Host in a Cluster
To configure this installation as a single host, or as the first host in a cluster, perform the following steps:
- Install MarkLogic and start MarkLogic as described in Installing MarkLogic and Starting MarkLogic Server.
- Log into the Admin Interface in a browser. It is on port 8001 of the host in which MarkLogic is running (for example, on the localhost,
http://localhost:8001). The Server Install page appears. - Click OK to continue.
- Wait for the server to restart.
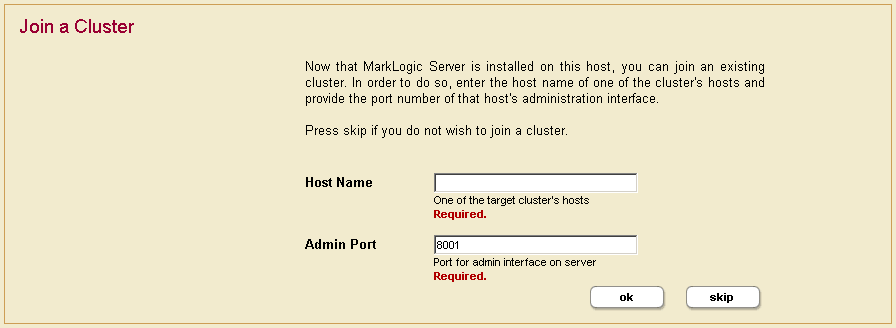
- After the server restarts, you will be prompted to join a cluster.
- Click Skip.
- You will be prompted to create an admin user. Enter the login name and password for the admin user.
- Click OK.
- You will be prompted to log in with your admin username and password.


You will now see the Admin Interface. If you do not need to add any hosts at this time, skip to Section 2.6.
Configuring an Additional Host in a Cluster
All hosts in a cluster have to be on the same platform. To configure this installation as an additional host in a cluster of the same platform, perform the following steps:
- On the node you want to add to an existing cluster, install MarkLogic and start MarkLogic, as described in Installing MarkLogic and Starting MarkLogic Server.
- Log into the Admin Interface in a browser. It is on port 8001 of the host in which MarkLogic is running (for example, on the localhost,
http://localhost:8001). The Server Install page appears. - Click OK to continue.
- Wait for the server to restart.
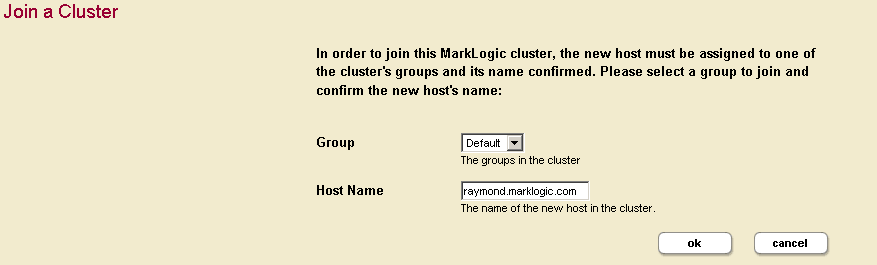
- After the server restarts, you will be prompted to join a cluster.
- Enter the DNS name or the IP address of one of the machines in the cluster. For instance, if this is the second host you are installing, you can enter the DNS name of the first host you installed.
- Click OK.
- You will be prompted for an admin username and password. You can use the admin username and password you created when installing the first host. Click OK.
- Select a Group to assign this host. Click OK.
- Click OK to confirm that you are joining the cluster.
- You have now joined the cluster.
- Click OK to transfer the cluster configuration information.

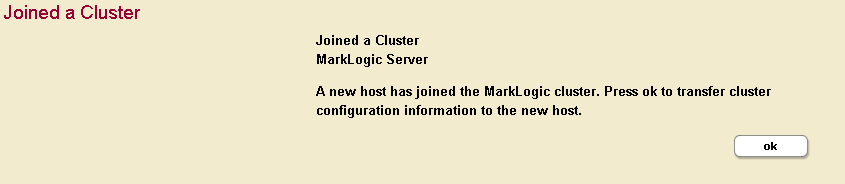
You have completed the process to join a cluster and will now see the Admin Interface.
Leaving a Cluster and Becoming a Single Host
If your host is currently in a cluster of multiple hosts, and you would like to leave the cluster and switch to a single host environment, follow the steps in this section.
A host cannot leave a cluster if there are still forests assigned to it or if it has any foreign clusters associated with it; you must delete all forests assigned to the host and de-couple any clusters associated with a host before you can leave the cluster. However, you can delete the configuration only for a forest and the forest data will remain on the filesystem, allowing you to add the forest back to the host after changing the configuration. For instructions on adding a forest to a host, see the Administrator's Guide.
Perform the following steps to leave the cluster to which a host is connected.
- Run the Admin Interface from the host you want to remove from the cluster.
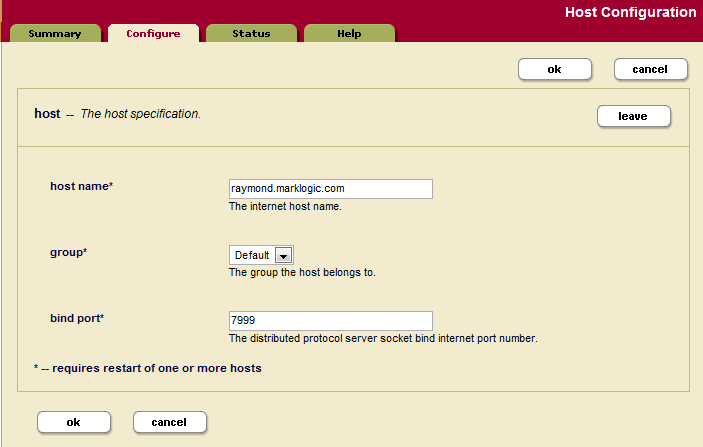
- Click the Hosts icon in the left menu tree. The Host Summary page appears.
- Click the name of the host you want to remove from the cluster, either from the left menu tree or from the Host Summary page. The Host Configuration page appears:
The Leave button only appears if the Admin Interface is running from this host.
- Click the Leave button
- Click OK to confirm leaving the cluster.
- The host restarts to load the new configuration.
- Follow the instructions in sections 'Configuring a Single Host or the First Host in a Cluster' or 'Configuring an Additional Host in a Cluster' as appropriate.
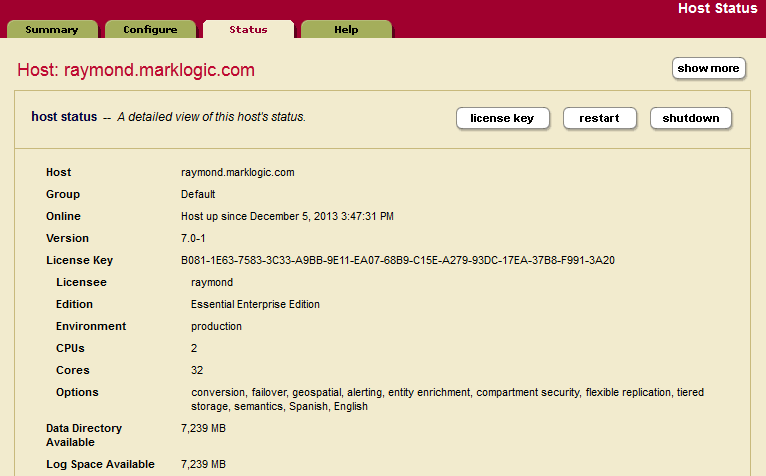
Entering a License Key
MarkLogic will run without a license key, but you should enter a valid key for what you are licensed for after installing MarkLogic. At any time, you can change the license key for a host from the Host Status page. You might need to change the license key if your license key expires, if you need to use some features that are not covered in your existing license key, if you upgrade your hardware with more CPUs and/or more cores, if you need a license that covers a larger database, if you require different languages, or for various other reasons. Changing the license key sometimes results in an automatic restart of MarkLogic (for example, if your new license enables a new language).
To change the license key for a host, perform the following steps using the Admin Interface:
- Click the Hosts icon on the left tree menu.
- Click the name of the host in which contains you want to change the license key, either on the tree menu or the summary page. The Host Configuration page appears.
- Click the Status tab. The Host Status page appears.
- Click the License Key button. The License Key Entry page appears.
- Enter your new license key information. For information about licensing of MarkLogic Server, contact your MarkLogic sales representative.
- After entering valid information in the Licensee and License Key fields, click OK. If it needs to, MarkLogic will automatically restart, and the new license key will take effect.
Checking for the Correct Software Version
After logging in with your admin username and password, the Admin Interface appears. In the left corner of the Admin Interface, the version number and product edition are displayed.
To view more details about the release of MarkLogic Server that is installed and licensed, complete the following steps:
- Click the Hosts icon on the left tree menu.
- Select the name of the host you just installed, either from the left menu tree or from the Host Summary page.
- Click the Status tab. The Host Status page appears.
- Check that <version> is correct.
To begin using MarkLogic Server, see the following document:
Otherwise, you are finished with the Admin Interface for now. You have successfully installed MarkLogic on your system.
Configuring MarkLogic Server on UNIX Systems to Run as a Non-daemon User
On UNIX-based systems (Linux and Solaris), MarkLogic runs as the UNIX user named daemon. This section describes how to change a configuration to run as a different named UNIX user. This procedure must be run by the root user. Additionally, the root user is still required for installing and uninstalling MarkLogic and for starting and stopping MarkLogic from the startup scripts.
To modify an installation to run as a user other than daemon, perform the following steps:
- In a command window on the machine in which you installed MarkLogic, log in as the
rootuser. - Make sure MarkLogic is stopped. If it is still running, stop it as follows:
- Edit the configuration file for your platform using a text editor such as
vi.Platform Configuration File to Edit Red Hat Linux /etc/marklogic.conf
Sun Solaris /etc/MarkLogic.conf
On Linux systems, you must create the
/etc/marklogic.conffile if it does not exist. This file is only read by the MarkLogic startup; it is never written to; therefore, it will survive an uninstall of MarkLogic. - In the file, edit the
MARKLOGIC_USERenvironment variable to point to the user in which you want MarkLogic Server to run. For example, if you want it to run as a user namedraymond, change the following line:MARKLOGIC_USER=daemon
MARKLOGIC_USER=raymond
- Save the changes to the
/etc/marklogic.conf(Linux) or/etc/MarkLogic.conffile (Solaris). - If you have not yet started MarkLogic after performing a clean installation (that is, after installing into a directory where MarkLogic has never been installed), then you are done and you can skip the rest of the steps in this procedure. If have an existing installation (for example, if you are upgrading to a maintenance release), then continue with the following steps.
- For all of the MarkLogic files owned by
daemon, you need to change the owner to the new user. This includes all forest data and all of the configuration files. By default, the forest data is in the following directories:Platform Default Data Directory (for configuration and log files, and default forest directory) Red Hat Linux /var/opt/MarkLogicSun Solaris /var/opt/MARKlogicFor example, on a Linux system, perform a command similar to the following, which changes the owner to the user specified earlier in the
/etc/sysconfig/MarkLogicfile:chown -R raymond
/var/opt/MarkLogic - Make sure to change the owner for all forests in the system, otherwise forests will fail to mount upon startup. Note that the above command only changes the owner for forests installed in the default directory. You need to run a similar command on the data directory for each forest in which a data directory is specified.
- When you have completed all the file and directory ownership changes, start MarkLogic as described in Starting MarkLogic Server.
Once you have performed this procedure, all new files created by MarkLogic are created with the new user ownership; there will be no need to change any ownership again.
On Linux systems, use the /etc/marklogic.conf script to set environment variables. Any configuration changes you make to the MarkLogic-supplied startup script (for example, /etc/sysconfig/MarkLogic on Linux) will not survive an upgrade and need to be merged in during any upgrade of MarkLogic (because the installation installs a new version of the startup scripts). Under Linux, the unistall process saves an old version of the scripts (for example, /etc/sysconfig/MarkLogic.rpmsave), so you can use that version to merge in your changes. If you perform a clean installation (not an upgrade installation), however, you will need to run this entire procedure again. If you use /etc/marklogic.conf for your environment variable changes, they will survive and upgrade and you will not need to merge your changes.
The following are default values of environment variables you can override in /etc/marklogic.conf on Linux-based systems (you will have to create the file if it does not exist):
MARKLOGIC_INSTALL_DIR=/opt/MarkLogic
MARKLOGIC_DATA_DIR=/var/opt/MarkLogic
MARKLOGIC_FSTYPE=ext4
MARKLOGIC_USER=daemon
MARKLOGIC_PID_FILE=/var/run/MarkLogic.pid
MARKLOGIC_UMASK=022
MARKLOGIC_DISABLE_JVM=0
MARKLOGIC_EC2_HOST
TZ=:/etc/localtime
Removing MarkLogic
To remove MarkLogic from your system, complete the following steps for the corresponding platform:
Using this procedure to remove MarkLogic from your system will not remove user data (configuration information, XQuery files used by HTTP or XDBC servers, or forest content). This data is left in place to simplify the software upgrade process. If you wish to remove the user data, you must do so manually using standard operating system commands.
In case you previously used converters/filters and want to remove this functionality:
- To remove MarkLogic Converters from a node that has MarkLogic 8.0-8 or later version 8 release installed, you can use package management tool, such as Control Panel on Windows or
rpmon Linux, to uninstall MarkLogic Converters. - To remove converters/filters from a node that has MarkLogic 8.0-7 or earlier release installed, you need to uninstall that release of MarkLogic, and then install MarkLogic Server 8.0-8 or later version 8 release but do not install MarkLogic Converters.