
MarkLogic Server 11.0 Product DocumentationMarkLogic Server on Amazon Web Services (AWS) Guide — Chapter 3
Deploying MarkLogic on EC2 Using CloudFormation
This chapter describes how to deploy MarkLogic Server using a CloudFormation Template.
- What CloudFormation Template Version to Use
- Overview of a MarkLogic Cluster on AWS
- Deployment and Startup
- Creating a CloudFormation Stack using the AWS Console
- Creating a CloudFormation Stack using the AWS Command-Line Interface
- CloudFormation Template Overview
- Anatomy of a CloudFormation Template
- Using CloudFormation with Secure Credentials
- Deleting a CloudFormation Stack
What CloudFormation Template Version to Use
There are two basic versions of the MarkLogic CloudFormation Template. One template will launch a MarkLogic cluster on AWS with a new VPC. The other template will launch a MarkLogic cluster in an existing VPC on AWS. Both templates allow you to specify parameter values at startup to configure the cluster.
Both templates enable you to launch clusters with a Classic Load Balancer (CLB) or Application Load Balancer (ALB) based on the Number of Zones, Elastic Block Storage, Auto Scaling Group, and so on. Your cluster can be in either one Availability Zone or three Availability Zones. Multiple nodes can be placed within each Availability Zone.
The examples in this chapter are based on the MarkLogic AWS template that creates a new VPC.
Overview of a MarkLogic Cluster on AWS
A Managed Cluster is automatically initialized and pre-configured with recommended topology, such as the one illustrated below. This diagram shows a typical architecture of MarkLogic Cluster on AWS. Elastic Network Interfaces are attached to each MarkLogic node and CloudWatch is used to monitor the EC2 instance health. AWS Lambda is used to managed Elastic Network Interface in VPCs.
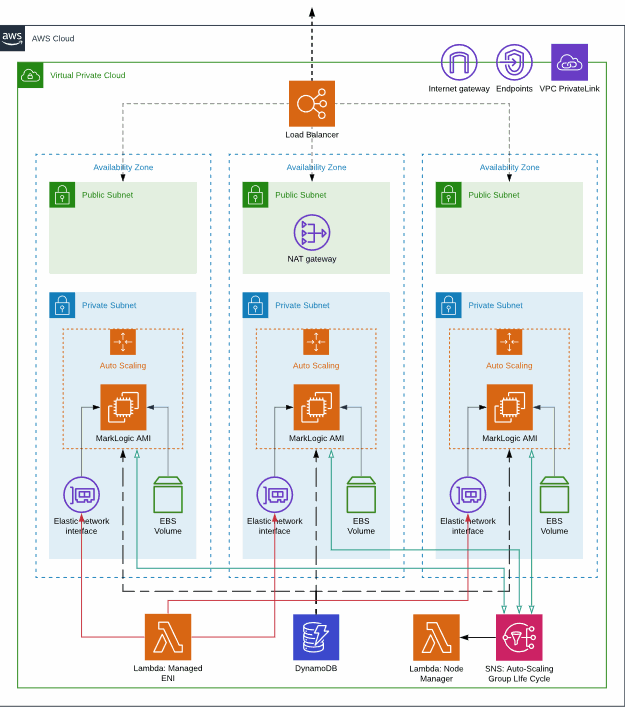
The sample CloudFormation templates implement a simple example of this reference architecture and makes use of the Managed Cluster feature. Regardless of how the cluster is created, the necessary components need to be created, configured and deployed in a controlled fashion.
Cloud Formation is an AWS Technology that allows you to specify the set of components necessary for creating a Stack. You can use one of the provided Amazon Cloud Formation templates to create a Managed Cluster. The Managed Cluster templates create:
- IAM Roles necessary for running AWS services without needing to pass in security credentials
- Security groups to control the incoming network traffic delivered to the instances.
- AutoScaling groups one per node
- Launch Configuration for the AutoScaling Groups
- Load balancer fronting all of the nodes
- EBS Volumes for each node
When using the Cloud Formation templates there are parameters that must be filled in (either via the AWS Console or any 3rd party command line tool that can launch a cloud formation stack). These parameters include:
- What Zone each node will run in
- The admin user and password for initially creating the security database
- The SSL Key name (Used to login to the instances once they are started)
- The size and EBS type of the volumes (in GB) to create for the initial data volume /var/opt/MarkLogic
- The EC2 instance type of the created instance.
- Optional: The Simple Notification Service (SNS) topic to be used to capture messages from the AutoScaling Groups and Managed Cluster Support startup procedure.
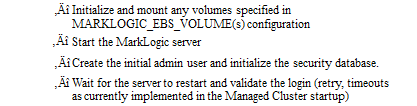
When launched, the Cloud Formation creates all the necessary resources. On startup, the Amazon EC2 nodes recognize that they are part of a Managed Cluster and perform the following actions without user intervention:
- Attach any volumes associated with this node
- Create a filesystem, if needed
- Mount the filesystem
- Start MarkLogic
- Apply and accept the EC2 license
- Either create the initial node (master) and set the admin username and password or attach to the cluster
- Associate the node with the Load Balancer
The Load Balancer detects proper running of MarkLogic via the HealthCheck App Server on port 7997 and will only direct traffic to that node if it has verified that the MarkLogic instance is up and running.
Each AutoScaling Group (ASG) detects system stability and will terminate and restart the node if the operating system is having problems. At any time you can hibernate the cluster by setting the ASG NodesPerZone value to 0. You can then restart the node by resetting the NodesPerZone to the previously set value. On restart, either by resuming from hibernate or restarting from the ASG detecting faults and restarting the server, the system will automatically do the following:
Deployment and Startup
MarkLogic is started as either a system service (from /sbin/service) or manually (for example, service MarkLogic start). The standard install starts MarkLogic on the next reboot after install, however it may be started via a script or system configuration at any point.
Any customization to the startup environment must be completely in place before MarkLogic starts the first time after an install so that it properly configures its role (single, cluster master, cluster joiner), detects the correct data volumes, Java JVM, paths, and other configurable information. This section describes the AWS-specific configuration variables.
MarkLogic is typically configured to start on boot, but also may be started manually. All startup paths should be configured to inherit the same environment so that behavior is consistent. The biggest variation depends on whether or not MarkLogic is pre-installed on the AMI.
During the init process, the interaction and dependency between MarkLogic services and other services may need to be considered especially if using an AMI without MarkLogic pre-installed and configured.
The following table shows the typical startup ordering of services on an AWS Linux system.
Note that cloud-init has several components, you can arrange using very low level configurations for file and config data to be populated in cloud-config state (52) but deployment tools use this for their own purposes. Most common is 'user scripts' which are run in 'cloud-final' (98[c]).
In Version 8, MarkLogic was moved to the LSB init configuration format which adds a dependency to run after cloud-final. This allows user configuration to be applied before MarkLogic whether or not it was pre-installed.
When MarkLogic is started, the following process runs:
/sbin/service MarkLogicis invoked . This runs via init (e.g/etc/rc5.d/S98MarkLogic), manually (e.g.service MarkLogic start)/etc/sysconfig/MarkLogicis sourced (performing the following)- Default values for core env vars are defaulted
/etc/marklogic.confis sourced (if it exists). This can modify or add variable.- If MARKLOGIC_EC2_HOST !=1, no additional EC2 specific processing is performed.
- MARKLOGIC_HOSTNAME is calculated if not defined by using EC2 metadata in order
- MARKLOGIC_AWS_ROLE is fetched from the IAM Role associated with the instance.
- MARKLOGIC_EBS is set to
/dev/sdfif not already set. - MARKLOGIC_AWS_SWAP_SIZE configures 32GB as the default swap space size value.
- If MARKLOGIC_EC2_USERDATA != 0, then EC2 user data is read and parsed. Any name/value pairs overwrite existing settings.
- If MARKLOGIC_CLUSTER_NAME, MARKLOGIC_NODE_NAME and MARKLOGIC_CLUSTER_MASTER is defined then the Managed Cluster logic is performed.
- If Step 11 is performed, all resolved variables are cached by writing to
/var/local/mlcmd.confto avoid the overhead of recalculating the values on a restart. - If Step 11 is not performed, the following occurs:
- If MARKLOGIC_ADMIN_AUTOCREATE is set and not empty:
- MARKLOGIC_ADMIN_PASSWORD is set to the value of the EC2 metadata who's key is $MARKLOGIC_ADMIN_AUTOCREATE. This overwrites any previous setting of MARKLOGIC_ADMIN_PASSWORD
- If MARKLOGIC_ADMIN_PASSWORD is not empty and MARKLOGIC_ADMIN_USERNAME is empty then set MARKLOGIC_ADMIN_USERNAME="admin"
- If MARKLOGIC_ADMIN_PASSWORD and if MARKLOGIC_ADMIN _USERNAME are both not empty then:
- Log the success or failure to the system log and console.
- If MARKLOGIC_ADMIN_AUTOCREATE is set and not empty:
Creating a CloudFormation Stack using the AWS Console
This section describes how to use the AWS Console to create a CloudFormation Stack from a template. This section describes each step in the procedure, but does not discuss all of the options for each step. For more details, see:
http://docs.aws.amazon.com/AWSCloudFormation/latest/UserGuide/cfn-console-create-stack.html.
As described in https://docs.aws.amazon.com/AmazonVPC/latest/UserGuide/vpce-interface.html#vpce-interface-limitations, the services used by the MarkLogic CloudFormation templates may not be available in all Availability Zones. If a service is not supported, you will get a UTC-0700 CREATE_FAILED error when you attempt to create a stack.
Before you can create a CloudFormation Stack, you will need the following:
- Purchase an AMI from Amazon MarketPlace or create your own AMI (if you have an active maintenance contract, you can contact MarkLogic Technical Support for help). The sample CloudFormation templates have the latest MarketPlace AMIs embedded in them, you will need to edit these with the appropriate AMI IDs.
- A CloudFormation template. You can either obtain a template from MarkLogic or create your own, as described in CloudFormation Template Overview. The MarkLogic CloudFormation templates are available from http://developer.marklogic.com/products/cloud/aws.
- An IAM Role, as described in Creating an IAM Role
- A Key Pair, as described in Creating a Key Pair
- An SNS Topic, as described in Creating a Simple Notification Service (SNS) Topic
The following procedure describes how to create a CloudFormation Stack from a template:
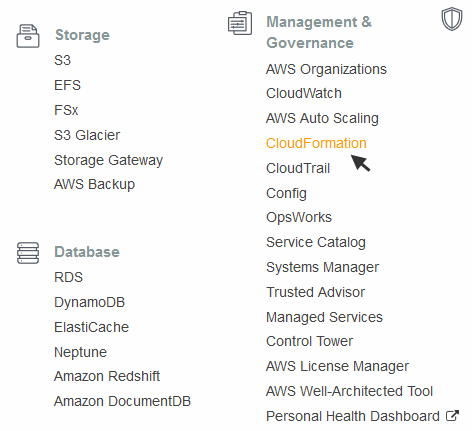
- Click on Services in the upper left-hand portion of the AWS page to access the Amazon Web Services home page:
- In the Amazon Web Services home page, click on CloudFormation:
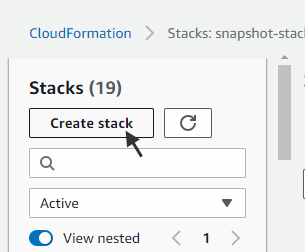
- In the CloudFormation Stacks page, click Create Stack.
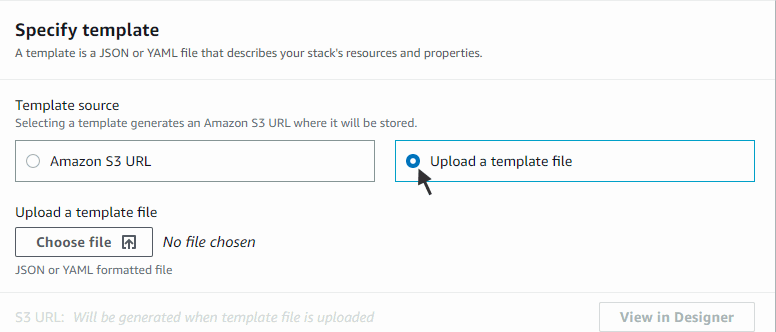
- In the Select Template window, click Upload a template to Amazon S3 and select the CloudFormation template you downloaded from http://developer.marklogic.com/products/cloud/aws. When done, click Next.
The screens and descriptions below are for a AWS CloudFormation template that creates a new VPC.
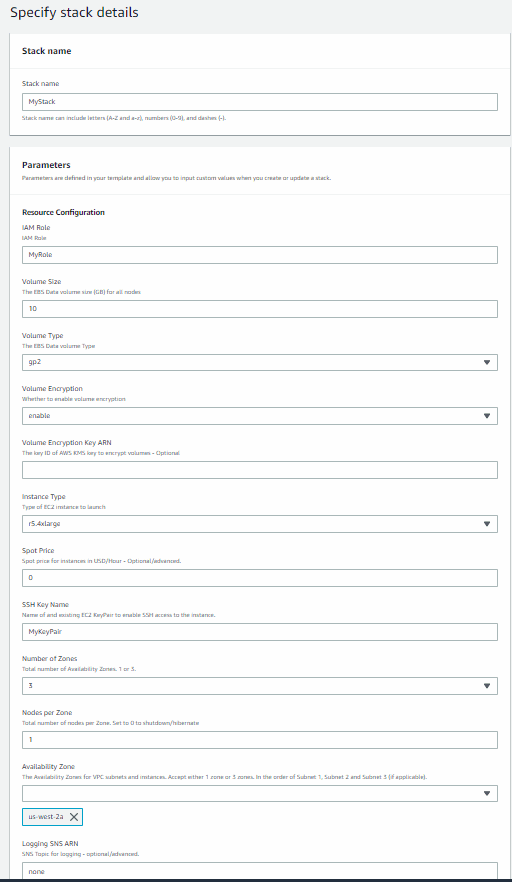
- In the Specify Details window, enter the name of the stack and information shown in the table below. Your Stack Name is used to identify all of the resources for your stack, including the names of your EBS volumes. It is a best practice to name your stack with an easily identifiable name, such as your user name. The EBS volumes for all but the first node in each zone are not removed when you delete the stack, so you will want to be able to easily identify those volumes should you want to remove them after deleting your stack.
The Resource Configuration parameters are described in the following table. CloudFormation does not have real time validation of parameter values. The following assumptions are made when using CloudFormation templates to deploy clusters:
Parameter Name Default Description IAMRole Requires Input The name of the IAM Role you created in Creating an IAM Role. Volume Size 10 The initial EBS volume size (GB). The range of valid values are 10 - 1000. Volume Type gp2 The EBS Data volume Type. Allowed Values: standardorgp2Volume Encryption enable Whether to enable volume encryption. Select either enableordisable.Volume Encryption Key ARN The optional key ID of AWS KMS key to encrypt volumes. InstanceType r5.4xlarge The type of EC2 instance to launch. These vary by release, product type, zone, region, and availability. There is no one single instance type that works for all MarkLogic deployments. Do note, however, that MarkLogic deployments generally have higher memory and storage I/O bandwidth requirements than legacy RDBMS deployments - so you'll likely want to start with Memory Optimized, Storage Optimized, or General Purpose instance types. The best instance type for your deployment will depend on your application code, workload, networking/system/cluster configurations, storage options, cloud architecture, etc. We recommend doing extensive testing in lower environments before using a specific instance type in production. Refer to http://developer.marklogic.com/products/cloud/aws for the current supported values for these fields. For details on each instance type, see http://docs.aws.amazon.com/AWSEC2/latest/UserGuide/instance-types.html. Only HVM instance types are now supported for Marketplace AMI's, PVM types may be used with custom AMIs. MarkLogic AMIs will not run on micro instances.
SpotPrice 0 Spot price for instances in USD/Hour. Allowed values are: 0 - 2. If not 0, then the amount given is a spot request for the instances is used instead of on-demand. SSH Key Name Requires Input The name of the Key Pair you created in Creating a Key Pair. Number of Zones 3 Total number of Availability Zones in a region. Allowed values are: 1 or 3. Nodes Per Zone 1 The number of nodes (hosts) to create for each zone. Allowed values are: 0 to 20. For example, a value of
1will create one node for each zone, a total of three nodes for the cluster.Availability Zone Requires Input The Availability Zones for subnets. Accept either 1 zone or 3 zones. In the order of Subnet 1, Subnet 2 and Subnet 3 (if applicable). Each zone in your cluster should be in the same region, such as
us-eastorus-west.The values of the
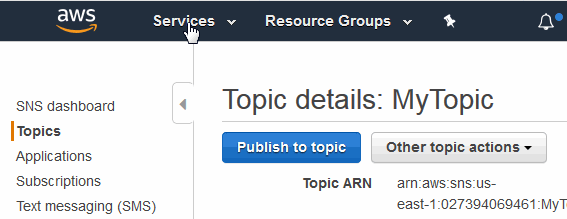
Availability ZoneandNumber of Zonesparameters must match.Logging SNS ARN none The Simple Notification Service (SNS) needed for logging. Enter the entire Topic ARN as it appears in the SNS Dashboard (for example, arn:aws:sns:us-east-1:1234567890123456:mytopic). For details on how to obtain an SNS Topic, see Creating a Simple Notification Service (SNS) Topic. - In the Network Configuration portion of the window are the parameters for the new VPC.
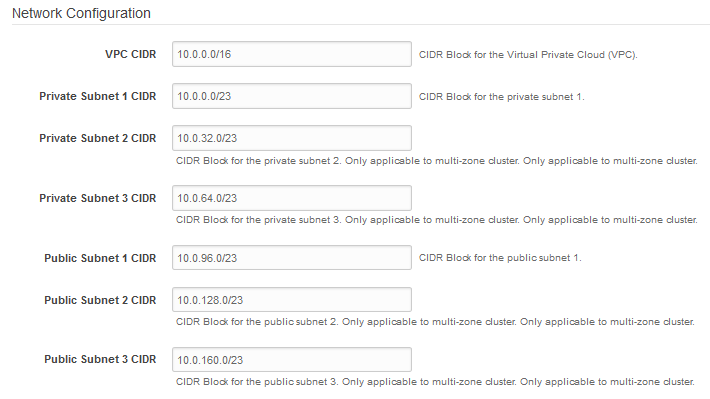
The Network Configuration parameters for the new VPC are described in the following table.
If you are using the MarkLogic AWS template that uses an existing VPC, you will see the following parameters:
- In the MarkLogic Configuration portion of the window are the parameters for the accessing MarkLogic Server. Click Next at the bottom when done.

The MarkLogic Configuration parameters are described in the following table.
If you want to use the BYOL (bring your own license) option, you must enter the License information in the Licensee and LicenseKey fields. If you don't provide any values for those fields, or leave the default none, the template automatically chooses the pay as you go instances option without any notification.
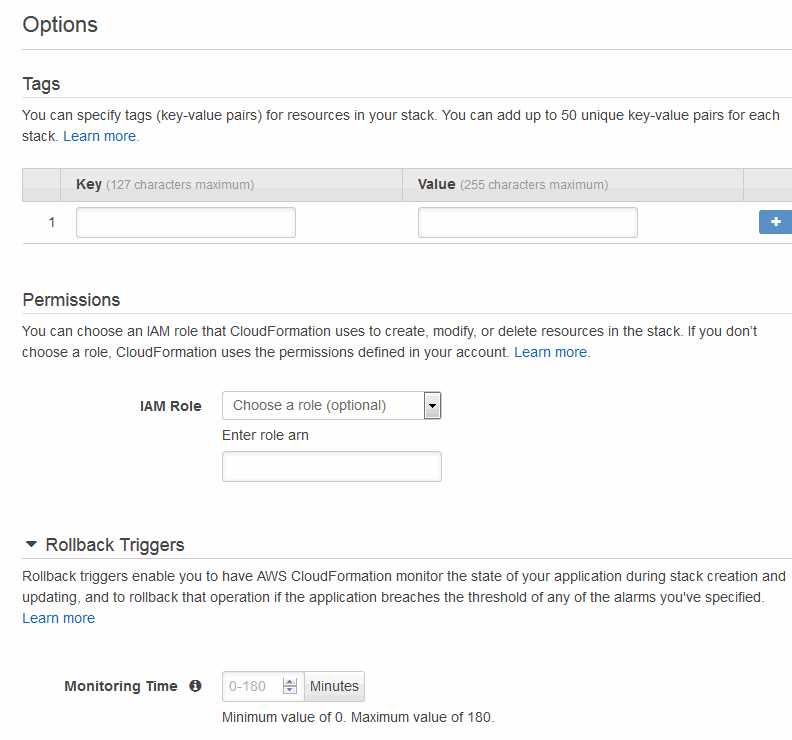
- In the Options window, enter any tags for your stack. The tag(s) you provide identify your EC2 resources in the EC2 dashboard. For example, if you identify the Key as
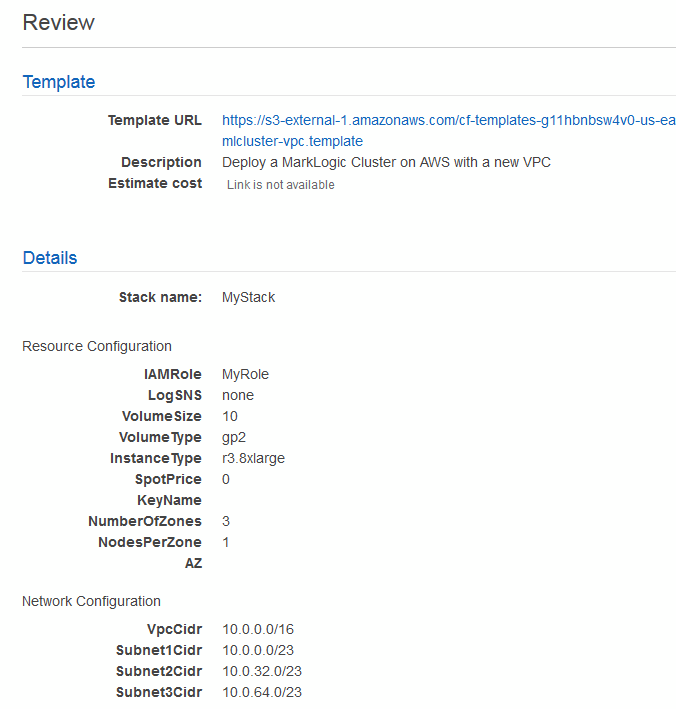
Name, the given Value (Test Stack, for example) will appear in the Name column of the Instance list in the EC2 dashboard. For details on tags, see http://docs.aws.amazon.com/AWSCloudFormation/latest/UserGuide/cfn-console-add-tags.html. Enter the role-back triggers, as described in https://docs.aws.amazon.com/AWSCloudFormation/latest/APIReference/API_RollbackConfiguration.html. When done, click Next. - In the Review window, review the settings. Click Previous to make any changes. When done, click Create.
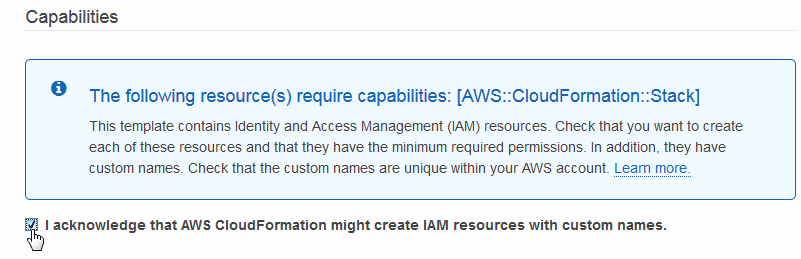
- Click on the I acknowledge prompt. Skipping this step will result in a failed stack.
- You will be notified that the stack is being created. The name, create date, and status of your stack will appear at the top of the page.

- It takes a few minutes depending on the speed of AWS and the number of resources you are creating in the stack. You can Use the Events tab in the bottom portion of the page to view the progress of your stack creation. Click Refresh to see the latest status.
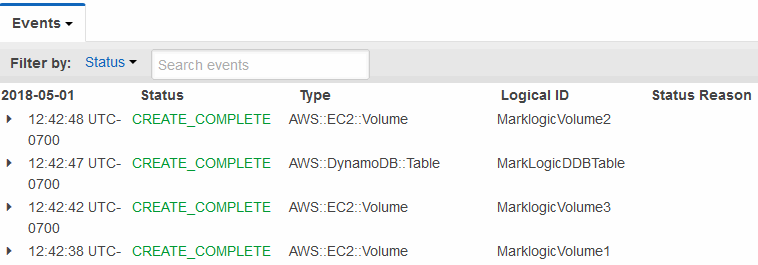
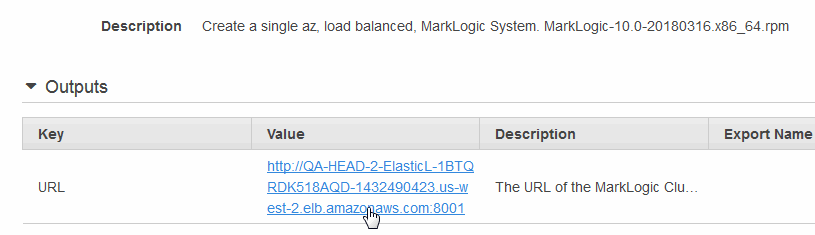
- A status of CREATE_COMPLETE indicates that your AutoScaling groups have been created. Wait approximately 5-10 minutes for your EC2 instances to boot up before opening your Stack Detail page, navigating to the Outputs section, and clicking the Load Balancer URL in the Value column. This will open the MarkLogic Admin Interface on an available instance.
If the URL in the Outputs tab does not work, wait another 5-10 minutes and try again.
- Log in using the administrator username and password you specified in 5.
Do not make any changes in the Administrator Interface until all of the hosts have been created and joined the cluster. If in doubt about the status of your stack, check the logs from the SNS topic described in Creating a Simple Notification Service (SNS) Topic.
Creating a CloudFormation Stack using the AWS Command-Line Interface
In addition to using the AWS CloudFormation console, you can use the AWS CloudFormation command line interface (CLI) to create a CloudFormation stack. The AWS CloudFormation CLI is described in http://aws.amazon.com/cli/.
The AWS command line tools do not work with spaces for CloudFormation parameter values. Any parameter values containing a space will result in an error.
The list of CLI commands are documented in http://docs.aws.amazon.com/AWSCloudFormation/latest/UserGuide/CFN_CMD.html.
The following is a summary on how to create a stack using the AWS CloudFormation CLI:
- Install and configure AWS CloudFormation CLI environment for your system, as described in http://docs.aws.amazon.com/AWSCloudFormation/latest/UserGuide/cfn-installing-cli.html.
- Call the cfn-create-stack function with similar parameters as shown in Creating a CloudFormation Stack using the AWS Console. In addition, you must include the parameter:
--capabilities "CAPABILITY_IAM", as described in https://aws.amazon.com/cloudformation/resources/templates/govcloud-us/. - The cfn-create-stack function runs asynchronously, so it will return an id for the stack before the stack is created. You can use the cfn-describe-stack-events command with the stack id to check the status of your stack.
- Once the stack is created, you can use the cfn-describe-stacks function to obtain the URL to the MarkLogic Admin Interface.
CloudFormation Template Overview
CloudFormation Templates consist of JSON code that is used to create a collection of AWS resources known as a stack. CloudFormation Templates are described in detail in http://docs.aws.amazon.com/AWSCloudFormation/latest/UserGuide/template-guide.html. This section describes the CloudFormation Template used to create a stack that consists of a three-plus node MarkLogic cluster and creates a new VPN.
Amazon Linux 2 is the recommended base image for a customed MarkLogic image.
The Sample Templates available from http://developer.marklogic.com/products/cloud/aws are designed to demonstrate the architecture and IT requirements for the managed cluster feature and be useable out of the box as an example only. A production template will likely need to be customized to accommodate your specific IT requirements and may hard code many of the values exposed as parameters and mappings in these examples. For example, if you will only run in one region, there is no need for a mapping table of Region to AMI ID.
Before attempting to modify this template, it is a best practice to run the unmodified template, as described in Creating a CloudFormation Stack using the AWS Console, to become familiar with the procedures for building a cloud stack.
The Sample Templates call sub-templates and wait for their completion. There are four sub-templates:
Each of the sub-templates can be used separately. For example, you can use the VPC stack template to create a VPC and use the master template for an existing VPC to launch a MarkLogic cluster.
VPC Stack
The VPC Stack is only applicable to the template that creates a MarkLogic cluster with new VPCs. The following resources are created with this stack:
- VPC
- Subnet 1
- Subnet 2 (if applicable)
- Subnet 3 (if applicable)
- VPC Route Table
- VPC Route
- Internet Gateway
The Internet Gateway, VPC Route and Route Table are configured so that each node in the cluster can have access to the internet.
Managed ENI Stack
The Managed ENI Stack deploys a Lambda function to define a custom resource in Cloud Formation template called the Managed ENI. The Lambda function uses the AWS Python SDK (boto3) to define CloudFormation lifecycle hook to manage the Elastic Network Interface.
Upon launch of the stack, the AWS Lambda function creates an Elastic Network Interface based on the node count, subnets, and security group. The Network Interfaces created are tagged with a stack identifiers.
Upon deletion of the stack, the AMS Lambda function deletes the Elastic Network Interfaces that were tagged with the stack identifiers mentioned above.
The Managed ENI Stack defines a new IAM role with the following policies:
Node Manager Stack
The Node Manager Stack deploys a Lambda function (using AWS Python SDK boto3) that is hooked up with Auto Scaling Group's life cycle event and manages each cluster node. The following resources will be created by the stack:
The Node Manager Stack defines a new IAM role with the following policies:
Endpoint Stack
The Endpoint Stack sub-template is invoked by the VPC Stack sub-template to create AWS Interface Endpoints for the VPC. Endpoint Stack creates VPC endpoints for EC2, KMS and ELB in the same region of the parent stack. The following resources are created by Endpoint Stack:
The Endpoint Stack defines a new IAM role with the following policies:
Anatomy of a CloudFormation Template
CloudFormation does not have real time validation of parameter values. The following are some of the behaviors to be aware of when using CloudFormation templates to deploy clusters.
- All of the template parameters must have values.
- The parameter values of
Availability ZoneandNumber of Zonesmust match. - When deploying to an existing VPC, the parameter values of the
Availability Zonemust be consistent with the parameter values ofSubnets. For example, if theAvailability Zonevalues areus-west-2a,us-west-2b, andus-west-2c, then Subnets must provide IDs of subnets located in the zones in above order. - When deploying to an existing VPC, the Subnets must be in the specified VPC.
Load balancer type depends on the number of zones selected. Select three zones for an Application Load Balancer (ALB), or select one zone for a Classic Load Balancer (CLB).
The main sections of the CloudFormation Template are as follows:
- Metadata
- Parameters Declaration
- Conditions Declaration
- Mappings Declaration
- Resources Declaration
- Outputs Declaration
These sample templates create a load balancer as well as enable a public IP for each MarkLogic Server. The Load Balancer type depends on the number of zones selected. Select three zones for an Application Load Balancer (ALB), or select one zone for Classic Load Balancer (CLB). The output of the stack lists the URL of the Load Balancer.
When the Instance Public IP address is enabled, you are able to directly access each host (port 8000 for example) and SSH (when a public DNS is configured as described in Accessing a MarkLogic Server Instance). Otherwise, you cannot directly access the hosts. It is a best practice to not enable the public IP address.
The Instance Public IP address must be enabled to use SNS topic described in Creating a Simple Notification Service (SNS) Topic.
Most applications need to use the load balancer as their endpoint. XCC applications, such as mlcp, need to set the xcc.httpcompliant=true mode to connect through the ELB regardless of session affinity issues. For details, see Using a Load Balancer or Proxy Server with an XCC Application in the XCC Developer's Guide.
Metadata
The Managed Cluster Feature uses an external metadata store (a DynamoDB table) to save the configuration information for the cluster. Whenever a cluster event happens, the metadata store is updated with latest cluster node information to ensure that the cluster remains available and reliable in different kinds of cloud service failure events.
AWSTemplateFormatVersion: 2010-09-09
Description: Deploy a MarkLogic Cluster on AWS with a new VPC
Metadata:
  version: 9.0-20180427
  binary: MarkLogic-9.0-20180427.x86_64.rpm
  AWS::CloudFormation::Interface:
    ParameterGroups:
      - Label:
          default: "Resource Configuration"
        Parameters:
          - IAMRole
          - LogSNS
          - VolumeSize
          - VolumeType
          - InstanceType
          - SpotPrice
          - KeyName
          - NumberOfZones
          - NodesPerZone
          - AZ
      - Label:
          default: "Network Configuration"
        Parameters:
          - VPC
          - PublicSubnet1
          - PublicSubnet2
          - PublicSubnet3
          - PrivateSubnet1
          - PrivateSubnet2
          - PrivateSubnet3
      - Label:
          default: "MarkLogic Configuration"
        Parameters:
          - AdminUser
          - AdminPass
          - Licensee
          - LicenseKey
    ParameterLabels:
      AdminUser:
        default: Admin User
      AdminPass:
        default: Admin password
      Licensee:
        default: Licensee
      LicenseKey:
        default: License Key
      IAMRole:
        default: IAM Role
      LogSNS:
        default: Logging SNS ARN
      VolumeSize:
        default: Volume Size
      VolumeType:
        default: Volume Type
      InstanceType:
        default: Instance Type
      SpotPrice:
        default: Spot Price
      KeyName:
        default: SSH Key Name
      NumberOfZones:
        default: Number of Zones
      NodesPerZone:
        default: Nodes per Zone
      AZ:
        default: Availability Zone
      VPC:
        default: VPC
      PublicSubnet1:
        default: Public Subnet 1
      PublicSubnet2:
        default: Public Subnet 2
      PublicSubnet3:
        default: Public Subnet 3
      PrivateSubnet1:
        default: Private Subnet 1
      PrivateSubnet2:
        default: Private Subnet 2
      PrivateSubnet3:
        default: Private Subnet 3
Parameters Declaration
The Parameters portion of the template defines the parameters necessary to build your MarkLogic cluster. The three zones define the hosted zones on which the servers in cluster are to be created. All of the zones should be in the same region, as described in http://docs.aws.amazon.com/AWSEC2/latest/UserGuide/using-regions-availability-zones.html.
For a description of each parameter, see the table at the end of 5 in Creating a CloudFormation Stack using the AWS Console.
The parameters used to configure the resources are shown below.
Parameters:
  # resource configuration
  IAMRole:
    Description: IAM Role
    Type: String
  VolumeSize:
    Description: The EBS Data volume size (GB) for all nodes
    Type: Number
    MinValue: '10'
    MaxValue: '1000'
    Default: '10'
  VolumeType:
    Description: The EBS Data volume Type
    Type: String
    AllowedValues:
      - standard
      - gp2
    Default: gp2
  InstanceType:
    Description: Type of EC2 instance to launch
    Type: String
    Default: r5.4xlarge
    AllowedValues:
      - ---- Essential Enterprise and Bring-Your-Own-License ----
      allowed instance types ......
      - -------------- Bring-Your-Own-License Only --------------
      allowed instance types ......
  SpotPrice:
    Description: Spot price for instances in USD/Hour - Optional/advanced.
    Type: Number
    MinValue: '0'
    MaxValue: '2'
    Default: '0'
  KeyName:
    Description: Name of and existing EC2 KeyPair to enable SSH access to the instance.
    Type: String
  NumberOfZones:
    Description: Total number of Availability Zones. 1 or 3.
    Type: Number
    AllowedValues:
      - 1
      - 3
    Default: 3
  NodesPerZone:
    Description: Total number of nodes per Zone. Set to 0 to shutdown/hibernate
    Type: Number
    MinValue: '0'
    MaxValue: '20'
    Default: '1'
The parameters used to configure the network are shown below.
The cluster can be in either one Availability Zone or three Availability Zones. Multiple nodes can be placed within an Availability Zone. The Availability Zones for subnets. Accept either 1 zone or 3 zones. In the order of Subnet 1, Subnet 2 and Subnet 3 (if applicable).
  AZ:
    Description: The Availability Zones for VPC subnets. Accept either 1 zone or 3 zones. In the order of Subnet 1, Subnet 2 and Subnet 3 (if applicable).
    Type: 'List<AWS::EC2::AvailabilityZone::Name>'
  LogSNS:
    Description: SNS Topic for logging - optional/advanced. Requires instance public IP enabled.
    Type: String
    Default: none
  # network configuration
     Parameters for VPC and subnets ........
The parameters used to configure MarkLogic Server are shown below.
  # marklogic configuration
  AdminUser:
    Description: The MarkLogic administrator username
    Type: String
  AdminPass:
    Description: The MarkLogic administrator password
    Type: String
    NoEcho: 'true'
  Licensee:
    Description: The MarkLogic Licensee or 'none'
    Type: String
    Default: none
  LicenseKey:
    Description: The MarkLogic License Key or 'none'
    Type: String
    Default: none
Conditions Declaration
The Conditions Declaration specifies the conditions under which portions of the template are used. For example, if NumberOfZones is not set to 1, the MultiZone condition enables the template to create three Availability Zones.
Conditions:
  UseLogSNS:
    - !Not [!Equals [!Ref LogSNS, "none"]]
  UseSpot: !Not
    - !Equals
      - !Ref SpotPrice
      - 0
  MultiZone: !Not [!Equals [!Ref NumberOfZones, 1]]
  EssentialEnterprise:
    !And [!Equals [!Ref LicenseKey, ''], !Equals [!Ref Licensee, '']]
  UseVolumeEncryption: !Equals [!Ref VolumeEncryption, 'enable']
  HasCustomEBSKey: !Not [!Equals [!Ref VolumeEncryptionKey, '']]
Mappings Declaration
The Mappings portion of the template provides a way of looking up values from a table.
The LicenseRegion2AMI map defines the values for all of the possible instance types. The LicenseRegion2AMI map defines the AMIs for each region. Each region has both a Enterprise and BYOL (Bring Your Own License) AMI. For details on AMIs, see https://docs.aws.amazon.com/AWSEC2/latest/UserGuide/AMIs.html.
You can set LambdaPackageBucket to point to your own private bucket.
Mappings:
  Variable:
    LambdaPackageBucket:
      base: 'marklogic-lambda-'
    TemplateUrl:
      base: 'https://s3.amazonaws.com/marklogic-releases'
    S3Directory:
      base: '9.0-9'
  LicenseRegion2AMI:
      us-east-1:
        Enterprise: ami-0c59ddcc7544fed1c
        BYOL: ami-0721c0f5c63ecd7c1
      All other supported regions .......
Resources Declaration
The Resources portion of the template defines all of the AWS resources created for your stack by this template. Each resource is defined as a specific AWS type. The details of each resource type are described in http://docs.aws.amazon.com/AWSCloudFormation/latest/UserGuide/aws-template-resource-type-ref.html.
These resources defined in this template include:
- VpcStack -- See VPC Stack for details.
- ManagedEniStack -- See Managed ENI Stack for details.
- NodeMgrLambdaStack -- See Node Manager Stack for details.
- Elastic Block Store (EBS) volumes
- DynamoDB Table (DynamoDB is the Amazon implementation of the Metadata Database)
- AutoScaling Groups (ASG). For each ASG, there are the following resources:
- Load Balancer ports
- Health Check values
- Security Group for each EC2 Instance
Because ENI is not managed by the CloudFormation stack directly, the Managed ENI Lambda function needs to identify the ENIs created in order to have the ability to update or clean them up. All ENIs created by the Lambda function are tagged with stack information.
The Availability Zones for VPC subnets. Accept either 1 zone or 3 zones. In the order of Subnet 1, Subnet 2 and Subnet 3 (if applicable). The Subnets in the VPC. You must provide values for all three public and private subnets for successful deployment. The order must be same as Availability Zone(s) selected. If you only select one Availability Zone, the second and third subnets will be ignored.
Upon launch of the ManagedEniStack stack, the AWS Lambda function creates an Elastic Network Interface based on the node count, subnets, and security group. The Network Interfaces created are tagged with a stack identifier.
ManagedEniStack:
    Type: AWS::CloudFormation::Stack
    DependsOn:
      - VpcStack
      - InstanceSecurityGroup
    Properties:
      NotificationARNs:
        - !If
          - UseLogSNS
          - !Ref LogSNS
          - !Ref 'AWS::NoValue'
      Parameters:
        S3Bucket: !Join [ "", [!FindInMap [Variable,"LambdaPackageBucket","base"], !Ref 'AWS::Region']]
        S3Directory: !FindInMap [Variable,"S3Directory","base"]
        NodesPerZone: !Ref NodesPerZone
        NumberOfZones: !Ref NumberOfZones
        Subnets: !If
          - MultiZone
          - !Join
            - ','
            - - !GetAtt [VpcStack, Outputs.PrivateSubnet1Id]
              - !GetAtt [VpcStack, Outputs.PrivateSubnet2Id]
              - !GetAtt [VpcStack, Outputs.PrivateSubnet3Id]
          - !GetAtt [VpcStack, Outputs.PrivateSubnet1Id]
        ParentStackName: !Ref 'AWS::StackName'
        ParentStackId: !Ref 'AWS::StackId'
        SecurityGroup: !Ref InstanceSecurityGroup
      TemplateURL: !Join ['/', [!FindInMap [Variable,"TemplateUrl","base"],!FindInMap [Variable,"S3Directory","base"],'ml-managedeni.template']]
      TimeoutInMinutes: 5
The NodeMgrLambdaStack portion of the template calls the ml-nodemanager.template sub-template to deploy a Lambda function that is hooked up with Auto Scaling Group's life cycle event and manages each cluster node. The resources created by the stack are described in Node Manager Stack.
  NodeMgrLambdaStack:
    Type: AWS::CloudFormation::Stack
    DependsOn: ManagedEniStack
    Properties:
      NotificationARNs:
        - !If
          - UseLogSNS
          - !Ref LogSNS
          - !Ref 'AWS::NoValue'
      Parameters:
        S3Bucket: !Join [ "", [!FindInMap [Variable,"LambdaPackageBucket","base"], !Ref 'AWS::Region']]
        S3Directory: !FindInMap [Variable,"S3Directory","base"]
      TemplateURL: !Join ['/', [!FindInMap [Variable,"TemplateUrl","base"],!FindInMap [Variable,"S3Directory","base"],'ml-nodemanager.template']]
      TimeoutInMinutes: 5  NodeMgrLambdaStack:
The EBS volumes used by /var/opt/MarkLogic for the first node in Zone1, Zone2 and Zone3. For details on the AWS::EC2::Volume type, see http://docs.aws.amazon.com/AWSCloudFormation/latest/UserGuide/aws-properties-ec2-ebs-volume.html.
All EBS volume definitions are similar to MarklogicVolume1 for Zone1, shown below.
  MarklogicVolume1:
    Type: 'AWS::EC2::Volume'
    Properties:
      AvailabilityZone: !Select [0, !Ref AZ]
      Size: !Ref VolumeSize
      Tags:
        - Key: Name
          Value: MarkLogicData 1
      VolumeType: !Ref VolumeType
      Encrypted: !If [UseVolumeEncryption, 'true', 'false']
      KmsKeyId: !If [HasCustomEBSKey, !Ref VolumeEncryptionKey, !Ref 'AWS::NoValue']
    Metadata:
      'AWS::CloudFormation::Designer':
        id: c81032f7-b0ec-47ca-a236-e24d57b49ae3
MarkLogicDDBTable creates a DynamoDB database used as the Metadata Database, described in AWS Terminology, and returns the name of the DynamoDB Table.
The read and write capacity are both set to 10 for a three-node template and 2 for a single-node template. It is critical to make sure you have enough capacity provisioned for peak periods, which occur when the instances in large cluster are restarted simultaneously. If you don't have enough capacity, the cluster may not recouple correctly when nodes are replaced following termination. You can set a CloudWatch alarm on capacity, which can either alert you manually or trigger a script to modify the capacity.
For details on the AWS::DynamoDB::Table type, see http://docs.aws.amazon.com/AWSCloudFormation/latest/UserGuide/aws-resource-dynamodb-table.html.
  MarkLogicDDBTable:
    Type: 'AWS::DynamoDB::Table'
    Properties:
      AttributeDefinitions:
        - AttributeName: node
          AttributeType: S
      KeySchema:
        - KeyType: HASH
          AttributeName: node
      ProvisionedThroughput:
        WriteCapacityUnits: '10'
        ReadCapacityUnits: '10'
    Metadata:
      'AWS::CloudFormation::Designer':
        id: e7190602-c2de-47ab-81e7-1315f8c01e2d
MarkLogicServerGroup1, MarkLogicServerGroup2 and MarkLogicServerGroup3 are the AutoScaling Groups (ASGs) for Zone1, Zone2 and Zone3. For details on the AWS::AutoScaling::AutoScalingGroup type, see http://docs.aws.amazon.com/AWSCloudFormation/latest/UserGuide/aws-properties-as-group.html. All of them are similar to MarkLogicServerGroup1 for Zone1, shown below.
MarkLogicServerGroup1:
    Type: 'AWS::AutoScaling::AutoScalingGroup'
    DependsOn:
      - VpcStack
      - ManagedEniStack
      - NodeMgrLambdaStack
    Properties:
      VPCZoneIdentifier:
        - !GetAtt [VpcStack, Outputs.PrivateSubnet1Id]
      LaunchConfigurationName: !Ref LaunchConfig1
      MinSize: '0'
      MaxSize: !Ref NodesPerZone
      DesiredCapacity: !Ref NodesPerZone
      Cooldown: '300'
      HealthCheckType: EC2
      HealthCheckGracePeriod: '300'
      LoadBalancerNames:
        - !Ref ElasticLoadBalancer
      NotificationConfiguration: !If
        - UseLogSNS
        - TopicARN: !Ref LogSNS
          NotificationTypes:
            - 'autoscaling:EC2_INSTANCE_LAUNCH'
            - 'autoscaling:EC2_INSTANCE_LAUNCH_ERROR'
            - 'autoscaling:EC2_INSTANCE_TERMINATE'
            - 'autoscaling:EC2_INSTANCE_TERMINATE_ERROR'
        - !Ref 'AWS::NoValue'
      Tags:
        - Key: marklogic:stack:name
          Value: !Ref 'AWS::StackName'
          PropagateAtLaunch: 'true'
        - Key: marklogic:stack:id
          Value: !Ref 'AWS::StackId'
          PropagateAtLaunch: 'true'
      LifecycleHookSpecificationList:
        - LifecycleTransition: 'autoscaling:EC2_INSTANCE_LAUNCHING'
          LifecycleHookName: NodeManager
          HeartbeatTimeout: 4800
          NotificationTargetARN: !GetAtt [NodeMgrLambdaStack, Outputs.NodeMgrSnsArn]
          RoleARN: !GetAtt [NodeMgrLambdaStack, Outputs.NodeMgrIamArn]
    Metadata:
      'AWS::CloudFormation::Designer':
        id: 31621dd0-4b18-4dcd-b443-db9cef64ebb1
NotificationTypes describes the notifications to be sent to the SNS Topic supplied to the cloud formation script to allow monitoring of AutoScaling group actions.
          NotificationTypes:
            - 'autoscaling:EC2_INSTANCE_LAUNCH'
            - 'autoscaling:EC2_INSTANCE_LAUNCH_ERROR'
            - 'autoscaling:EC2_INSTANCE_TERMINATE'
            - 'autoscaling:EC2_INSTANCE_TERMINATE_ERROR'
        - !Ref 'AWS::NoValue'
The InstanceSecurityGroup defines the ingress rules for the SecurityGroup.
InstanceSecurityGroup:
    Type: 'AWS::EC2::SecurityGroup'
    DependsOn:
      - VpcStack
    Properties:
      GroupDescription: Enable SSH access and HTTP access on the inbound port
      VpcId: !GetAtt [VpcStack, Outputs.VpcId]
      SecurityGroupIngress:
        - IpProtocol: tcp
          FromPort: '22'
          ToPort: '22'
          CidrIp: 0.0.0.0/0
        - IpProtocol: tcp
          FromPort: '7998'
          ToPort: '7998'
          CidrIp: 0.0.0.0/0
        - IpProtocol: tcp
          FromPort: '8000'
          ToPort: '8010'
          CidrIp: 0.0.0.0/0
        - IpProtocol: tcp
          FromPort: '7997'
          ToPort: '7997'
          CidrIp: 0.0.0.0/0
        - IpProtocol: tcp
          FromPort: '7999'
          ToPort: '7999'
          CidrIp: 0.0.0.0/0
  InstanceSecurityGroupIngress:
    Type: 'AWS::EC2::SecurityGroupIngress'
    DependsOn:
      - InstanceSecurityGroup
    Properties:
      IpProtocol: tcp
      FromPort: '0'
      ToPort: '65355'
      GroupId: !Ref InstanceSecurityGroup
      SourceSecurityGroupId: !Ref InstanceSecurityGroup
  ElbSecurityGroup:
    Type: 'AWS::EC2::SecurityGroup'
    DependsOn: VpcStack
    Properties:
      GroupDescription: Enable SSH access and HTTP access on the inbound port
      VpcId: !GetAtt [VpcStack, Outputs.VpcId]
      SecurityGroupIngress:
        - IpProtocol: tcp
          FromPort: '22'
          ToPort: '22'
          CidrIp: 0.0.0.0/0
        - IpProtocol: tcp
          FromPort: '7998'
          ToPort: '7998'
          CidrIp: 0.0.0.0/0
        - IpProtocol: tcp
          FromPort: '8000'
          ToPort: '8010'
          CidrIp: 0.0.0.0/0
        - IpProtocol: tcp
          FromPort: '7997'
          ToPort: '7997'
          CidrIp: 0.0.0.0/0
LaunchConfig1, LaunchConfig2 and LaunchConfig3 are the Launch Configurations for ASG 1, ASG 2 and ASG 3. These describe how to look up the AMI id associated with the region, instance type, and architecture (PVM vs. HVM). All are similar to that below for ASG 1. For details on the AWS::AutoScaling::LaunchConfiguration type, see http://docs.aws.amazon.com/AWSCloudFormation/latest/UserGuide/aws-properties-as-launchconfig.html.
LaunchConfig1:
    Type: 'AWS::AutoScaling::LaunchConfiguration'
    DependsOn:
      - InstanceSecurityGroup
    Properties:
      BlockDeviceMappings:
        - DeviceName: /dev/sdf
          NoDevice: true
          Ebs: {}
      KeyName: !Ref KeyName
      ImageId: !If [EssentialEnterprise, !FindInMap [LicenseRegion2AMI,!Ref 'AWS::Region',"Enterprise"], !FindInMap [LicenseRegion2AMI, !Ref 'AWS::Region', "BYOL"]]
Each Launch Configuration has a UserData and a SecurityGroups property, as shown below.
The UserData property that is populated with the data assigned to the variables described in AWS Configuration Variables. Below is the UserData property for ASG 1.
In VolumeSize, the ,* defines the volume size for the 2nd and any additional nodes in each ASG. The # indicates that the nodes are dynamically named and a numeric suffix is added from 1 - MaxNodesPerZone.
UserData: !Base64
        'Fn::Join':
          - ''
          - - MARKLOGIC_CLUSTER_NAME=
            - !Ref MarkLogicDDBTable
            - |+

            - MARKLOGIC_EBS_VOLUME=
            - !Ref MarklogicVolume1
            - ',:'
            - !Ref VolumeSize
            - '::'
            - !Ref VolumeType
            - |
              ::,*
            - |
              MARKLOGIC_NODE_NAME=NodeA#
            - MARKLOGIC_ADMIN_USERNAME=
            - !Ref AdminUser
            - |+

            - MARKLOGIC_ADMIN_PASSWORD=
            - !Ref AdminPass
            - |+

            - |
              MARKLOGIC_CLUSTER_MASTER=1
            - MARKLOGIC_LICENSEE=
            - !Ref Licensee
            - |+

            - MARKLOGIC_LICENSE_KEY=
            - !Ref LicenseKey
            - |+

            - MARKLOGIC_LOG_SNS=
            - !Ref LogSNS
            - |+

            - !If
              - UseVolumeEncryption
              - !Join
                - ''
                - - 'MARKLOGIC_EBS_KEY='
                  - !If
                    - HasCustomEBSKey
                    - !Ref VolumeEncryptionKey
                    - 'default'
              - ''
Each Launch Configuration has a SecurityGroups property that assigns the security group defined by InstanceSecurityGroup to the Amazon EC2 instances in the Auto Scaling group. Each property is like the following.
      SecurityGroups:
        - !Ref InstanceSecurityGroup
      InstanceType: !Ref InstanceType
      IamInstanceProfile: !Ref IAMRole
      SpotPrice: !If
        - UseSpot
        - !Ref SpotPrice
        - !Ref 'AWS::NoValue'
    Metadata:
      'AWS::CloudFormation::Designer':
        id: 2efb8cfb-df53-401d-8ff2-34af0dd25993
ElasticLoadBalancer is the Load Balancer for all of the ASGs. For details on the AWS::ElasticLoadBalancing::LoadBalancer type, see http://docs.aws.amazon.com/AWSCloudFormation/latest/UserGuide/aws-properties-ec2-elb.html.
ElasticLoadBalancer:
    Type: 'AWS::ElasticLoadBalancing::LoadBalancer'
    DependsOn:
      - VpcStack
      - ElbSecurityGroup
    Properties:
      AppCookieStickinessPolicy:
        - CookieName: SessionID
          PolicyName: MLSession
      SecurityGroups:
        - !Ref ElbSecurityGroup
      Subnets:
        - !GetAtt [VpcStack, Outputs.PublicSubnet1Id]
        - !If [MultiZone, !GetAtt [VpcStack, Outputs.PublicSubnet2Id], !Ref 'AWS::NoValue']
        - !If [MultiZone, !GetAtt [VpcStack, Outputs.PublicSubnet3Id], !Ref 'AWS::NoValue']
      ConnectionDrainingPolicy:
        Enabled: 'true'
        Timeout: '60'
      CrossZone: 'true'
Listeners defines all of the ports the Elastic Load Balancer (ELB) opens to the public.
      Listeners:
        - LoadBalancerPort: '8000'
          InstancePort: '8000'
          Protocol: HTTP
          PolicyNames:
            - MLSession
        - LoadBalancerPort: '8001'
          InstancePort: '8001'
          Protocol: HTTP
          PolicyNames:
            - MLSession
        - LoadBalancerPort: '8002'
          InstancePort: '8002'
          Protocol: HTTP
          PolicyNames:
            - MLSession
        - LoadBalancerPort: '8003'
          InstancePort: '8003'
          Protocol: HTTP
          PolicyNames:
            - MLSession
        - LoadBalancerPort: '8004'
          InstancePort: '8004'
          Protocol: HTTP
          PolicyNames:
            - MLSession
        - LoadBalancerPort: '8005'
          InstancePort: '8005'
          Protocol: HTTP
          PolicyNames:
            - MLSession
        - LoadBalancerPort: '8006'
          InstancePort: '8006'
          Protocol: HTTP
          PolicyNames:
            - MLSession
        - LoadBalancerPort: '8007'
          InstancePort: '8007'
          Protocol: HTTP
          PolicyNames:
            - MLSession
        - LoadBalancerPort: '8008'
          InstancePort: '8008'
          Protocol: HTTP
          PolicyNames:
            - MLSession
HealthCheck checks the health of each MarkLogic instance by contacting its HealthCheck App Server on port 7997 every number of seconds specified by Interval. Any answer other than "200 OK" within the Timeout period (in seconds) is considered unhealthy and that instance is removed from the ELB. For details on the HealthCheck parameters, see http://docs.aws.amazon.com/ElasticLoadBalancing/latest/APIReference/API_HealthCheck.html.
      HealthCheck:
        Target: 'HTTP:7997/'
        HealthyThreshold: '3'
        UnhealthyThreshold: '5'
        Interval: '10'
        Timeout: '5'
    Metadata:
      'AWS::CloudFormation::Designer':
        id: e188e71e-5f01-4816-896e-9bd30b9a96c1
Alb:
  Condition: MultiZone
  Type: AWS::ElasticLoadBalancingV2::LoadBalancer
  DependsOn:
    - VpcStack
    - ElbSecurityGroup
  Properties:
    SecurityGroups:
    - !Ref ElbSecurityGroup
    Subnets:
    - !GetAtt [VpcStack, Outputs.PublicSubnet1Id]
    - !If [MultiZone, !GetAtt [VpcStack, Outputs.PublicSubnet2Id], !Ref 'AWS::NoValue']
    - !If [MultiZone, !GetAtt [VpcStack, Outputs.PublicSubnet3Id], !Ref 'AWS::NoValue']
  Metadata:
    'AWS::CloudFormation::Designer':
    id: e188e71e-5f01-4816-896e-9bd30b9a96c1
**ALB Target group section after the ALB declaration:**
Description: #Descriptions of the 9 TargetGroups for MultiZone deployments (3 zones). TargetGroups route requests to registered targets.
#Health checks are performed on each TargetGroup.
AlbTargetGroup1:
Condition: MultiZone
Type: "AWS::ElasticLoadBalancingV2::TargetGroup"
DependsOn:
  - VpcStack
Properties:
  HealthCheckIntervalSeconds: 10
  HealthCheckTimeoutSeconds: 5
  HealthyThresholdCount: 3
  HealthCheckPort: 7997
  UnhealthyThresholdCount: 5
  Port: 8000
  Protocol: HTTP
  TargetGroupAttributes:
    - Key: stickiness.enabled
      Value: true
    - Key: stickiness.type
      Value: lb_cookie
    - Key: stickiness.lb_cookie.duration_seconds
      Value: 3600
    - Key: deregistration_delay.timeout_seconds
      Value: 60
VpcId: !GetAtt [VpcStack, Outputs.VpcId]
**ALB Listener groups section after the ALB target groups:**
Description:   #Descriptions of the 9 Listeners for MultiZone deployments (3 zones). Each Listener connects Application Load Balancer to a TargetGroup with a particular port.
AlbListener1:
  Condition: MultiZone
  Type: "AWS::ElasticLoadBalancingV2::Listener"
  DependsOn:
    - Alb
    - AlbTargetGroup1
  Properties:
    DefaultActions:
      - TargetGroupArn: !Ref AlbTargetGroup1
        Type: forward
    LoadBalancerArn: !Ref Alb
    Port: 8000
    Protocol: HTTP
Outputs Declaration
If the CloudFormation launch is successful, Outputs generates the URL of the ELB pointing to the MarkLogic Admin Interface port (8001).
Outputs:
  URL:
    Description: The URL of the MarkLogic Cluster
    Value: !Join
      - ''
      - - 'http://'
      - !If [MultiZone, !GetAtt [Alb, DNSName], !GetAtt [ElasticLoadBalancer, DNSName]]
        ':8001'
        - !GetAtt
          - ElasticLoadBalancer
          - DNSName
        - ':8001'
  PrivateSubnetRouteTableID:
    Description: Private Subnet Route Table ID
    Value: !GetAtt [VpcStack, Outputs.PrivateSubnetRouteTableID]
  InstanceSecurityGroupID:
    Description: Instance Security Group ID
    Value: !Ref InstanceSecurityGroup
The CloudFormation template supports both a Classic Load Balancer (CLB) and an Application Load Balancer (ALB).
The CloudFormation template creates a different type of load balancer depending on the number of zones to which you deploy. The CloudFormation template will create a CLB if you deploy to one zone. The CloudFormation template will create an ALB if you deploy to three zones. If you are using your own CloudFormation template, you can deploy to two or more zones to create an ALB.
CLB runs at OSI layers 4 (transport) and 7 (application). ALB runs at OSI layer 7. If the CloudFormation template creates an ALB, you are unable to use an ODBC connection with business intelligence (BI) tools. To use an ODBC connection with BI tools, you can create a separate Network Load Balancer for ODBC connections.
Using CloudFormation with Secure Credentials
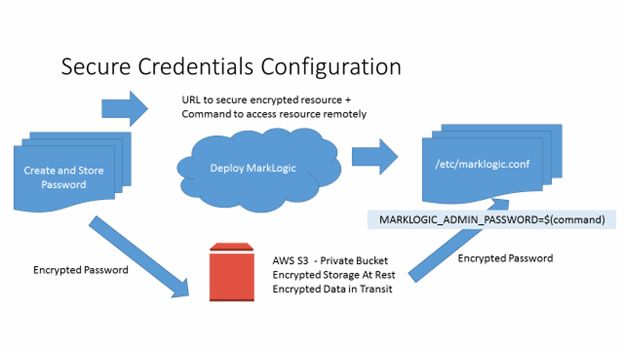
The sample templates are not designed for production environments. Most deployments will have specific infrastructure and integration requirements you will need to address. An important issue is how to manage secure credentials for MarkLogic in a automated hands off process. The sample templates pass the Admin Password in plain text as cloud formation parameters which then are converted into simple EC2 User Data name/value pairs. This is not a secure method of handling credentials.
As Mentioned in Configuration using the /etc/marklogic.conf File, an alternative to EC2 UserData is creating /etc/marklogic.conf during the deployment. This can be done in CloudFormation fairly easily. For Production deployments using CloudFormation, the AWS::CloudFormation::Init Resource (and the helper cfn-init commands) are recommended for deployment and configuration. See: http://docs.aws.amazon.com/AWSCloudFormation/latest/UserGuide/aws-resource-init.html.
If not using CloudFormation the cloud-init service, the low-level API which CloudFormation uses, can be used directly. See http://docs.aws.amazon.com/AWSEC2/latest/UserGuide/user-data.html for details.
With the CloudInit resource, EC2 UserData is only used for a small 'bootstrap' script that accesses the configuration variables from the template metadata resource securely via cfn-init. By passing a reference to a secure channel for credentials instead of the credentials themselves, no confidential data is passed directly from the origin to the EC2 instance. This process is recommended by AWS and discussed in this posting:
http://blogs.aws.amazon.com/application-management/post/Tx3LKFZ27CWZBKO/Authenticated-File-Downloads-with-CloudFormation
There are many options for configuring the necessary authentication and providing a protected storage and access. Choosing the appropriate configurations is specific to your requirements and integration strategy and should be part of your overall IT and security planning. Integration MarkLogic deployment with CloudFormation or another orchestration requires only that the file /etc/marklogic.conf be created prior to the first startup of MarkLogic on that instance.
Below are snippets of the Launch Configuration and AutoScalingGroup sections from an example CloudFormation template that makes use of CloudInit and a secure S3 bucket for the admin password. Note that the URL itself for the S3 file does not need to be confidential, so it may be safely passed as a CloudFormation parameter and stored for the lifetime of the instance. In the Launch Configuration, a simple script is used to invoke cfn-init, passing a reference to the MetaData resource associated with the AutoScalingGroup for a zone. The MetaData resource is a sibling of the "Properties" tag in the AutoScalingGroup section.
The "files" entry in the AutoScalingGroup section writes /etc/marklogic.conf with the root owner and group (read-only by owner).
The "services" entry in the AutoScalingGroup section starts MarkLogic after CloudInit is complete and restarts it if /etc/marklogic.conf or /etc/sysconfig/MarkLogic is updated by CloudInit in the future.
Example Launch Configuration Snippet:
"LaunchConfig1" : {
      "Type" : "AWS::AutoScaling::LaunchConfiguration",
      "Properties" : {
         .... },
"UserData": {"Fn::Base64": {"Fn::Join": [
  "",
   [
    "#!/bin/bash\n",
    "function error_exit\n",
    "{\n",
    "logger -t MarkLogic  \"$1\"",
    "exit 1\n",
    "}\n",
    "yum update -y aws-cfn-bootstrap\n",
    "yum update -y\n",
    "# Install application\n",
    "/opt/aws/bin/cfn-init -v -s ",
    {"Ref": "AWS::StackId"}, " -r ASG1  --region ",
    {"Ref": "AWS::Region"}, " || error_exit 'Failed to run cfn-init'\n",
    "\n",
    "# All is well so signal success\n",
    "\n"
  ]
]}}}
Example AutoScalingGroup Snippet:
"ASG1" : {
       "Type" : "AWS::AutoScaling::AutoScalingGroup",
       "Properties" : {               .....
     },
  "Metadata": {
  "MarkLogic::MetaDataVersion": "2015-07-17-14:49:23",
  "AWS::CloudFormation::Init": {
    "config": {
      "files": {"/etc/marklogic.conf": {
        "content": {"Fn::Join": [
          "",
          [
          "MARKLOGIC_CLUSTER_NAME=",{"Ref": "MarkLogicDDBTable"}, "\n",
          "MARKLOGIC_EBS_VOLUME=", {"Ref": "MarkLogicVolume1"}, "\n",
          "MARKLOGIC_NODE_NAME=NodeA#\n",
          "MARKLOGIC_ADMIN_USERNAME=",{"Ref": "AdminUser"},"\n",
          "# Password obtained via protected S3 file\n",
          "# MARKLOGIC_ADMIN_PASSWORD=\n",
          "# $(s3 cp --region us-west-2 s3://bucket/secret-password - ) \n",
          "MARKLOGIC_ADMIN_PASSWORD=$( aws s3 --region ",
          {"Ref": "AWS::Region"}, " cp ", {"Ref": "AdminPassS3URL"}, " - )\n",
          "MARKLOGIC_CLUSTER_MASTER=0\n"
          ] ]} ,
        "mode": "000400",
        "owner": "root",
        "group": "root"
      }},
      "services": {"sysvinit":
    {"MarkLogic": {
        "enabled": "true",
        "ensureRunning": "true",
        "files": [
          "/etc/marklogic.conf",
          "/etc/sysconfig/MarkLogic"
        ]  }
  }}
}}
Deleting a CloudFormation Stack
To delete a CloudFormation stack, follow the procedure described in http://docs.aws.amazon.com/AWSCloudFormation/latest/UserGuide/cfn-console-delete-stack.html.
Deleting your CloudFormation stack removes most of the EC2 resources (instances, security groups, etc.) created by your CloudFormation template. The exception is that the EBS volumes are not removed. Should you want to remove the EBS volumes after deleting your stack, you must manually remove them by following the procedure described in http://docs.aws.amazon.com/AWSEC2/latest/UserGuide/ebs-deleting-volume.html.
When a stack is deleted, the EBS volume that was created for the first node in each zone is also deleted. However the EBS volumes for any additional nodes in each zone are not deleted. This is because they were not created directly in the CloudFormation stack, but instead as a part of the startup process of the additional nodes.